您是否見過一個機器人項目,其設(shè)備看起來像一對大卡通眼睛,想知道那部分是做什么的?有可能你正在看超聲波傳感器。在本教程中,您將了解HC-SR04超聲波傳感器,包括如何使用Arduino連接它來構(gòu)建電子卷尺。
超聲波如何傳感器工作?
超聲波傳感器是一種利用超聲波測量物體距離的裝置。超聲波換能器 - 麥克風(fēng)和揚聲器串聯(lián) - 發(fā)送和接收超高頻聲波以獲得物體的距離或接近度。超高頻聲波從物體表面反射,形成獨特的回聲模式。
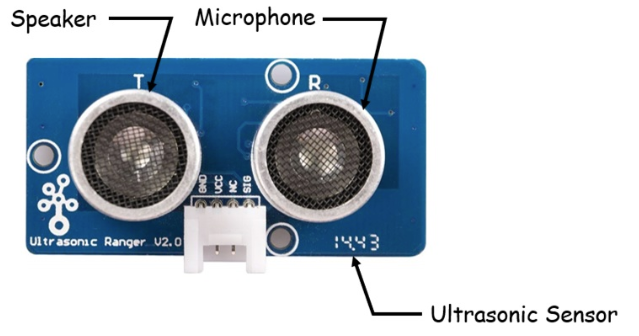
圖1 。 HC-SR04超聲波傳感器。
圖2顯示了超聲波傳感器的超高頻聲音波從物體表面反射。
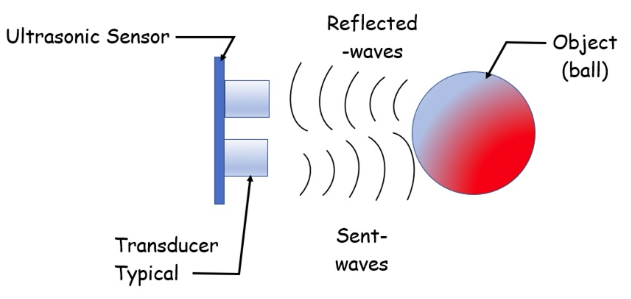
圖2. 發(fā)送和反射波:超聲波傳感器基本操作。
使用TinkerCad電路將超聲波傳感器連接到Arduino
基本了解超聲波傳感器的工作原理,現(xiàn)在就可以了將設(shè)備連接到Arduino。要探索超聲波傳感器的操作,您可以使用TinkerCad電路構(gòu)建虛擬功能電路。
TinkerCad Circuits是一款免費的在線電路仿真器,可以在將它們連接到真正的面包板上之前模擬各種電氣和電子電路。您甚至可以使用TinkerCad Circuits測試Arduino項目(包括代碼)。在承諾構(gòu)建物理電路之前,您可以通過實驗獲得寶貴的電子知識。
圖3顯示了使用TinkerCad Circuits構(gòu)建的功能超聲波傳感器Arduino項目。
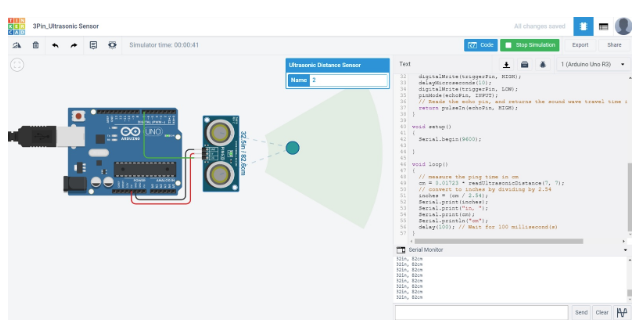
圖3. 在線超聲波傳感器和Arduino TinkerCard電路。
如果您有試驗超聲波傳感器的面包板,請使用圖4作為參考。
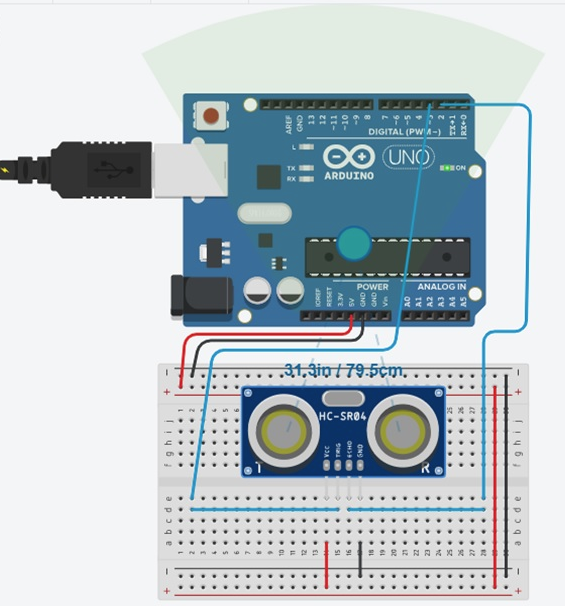
圖4. TinkerCad Circuits內(nèi)置的面包板布線版本。
在面包板上用Arduino連接超聲波傳感器
您可以使用TinkerCad Circuits內(nèi)置的超聲波傳感器Arduino電路或圖5所示的電氣接線圖來構(gòu)建您的傳感設(shè)備。
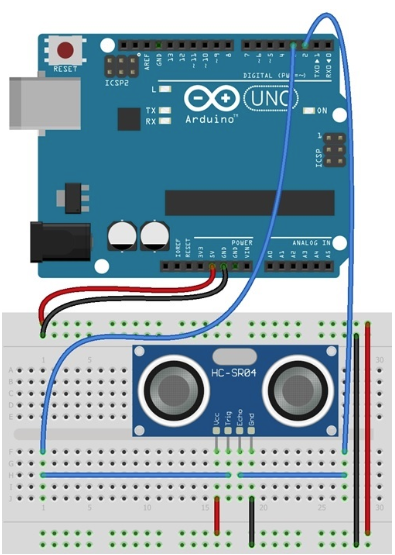
圖5。實際超聲波傳感器的電氣接線圖到Arduino。
如果您使用的是4針超聲波傳感器,則常閉引腳(NC)接地。您可以如圖所示放置面包板上的超聲波傳感器,并使用跳線完成Arduino的接線。
這是我使用4線跳線將超聲波傳感器連接到Arduino的電路。
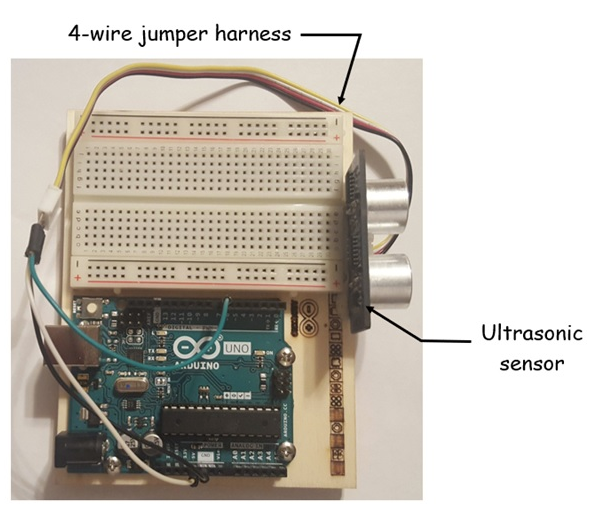
圖6。作者的實際電路。
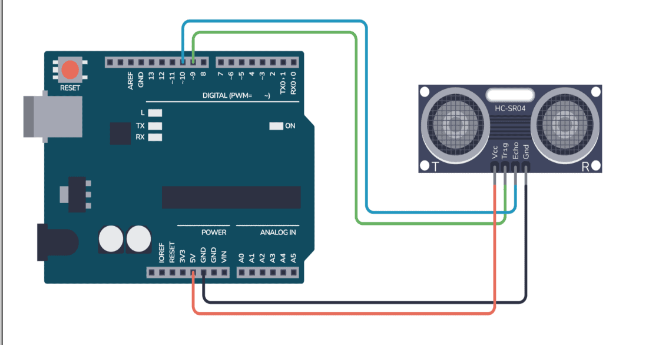
4線跳線線束采用彩色編碼。圖7顯示了Arduino和超聲波傳感器之間的接線連接。
圖7. 4線彩色編碼跳線接線連接。
您現(xiàn)在已成功將超聲波傳感器連接到Arduino!您現(xiàn)在可以將超聲波傳感器代碼安裝(上傳)到Arduino。
超聲波傳感器代碼
該項目的最后一部分是將超聲波傳感器代碼上傳到Arduino。使用USB線將Arduino連接到臺式PC或筆記本電腦。在Arduino IDE中,輸入如下所示的代碼。您也可以將代碼下載到臺式PC或筆記本電腦的硬盤上。在IDE中,您可以通過單擊水平箭頭上傳代碼。
此草圖讀取 PING)))超聲波測距儀,并返回距離范圍內(nèi)最近的對象的距離。為此,它向傳感器發(fā)送脈沖以啟動讀數(shù),然后監(jiān)聽要返回的脈沖。返回脈沖的長度與物體距傳感器的距離成正比。
電路:
+ P連接+)+)連接到+ 5V
PING的GND連接)))接地
PING的SIG連接)))連接到數(shù)字引腳7
完整項目代碼
/* Ping))) Sensor
*/
// this constant won‘t change. It’s the pin number
// of the sensor‘s output:
const int pingPin = 7;
void setup() {
// initialize serial communication:
Serial.begin(9600);
}
void loop()
{
// establish variables for duration of the ping,
// and the distance result in inches and centimeters:
long duration, inches, cm;
// The PING))) is triggered by a HIGH pulse of 2 or more microseconds.
// Give a short LOW pulse beforehand to ensure a clean HIGH pulse:
pinMode(pingPin, OUTPUT);
digitalWrite(pingPin, LOW);
delayMicroseconds(2);
digitalWrite(pingPin, HIGH);
delayMicroseconds(2);
digitalWrite(pingPin, LOW);
// The same pin is used to read the signal from the PING))): a HIGH
// pulse whose duration is the time (in microseconds) from the sending
// of the ping to the reception of its echo off of an object.
pinMode(pingPin, INPUT);
duration = pulseIn(pingPin, HIGH);
// convert the time into a distance
inches = microsecondsToInches(duration);
inches = inches +2;// Ultrasonic Calibration factor
cm = microsecondsToCentimeters(duration);
cm = cm +2; // Ultrasonic Calibration factor
// Display measured values on the Serial Monitor
Serial.print(inches);
Serial.print(“in, ”);
Serial.print(cm);
Serial.print(“cm”);
Serial.println();
delay(1000);
}
long microsecondsToInches(long microseconds)
{
// According to Parallax’s datasheet for the PING))), there are
// 73.746 microseconds per inch (i.e. sound travels at 1130 feet per
// second)。 This gives the distance travelled by the ping, outbound
// and return, so we divide by 2 to get the distance of the obstacle.
// See: http://www.parallax.com/dl/docs/prod/acc/28015-PING-v1.3.pdf
return microseconds / 74 / 2;
}
// microsecondsToCentimeters function
long microsecondsToCentimeters(long microseconds)
{
// The speed of sound is 340 m/s or 29 microseconds per centimeter.
// The ping travels out and back, so to find the distance of the
// object we take half of the distance travelled.
return microseconds / 29 / 2;
}
您應(yīng)該立即在IDE中看到距離數(shù)據(jù)向下滾動。圖8顯示了示例距離測量會話的數(shù)據(jù)。
圖8. 帶電子卷尺的示例距離測量會話。
在超聲波傳感器和測量距離的物體之間放置一個小刻度尺或標尺。您的讀數(shù)與實際測量距離相比有多準確?
測量值應(yīng)該非常接近相同,這意味著您已經(jīng)成功構(gòu)建了電子卷尺。您可以使用電子卷尺觀察各種物體及其測量距離。快樂測量!
注意
此項目代碼最初由David A Mellis創(chuàng)建,由Tom Igoe修改,后來由Don Wilcher修改。此示例代碼位于公共域中。
-
Arduino
+關(guān)注
關(guān)注
188文章
6473瀏覽量
187418 -
HC-SR04
+關(guān)注
關(guān)注
9文章
82瀏覽量
42624
發(fā)布評論請先 登錄
相關(guān)推薦
典型的超聲波傳感器及其應(yīng)用領(lǐng)域
超聲波傳感器是模擬還是數(shù)字
超聲波傳感器輸出的是什么信號
在全志H616核桃派開發(fā)板上實現(xiàn)超聲波傳感器測距
基于51單片機的車輛倒車雷達報警系統(tǒng),HC-SR04超聲波測距,全套資料
超聲波傳感器的工作原理 超聲波傳感器的聲波頻率是多少
超聲波傳感器的工作模式有哪些
如何將HC-SR04連接到Arduino并編寫一個簡單的程序來測量距離
超聲波液位傳感器的工作原理 超聲波液位傳感器型號
超聲波傳感器形成超聲波的原理
超聲波傳感器和超聲波測距原理分析
超聲波傳感器的硬件組成及類型


 怎樣用Arduino連接HC-SR04超聲波傳感器來構(gòu)建電子卷尺


評論