步驟1:購買產品
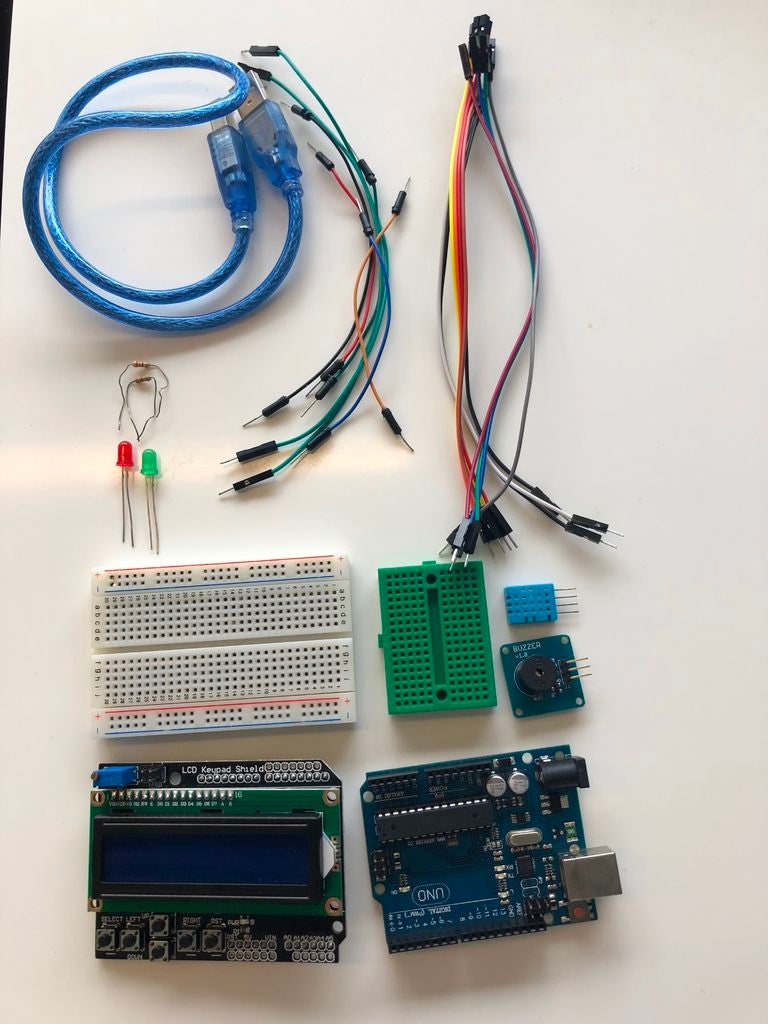
項目列表:
- Arduino Uno
- LCD鍵盤屏蔽
- 11對公母線
- 7對公對母線
- DHT溫度傳感器
- 大型面包板
- 小型面包板
- 無源蜂鳴器(5V)
- 綠色LED
- 紅色LED
- 2個電阻(330歐姆)
步驟2:組裝LCD鍵盤
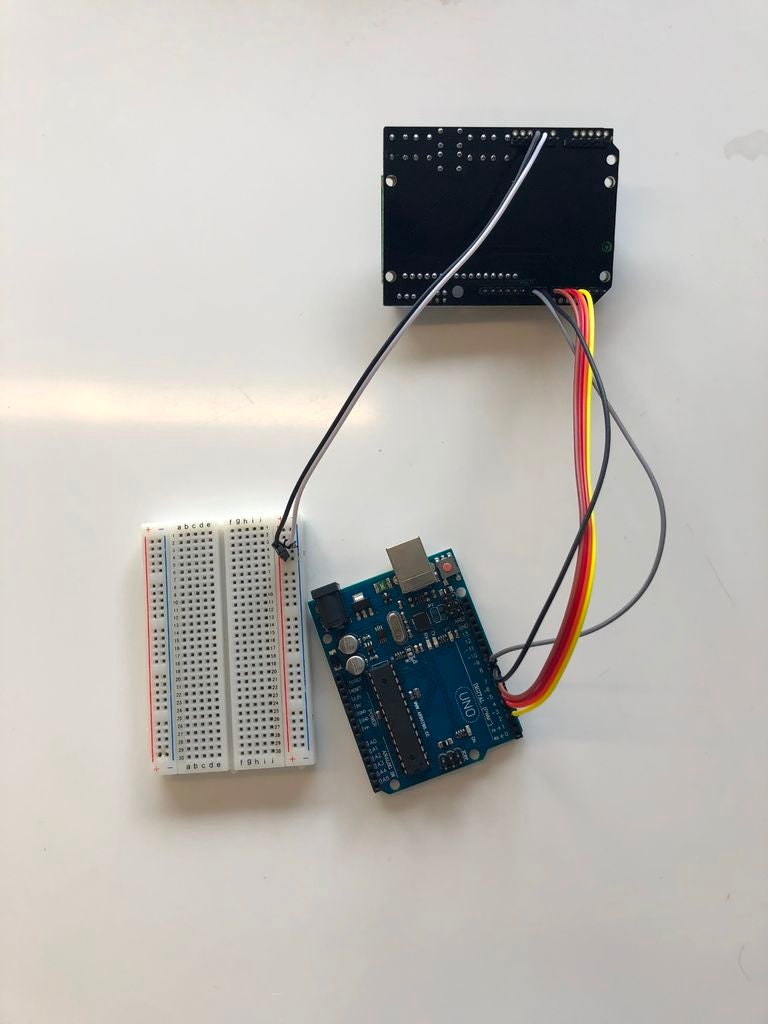
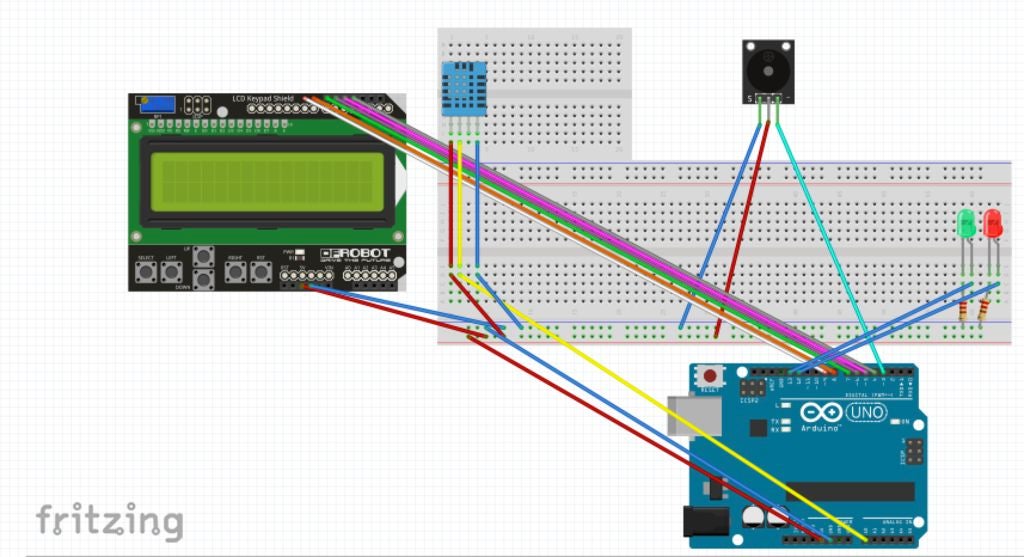
將橙色線放入LCD鍵盤( 5從右上角開始,另一邊進入Arduino板的端口4.
將紅線放入LCD鍵盤(右上角為6),另一端插入端口5 in Arduino板。
將藍線放入LCD鍵盤(右上角7個),另一側插入Ard端口6 uino board。
將粉紅色線放入LCD鍵盤(右上方8個),另一側放入Arduino板的端口7中。
將灰色線放入LCD鍵盤(右上角為9),另一端為Arduino板上的端口8.
將白線放入LCD鍵盤(右上角為10),另一側為Arduino板上的端口9。
將白線放入LCD鍵盤(右下角為9),另一側放入面包板的負極。
放置灰色線進入LCD鍵盤(右下方10個),另一側進入面包板正極。
步驟3:無源蜂鳴器組裝
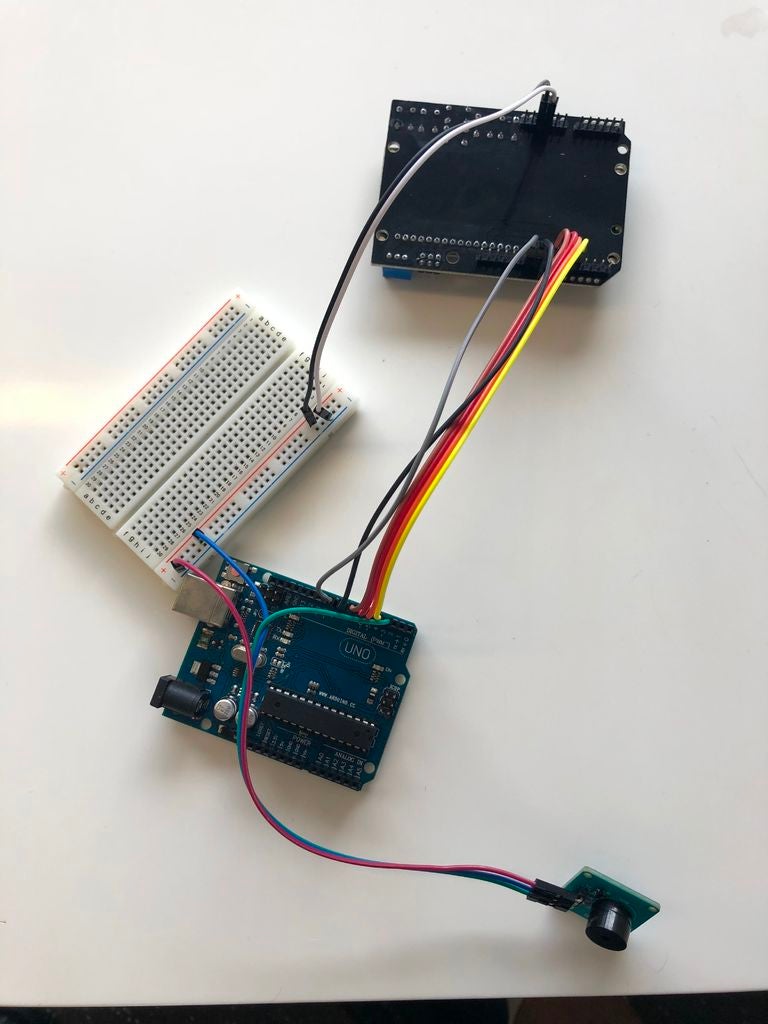
將灰線放入無源蜂鳴器的“SIG”端口,另一端插入Arduino板的端口3.
將藍線放入‘UCC ’被動蜂鳴器的端口,另一側進入面包板的正極。
將紫色線放入無源蜂鳴器的“GND”端口,另一端進入面包板的負極。
步驟4:裝配DHT溫度傳感器
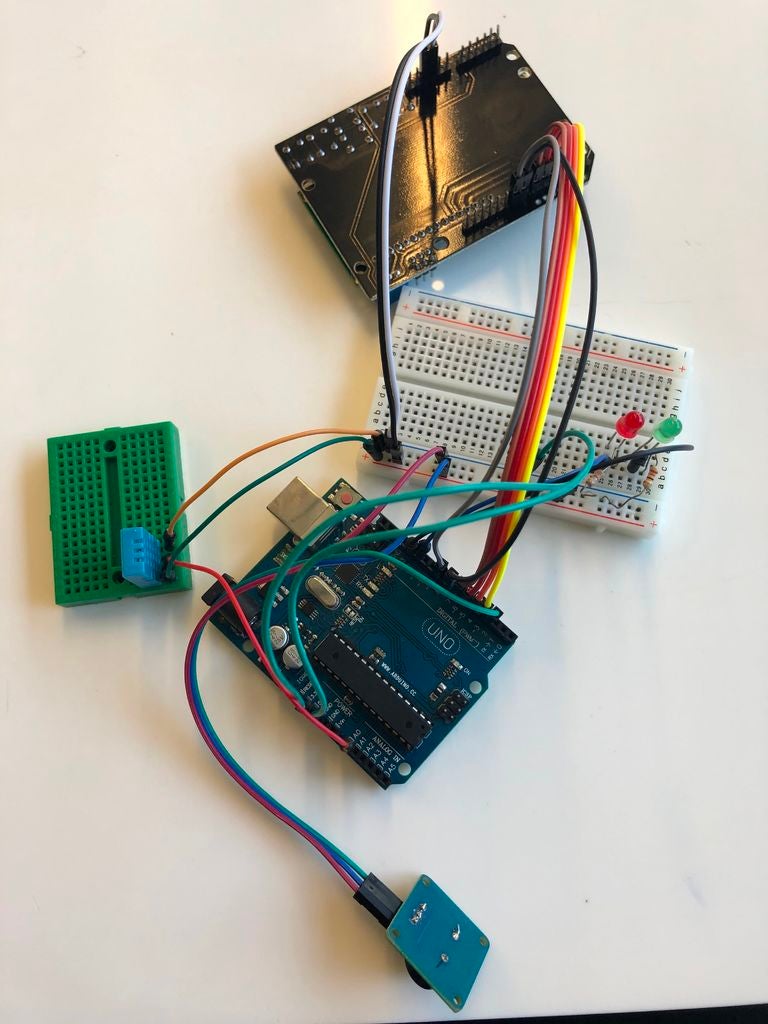
將DHT溫度傳感器放入H14-H17點。
將橙色線放入位于J14位置的面包板中,將另一端放入面板中的負排。
將白線放入位于J16位置的面包板中,將另一端放入端口A0中。
將灰線放入位于J17位置的面包板中,將另一端放入面包板中的正排。
步驟5:組裝LED
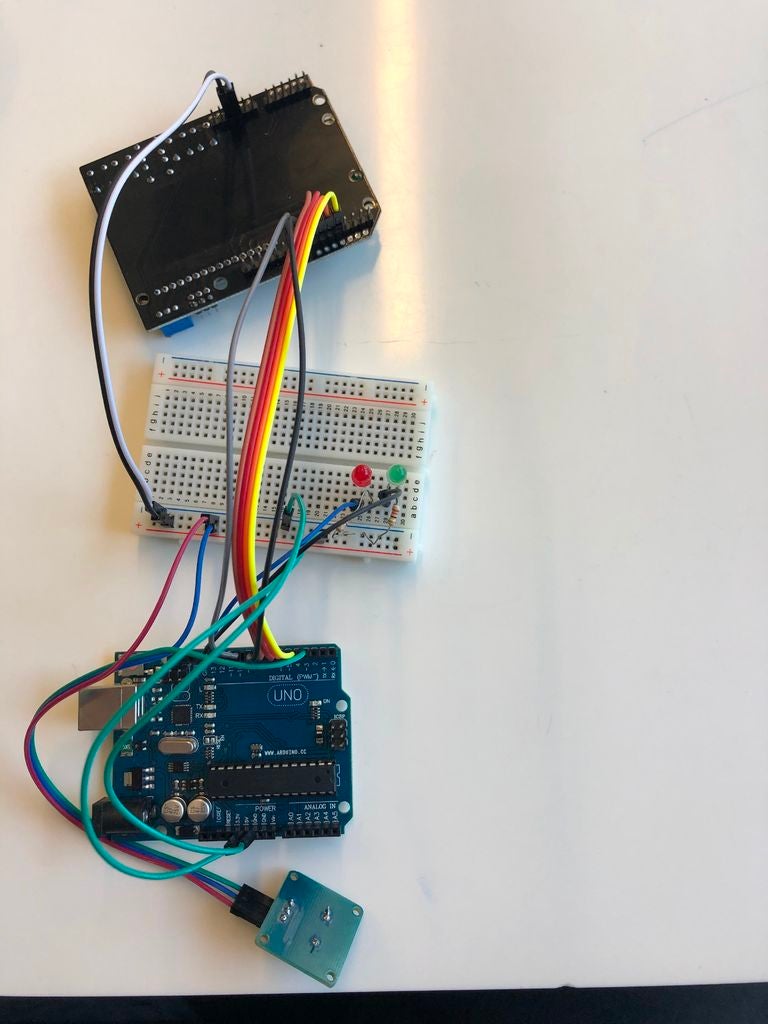
將綠色LED的正極線放入D28,將負極線放入D29,放入面包板。
將紅色LED的正極線放入D25,將負極線放入D26,放入面包板。
將電阻器的一側放在位置B29(綠色LED)和另一側在負排中。
將電阻器的一側放在位置B26(紅色LED)和t在負排的另一側。
將灰色線放在面包板位置B28,另一側放入Arduino板的端口13。
將綠色線放入面包板位置B25,另一側進入Arduino板的端口12。
步驟6:接地和5V端口的組裝
將黃線放入面板正面和Arduino板上‘GND’的另一面。
將黃線放入面包板負極,另一面放入Arduino板的“5V”。
第7步:插入代碼和打印框
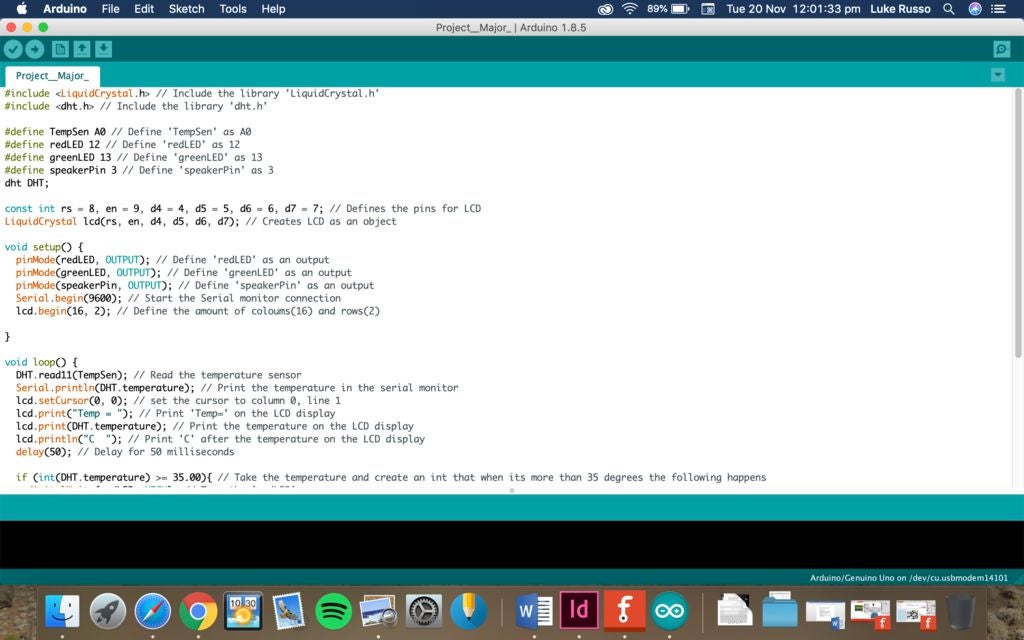
#include // Include the library ‘LiquidCrystal.h’
#include // Include the library ‘dht.h’
#define TempSen A0 // Define ‘TempSen’ as A0
#define redLED 12 // Define ‘redLED’ as 12
#define greenLED 13 // Define ‘greenLED’ as 13
#define speakerPin 3 // Define ‘speakerPin’ as 3
dht DHT;
const int rs = 8, en = 9, d4 = 4, d5 = 5, d6 = 6, d7 = 7; // Defines the pins for LCD
LiquidCrystal lcd(rs, en, d4, d5, d6, d7); // Creates LCD as an object
void setup() {
pinMode(redLED, OUTPUT); // Define ‘redLED’ as an output
pinMode(greenLED, OUTPUT); // Define ‘greenLED’ as an output
pinMode(speakerPin, OUTPUT); // Define ‘speakerPin’ as an output
Serial.begin(9600); // Start the Serial monitor connection
lcd.begin(16, 2); // Define the amount of coloums(16) and rows(2)
}
void loop() {
DHT.read11(TempSen); // Read the temperature sensor
Serial.println(DHT.temperature); // Print the temperature in the serial monitor
lcd.setCursor(0, 0); // set the cursor to column 0, line 1
lcd.print(“Temp = ”); // Print ‘Temp=’ on the LCD display
lcd.print(DHT.temperature); // Print the temperature on the LCD display
lcd.println(“C ”); // Print ‘C’ after the temperature on the LCD display
delay(50); // Delay for 50 milliseconds
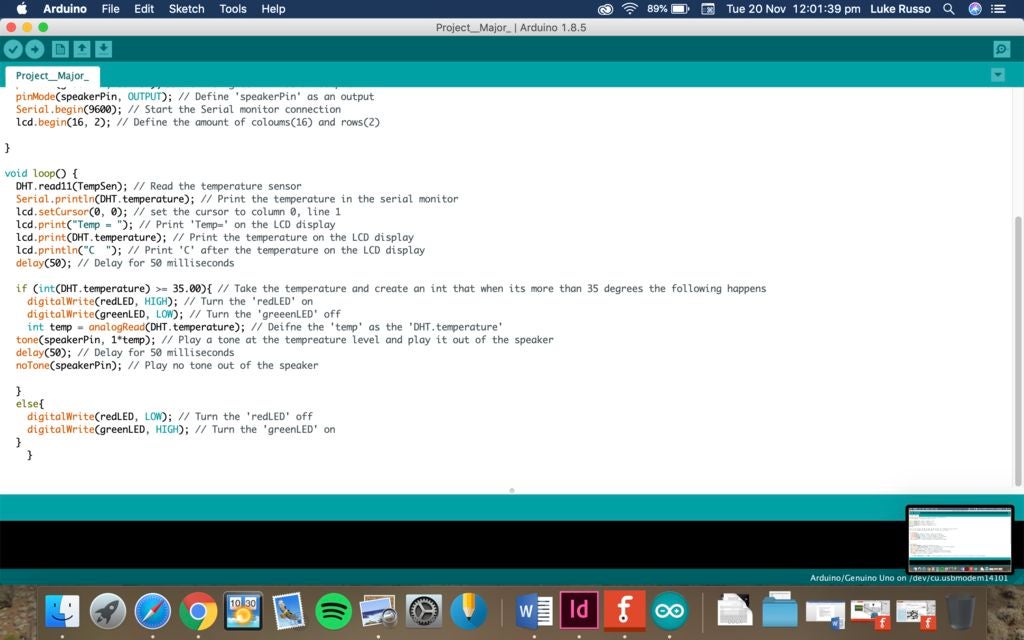
if (int(DHT.temperature) 》= 35.00){ // Take the temperature and create an int that when its more than 35 degrees the following happens
digitalWrite(redLED, HIGH); // Turn the ‘redLED’ on
digitalWrite(greenLED, LOW); // Turn the ‘greeenLED’ off
int temp = analogRead(DHT.temperature); // Deifne the ‘temp’ as the ‘DHT.temperature’
tone(speakerPin, 1*temp); // Play a tone at the tempreature level and play it out of the speaker
delay(50); // Delay for 50 milliseconds
noTone(speakerPin); // Play no tone out of the speaker
}
else{
digitalWrite(redLED, LOW); // Turn the ‘redLED’ off
digitalWrite(greenLED, HIGH); // Turn the ‘greenLED’ on
}
}
-
溫度報警器
+關注
關注
3文章
29瀏覽量
11267
發布評論請先 登錄
相關推薦
TBJ-150 一體化聲光報警器環境溫度采用什么模式
電子圍欄報警器報警常見問題
光柵報警器一直報警是什么原因
紅外報警器設計原理與實現方法


 溫度報警器的制作



評論