1. 介紹
Vitis是Xilinx新推出的統一軟件平臺,可實現在 Xilinx 所有芯片(包括 FPGA、SoC 和 Versal ACAP)上開發嵌入式軟件和加速應用。Xilinx主要宣傳Vitis可以為異構平臺的應用實現加速。其實,Vitis也能完美的支持嵌入式軟件開發。下面以MicroZed單板為例,介紹在Vitis里如何創建嵌入式軟件工程,并且編譯和調試,直到啟動。
2. 測試環境
1). Windows 10
2). Vitis 2019.2
3). MicroZed
3. Vivado工程導出XSA文件
在MicroZed 2019.1 BSP下載MicroZed的Petalinux BSP。解壓后,使用Vivado 2019.2 打開其中的硬件工程,升級所有IP,然后編譯工程。為了測試,也可以在BD設計中,添加AXI timer,AXI BRAM等IP。成功編譯工程后,導出硬件設計文件mz_petalinux_wrapper.xsa。在2019.2使用了新的硬件設計文件格式,也就是XSA文件。
3.1. BD設計
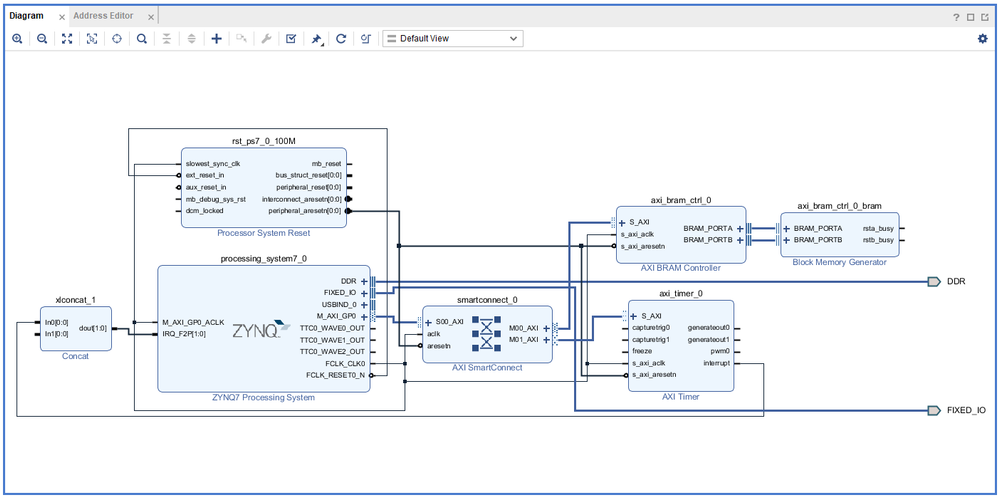
也可以不添加AXI timer,AXI BRAM等IP。
3.2. 導出硬件的菜單
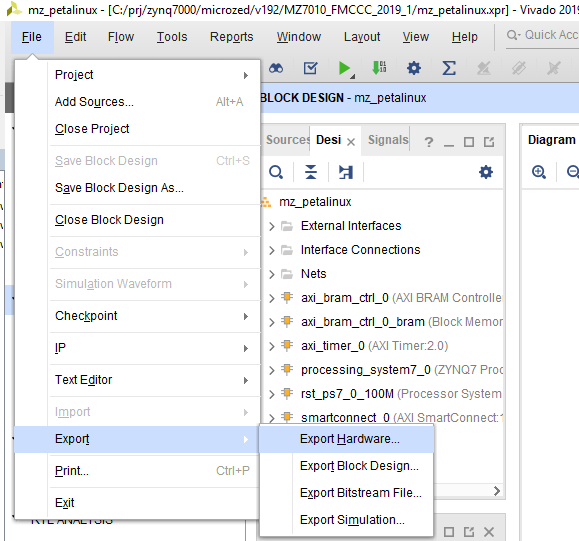
3.3. 導出硬件的界面
請指定XSA文件的路徑和名字。
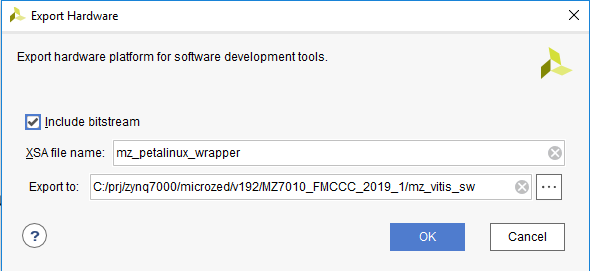
3.4. Vivado在TCL Console里關于導出硬件的打印。
write_hw_platform -fixed -force  -include_bit -file C:/prj/zynq7000/microzed/v192/MZ7010_FMCCC_2019_1/mz_vitis_sw/mz_petalinux_wrapper.xsa
INFO: [Vivado 12-4895] Creating Hardware Platform: C:/prj/zynq7000/microzed/v192/MZ7010_FMCCC_2019_1/mz_vitis_sw/mz_petalinux_wrapper.xsa ...
INFO: [Vivado 12-4896] Successfully created Hardware Platform: C:/prj/zynq7000/microzed/v192/MZ7010_FMCCC_2019_1/mz_vitis_sw/mz_petalinux_wrapper.xsa
write_hw_platform: Time (s): cpu = 00:00:16 ; elapsed = 00:00:17 . Memory (MB): peak = 1570.996 ; gain = 0.000
4. 創建工程
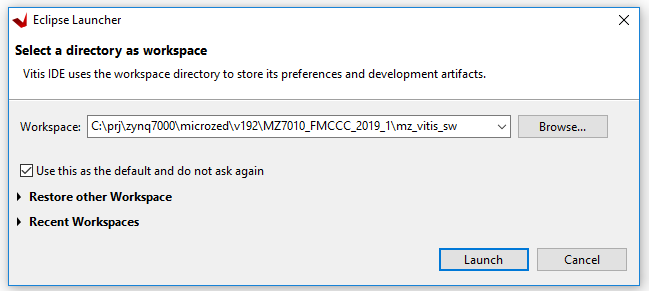
4.1. 指定workspace目錄。
啟動Vitis,指定它的workspace目錄。
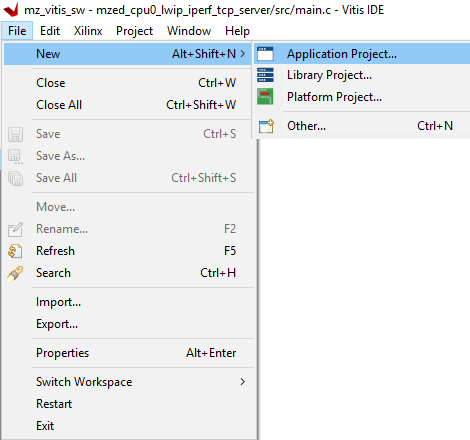
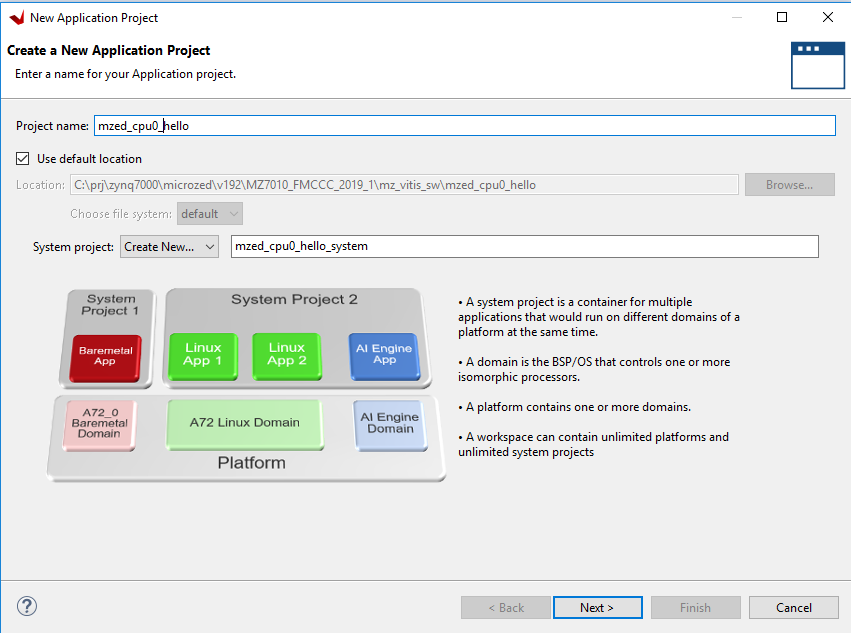
4.3. 指定Application工程名
指定Application的工程名,可以使用默認的system工程名。
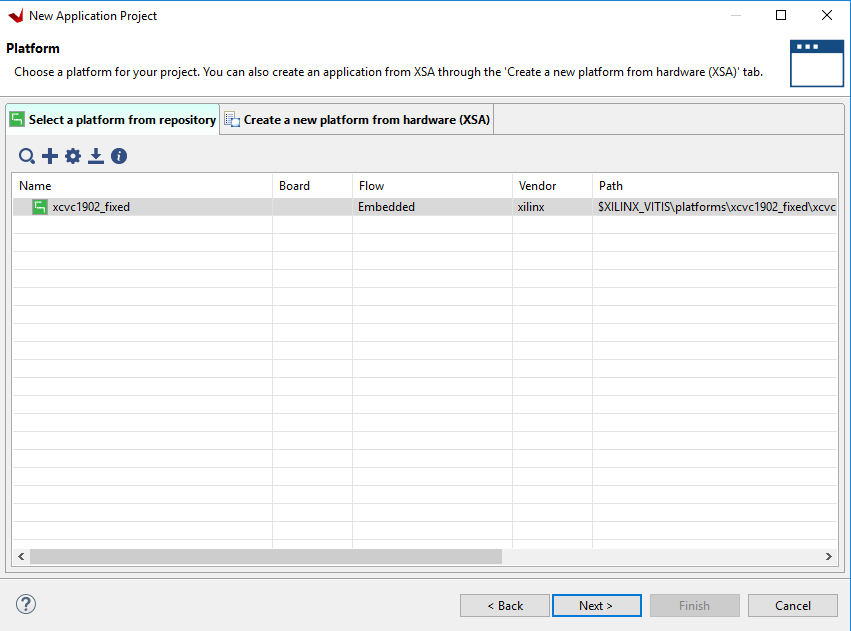
4.4. Platform頁面
點擊Next,進入Platform頁面。
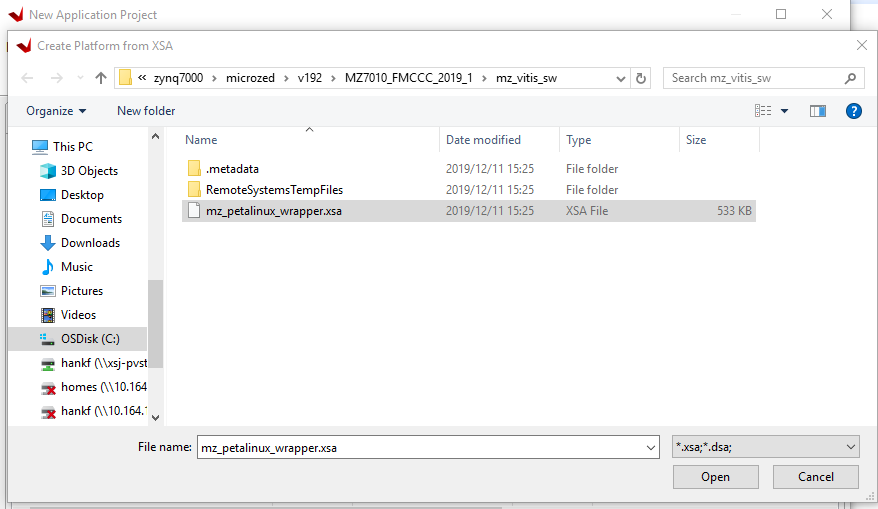
4.5. 指定XSA文件
在Platform頁面,選擇右邊的“Creae a new platform from hardware(XSA)”, 在點擊“+”,指定平臺的XSA文件,然后Vitis自動創建platform。

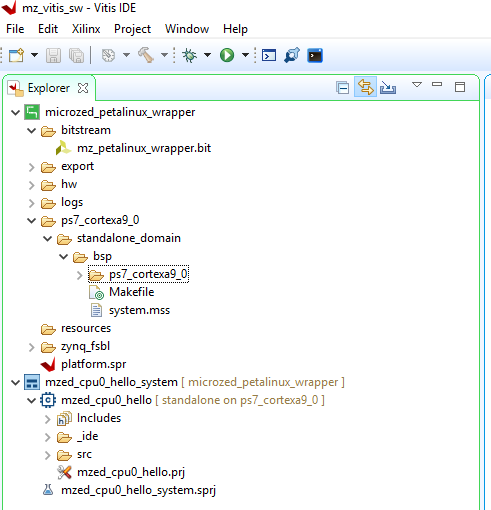
4.7. 創建工程后的目錄結構。
4.8. 執行編譯。
創建工程后,執行編譯。會先編譯FSBL工程,BSP工程,再編譯應用程序工程。
Project --> Build Project
15:53:30 **** Build of configuration Debug for project mzed_cpu0_hello ****
make all
C:/Xilinx/Vitis/2019.2/gnuwin/bin/make --no-print-directory pre-build
a9-linaro-pre-build-step

C:/Xilinx/Vitis/2019.2/gnuwin/bin/make --no-print-directory main-build
Building file: ../src/helloworld.c
Invoking: ARM v7 gcc compiler
arm-none-eabi-gcc -Wall -O0 -g3 -c -fmessage-length=0 -MT"src/helloworld.o" -mcpu=cortex-a9 -mfpu=vfpv3 -mfloat-abi=hard -IC:/prj/zynq7000/microzed/v192/MZ7010_FMCCC_2019_1/mz_vitis_sw/microzed_petalinux_wrapper/export/microzed_petalinux_wrapper/sw/microzed_petalinux_wrapper/standalone_domain/bspinclude/include -MMD -MP -MF"src/helloworld.d" -MT"src/helloworld.o" -o "src/helloworld.o" "../src/helloworld.c"
Finished building: ../src/helloworld.c

Building file: ../src/platform.c
Invoking: ARM v7 gcc compiler
arm-none-eabi-gcc -Wall -O0 -g3 -c -fmessage-length=0 -MT"src/platform.o" -mcpu=cortex-a9 -mfpu=vfpv3 -mfloat-abi=hard -IC:/prj/zynq7000/microzed/v192/MZ7010_FMCCC_2019_1/mz_vitis_sw/microzed_petalinux_wrapper/export/microzed_petalinux_wrapper/sw/microzed_petalinux_wrapper/standalone_domain/bspinclude/include -MMD -MP -MF"src/platform.d" -MT"src/platform.o" -o "src/platform.o" "../src/platform.c"
Finished building: ../src/platform.c

Building target: mzed_cpu0_hello.elf
Invoking: ARM v7 gcc linker
arm-none-eabi-gcc -mcpu=cortex-a9 -mfpu=vfpv3 -mfloat-abi=hard -Wl,-build-id=none -specs=Xilinx.spec -Wl,-T -Wl,../src/lscript.ld -LC:/prj/zynq7000/microzed/v192/MZ7010_FMCCC_2019_1/mz_vitis_sw/microzed_petalinux_wrapper/export/microzed_petalinux_wrapper/sw/microzed_petalinux_wrapper/standalone_domain/bsplib/lib -o "mzed_cpu0_hello.elf"  ./src/helloworld.o ./src/platform.o   -Wl,--start-group,-lxil,-lgcc,-lc,--end-group
Finished building target: mzed_cpu0_hello.elf

Invoking: ARM v7 Print Size
arm-none-eabi-size mzed_cpu0_hello.elf  |tee "mzed_cpu0_hello.elf.size"
   text	   data	    bss	    dec	    hex	filename
  19064	   1144	  22568	  42776	   a718	mzed_cpu0_hello.elf
Finished building: mzed_cpu0_hello.elf.size

15:53:43 Build Finished (took 12s.869ms)
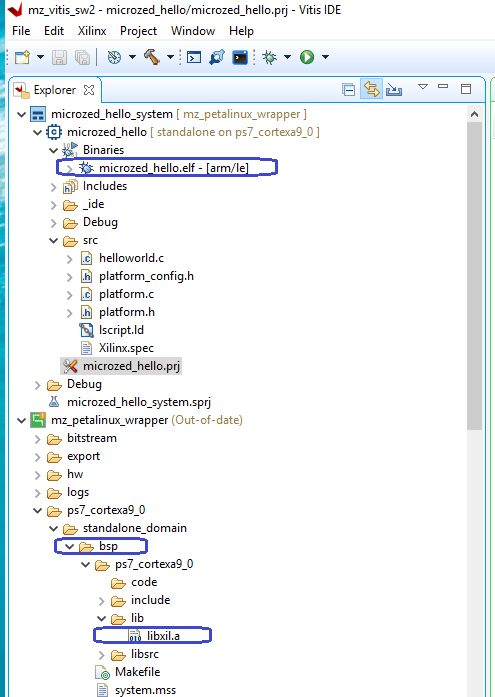
編譯后應用程序和Domain目錄結構
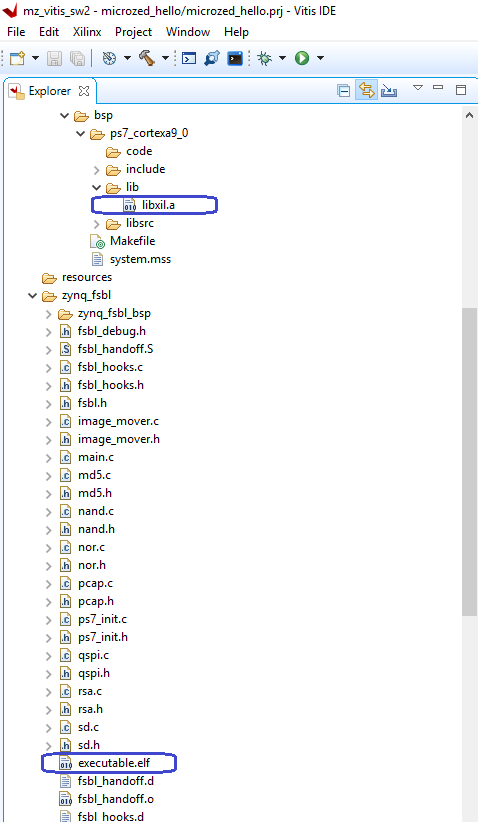
編譯后FSBL目錄結構
5. 調試工程 5.1. 調試配置界面
先點擊想調試的工程,再點擊工具條調試圖標旁邊的三角形,選擇"Debug Configurations",
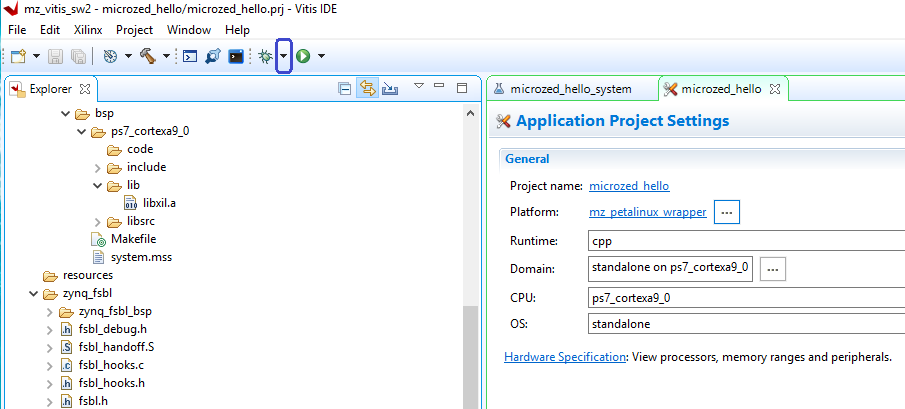
得到調試配置界面。
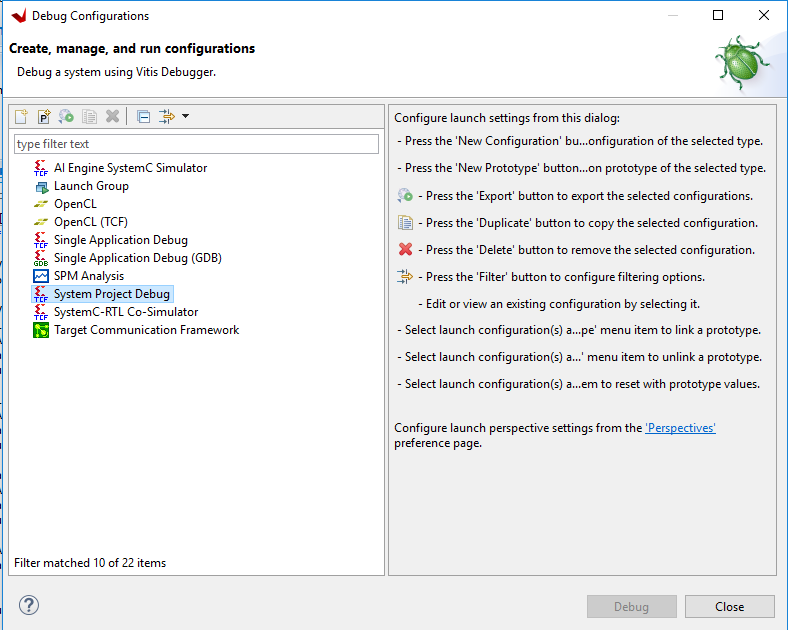
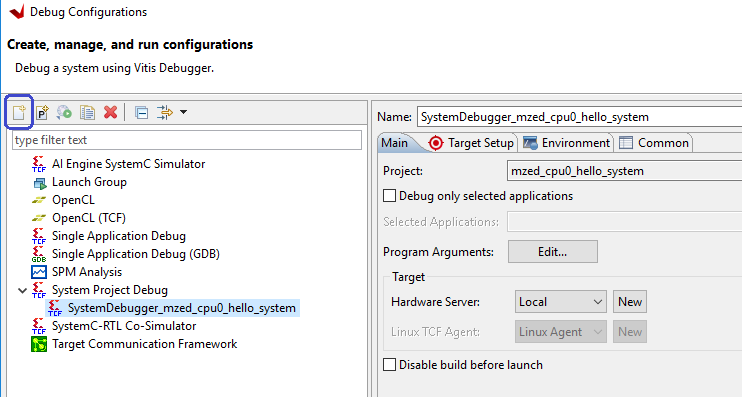
5.2. 自動創建調試配置
雙擊System Project,Vitis自動創建了調試配置。
5.3. 檢查調試配置的Target Setup。
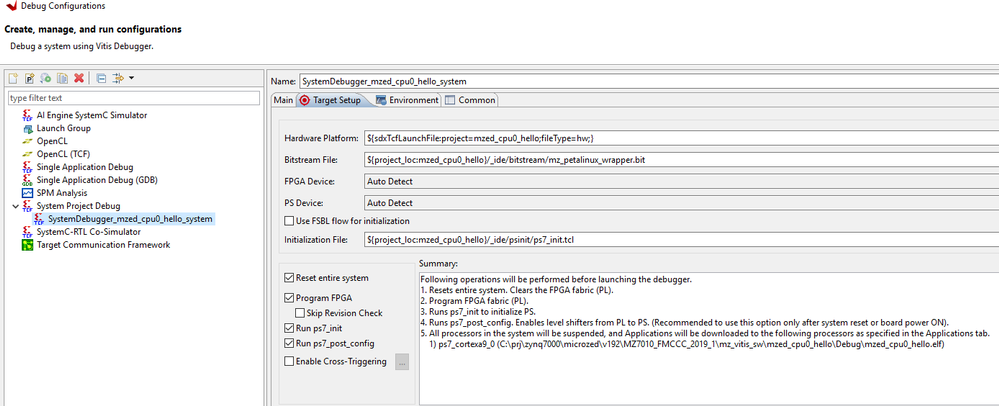
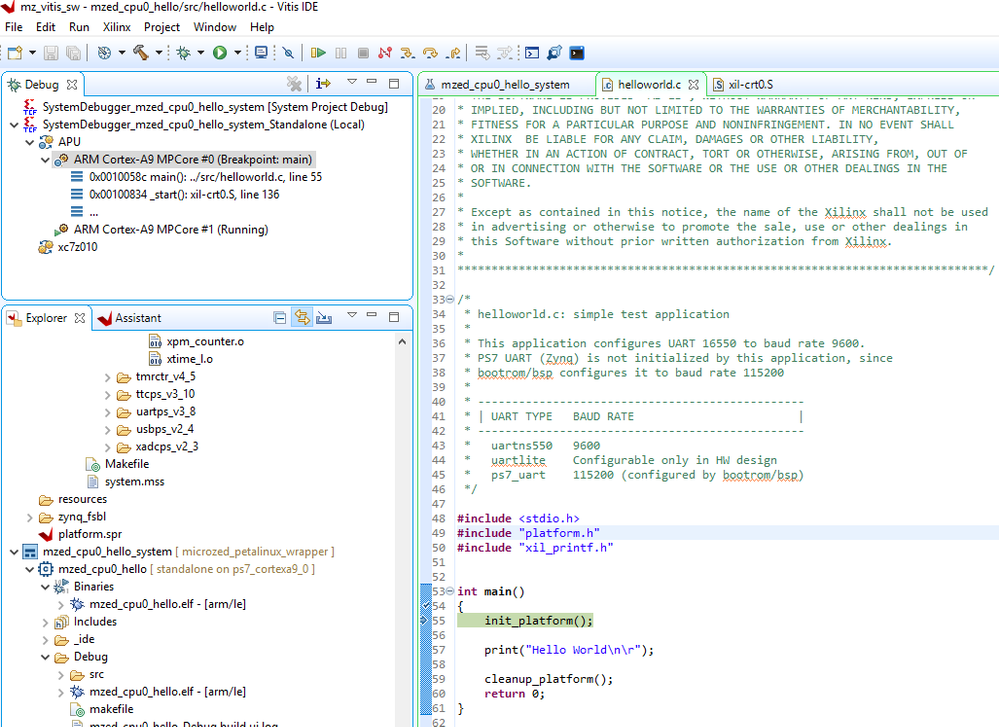
5.4. 開始調試
點擊Debug后,會開始調試。由于有FPGA設計,先下載FPGA。
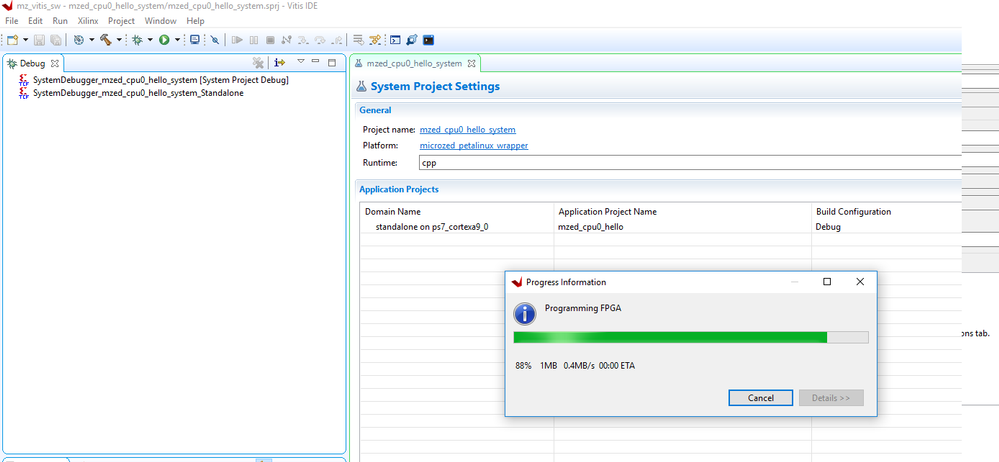
6. 調試工程 6.1. FreeRTOS
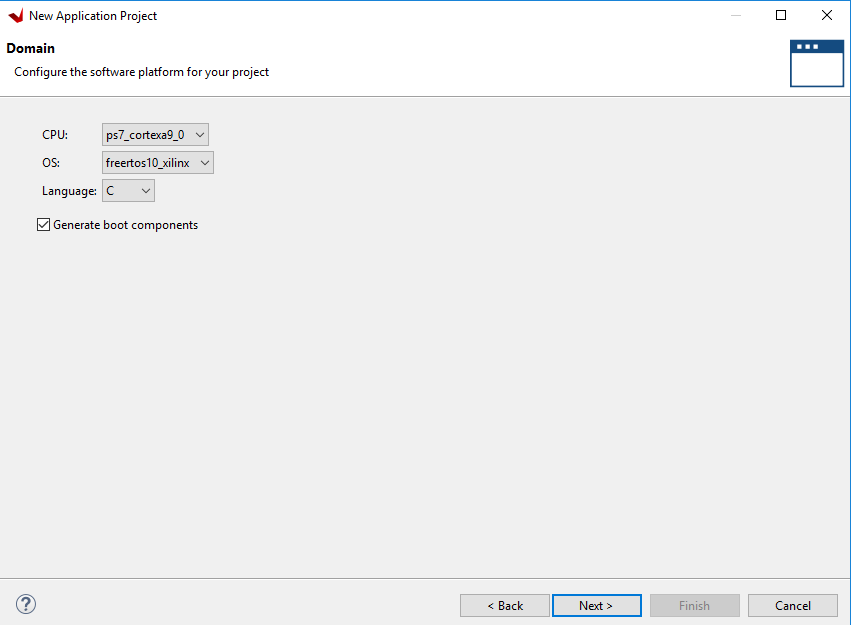
之前只是簡單的Hello world工程。下面創建更復雜的FreeRTOS LWIP TCP iPerf server. 在Domain界面,為OS選擇FreeRTOS。
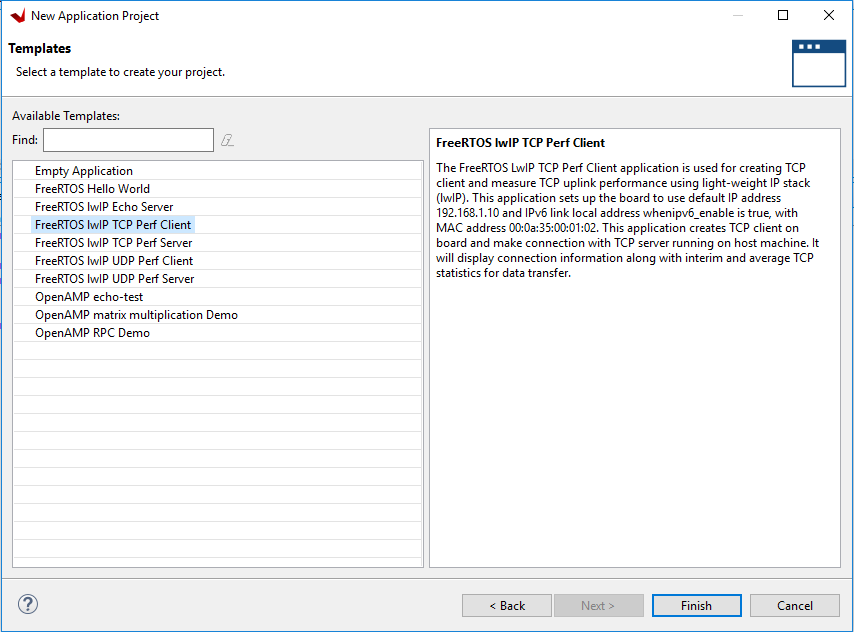
6.2. LWIP TCP iPerf server
在Templates界面,為Template選擇FreeRTOS LWIP TCP Perf server。
6.3. 調試LWIP TCP iPerf server
同樣的啟動調試,也在main函數入口處停下,直接選擇連續運行。
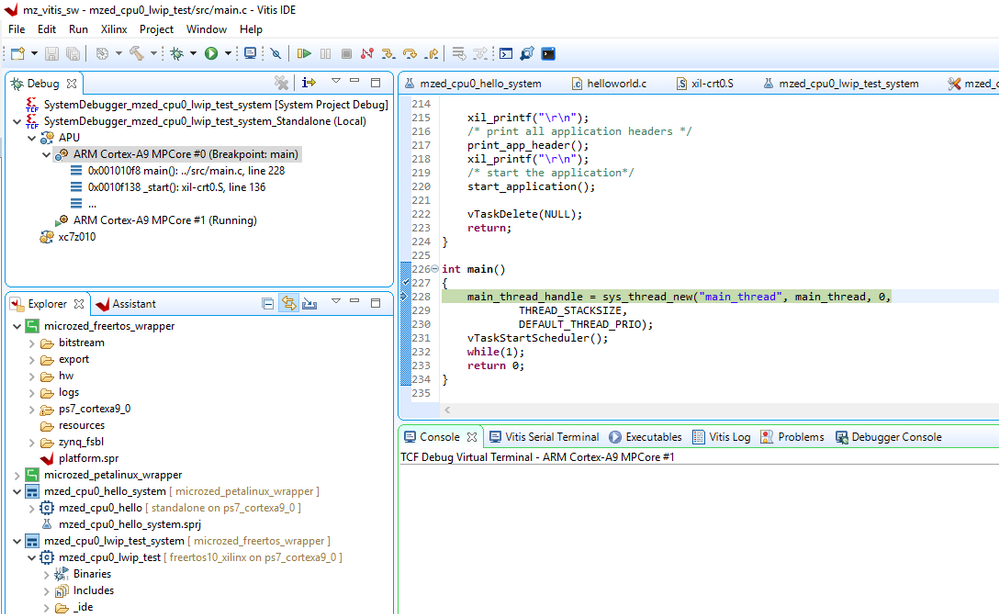
6.4. 連續運行
連續運行后,單板串口打印。
-----lwIP Socket Mode TCP Server Application------
Start PHY autonegotiation
Waiting for PHY to complete autonegotiation.
autonegotiation complete
link speed for phy address 0: 100
ERROR: DHCP request timed out
Configuring default IP 192.168.1.10
Board IP:       192.168.1.10
Netmask :       255.255.255.0
Gateway :       192.168.1.1

TCP server listening on port 5001
On Host: Run $iperf -c 192.168.1.10 -i 5 -t 300 -w 2M
6.5. 電腦Ping測試
設置電腦IP地址,再做Ping測試,檢查單板網絡是否正常。
C:/tools/iperf-2.0.5-2-win32>ping 192.168.1.10

Pinging 192.168.1.10 with 32 bytes of data:
Reply from 192.168.1.10: bytes=32 time=1ms TTL=255
Reply from 192.168.1.10: bytes=32 time
6.6. 電腦iperf測試
在電腦啟動iperf測試。
C:/tools/iperf-2.0.5-2-win32>iperf -c 192.168.1.10 -i 5 -t 20 -w 2M
------------------------------------------------------------
Client connecting to 192.168.1.10, TCP port 5001
TCP window size: 2.00 MByte
------------------------------------------------------------
[  3] local 192.168.1.100 port 63484 connected with 192.168.1.10 port 5001
[ ID] Interval       Transfer     Bandwidth
[  3]  0.0- 5.0 sec  55.4 MBytes  92.9 Mbits/sec
[  3]  5.0-10.0 sec  53.4 MBytes  89.5 Mbits/sec
[  3] 10.0-15.0 sec  53.5 MBytes  89.8 Mbits/sec
[  3] 15.0-20.0 sec  53.4 MBytes  89.5 Mbits/sec
[  3]  0.0-20.0 sec   216 MBytes  90.4 Mbits/sec
6.7. 單板iperf測試串口打印
在電腦啟動啟動iperf測試后,單板串口打印。
[  1] local 192.168.1.10 port 5001 connected with 192.168.1.100 port 5001
[ ID] Interval    Transfer     Bandwidth
[  1]  0.0- 5.0 sec  53.2 MBytes  89.3 Mbits/sec
[  1]  5.0-10.0 sec  53.4 MBytes  89.6 Mbits/sec
[  1] 10.0-15.0 sec  53.4 MBytes  89.6 Mbits/sec
[  1] 15.0-20.0 sec  53.4 MBytes  89.6 Mbits/sec
[  1]  0.0-20.2 sec   216 MBytes  89.6 Mbits/sec
TCP test passed Successfully
編輯:hfy
-
嵌入式軟件
+關注
關注
4文章
240瀏覽量
26646 -
MicroZed
+關注
關注
0文章
9瀏覽量
5239
發布評論請先 登錄
相關推薦
嵌入式學習建議
什么是嵌入式?一文讀懂嵌入式主板
名單公布!【書籍評測活動NO.42】 嵌入式Hypervisor:架構、原理與應用
嵌入式軟件開發招聘
嵌入式軟件工程師如何提升自己?
嵌入式軟件工程師和硬件工程師的區別?
AMD Vitis? Embedded嵌入式軟件開發套件的功能和特性概述


 Vitis里如何創建嵌入式軟件工程


評論