計算機視覺主要問題有圖像分類、目標檢測和圖像分割等。針對圖像分類任務,提升準確率的方法路線有兩條,一個是模型的修改,另一個是各種數據處理和訓練的技巧(tricks)。圖像分類中的各種技巧對于目標檢測、圖像分割等任務也有很好的作用,因此值得好好總結。本文在精讀論文的基礎上,總結了圖像分類任務的各種tricks如下:
Warmup
Label-smoothing
Random image cropping and patching
Knowledge Distillation
Cutout
Random erasing
Cosine learning rate decay
Mixup training
AdaBoud
AutoAugment
其他經典的tricks
Warmup
學習率是神經網絡訓練中最重要的超參數之一,針對學習率的技巧有很多。Warm up是在ResNet論文[1]中提到的一種學習率預熱的方法。由于剛開始訓練時模型的權重(weights)是隨機初始化的(全部置為0是一個坑,原因見[2]),此時選擇一個較大的學習率,可能會帶來模型的不穩定。學習率預熱就是在剛開始訓練的時候先使用一個較小的學習率,訓練一些epoches或iterations,等模型穩定時再修改為預先設置的學習率進行訓練。論文[1]中使用一個110層的ResNet在cifar10上訓練時,先用0.01的學習率訓練直到訓練誤差低于80%(大概訓練了400個iterations),然后使用0.1的學習率進行訓練。
上述的方法是constant warmup,18年Facebook又針對上面的warmup進行了改進[3],因為從一個很小的學習率一下變為比較大的學習率可能會導致訓練誤差突然增大。論文[3]提出了gradual warmup來解決這個問題,即從最開始的小學習率開始,每個iteration增大一點,直到最初設置的比較大的學習率。
Gradual warmup代碼如下:
fromtorch.optim.lr_scheduler import_LRScheduler
classGradualWarmupScheduler(_LRScheduler):
“”“
Args:
optimizer (Optimizer): Wrapped optimizer.
multiplier: target learning rate = base lr * multiplier
total_epoch: target learning rate is reached at total_epoch, gradually
after_scheduler: after target_epoch, use this scheduler(eg. ReduceLROnPlateau)
”“”
def__init__(self, optimizer, multiplier, total_epoch, after_scheduler=None):
self.multiplier = multiplier
ifself.multiplier 《= 1.:
raiseValueError(‘multiplier should be greater than 1.’)
self.total_epoch = total_epoch
self.after_scheduler = after_scheduler
self.finished = False
super().__init__(optimizer)
defget_lr(self):
ifself.last_epoch 》 self.total_epoch:
ifself.after_scheduler:
ifnotself.finished:
self.after_scheduler.base_lrs = [base_lr * self.multiplier forbase_lr inself.base_lrs]
self.finished = True
returnself.after_scheduler.get_lr()
return[base_lr * self.multiplier forbase_lr inself.base_lrs]
return[base_lr * ((self.multiplier - 1.) * self.last_epoch / self.total_epoch + 1.) forbase_lr inself.base_lrs]
defstep(self, epoch=None):
ifself.finished andself.after_scheduler:
returnself.after_scheduler.step(epoch)
else:
returnsuper(GradualWarmupScheduler, self).step(epoch)
Linear scaling learning rate
Linear scaling learning rate是在論文[3]中針對比較大的batch size而提出的一種方法。
在凸優化問題中,隨著批量的增加,收斂速度會降低,神經網絡也有類似的實證結果。隨著batch size的增大,處理相同數據量的速度會越來越快,但是達到相同精度所需要的epoch數量越來越多。也就是說,使用相同的epoch時,大batch size訓練的模型與小batch size訓練的模型相比,驗證準確率會減小。
上面提到的gradual warmup是解決此問題的方法之一。另外,linear scaling learning rate也是一種有效的方法。在mini-batch SGD訓練時,梯度下降的值是隨機的,因為每一個batch的數據是隨機選擇的。增大batch size不會改變梯度的期望,但是會降低它的方差。也就是說,大batch size會降低梯度中的噪聲,所以我們可以增大學習率來加快收斂。
具體做法很簡單,比如ResNet原論文[1]中,batch size為256時選擇的學習率是0.1,當我們把batch size變為一個較大的數b時,學習率應該變為 0.1 × b/256。
Label-smoothing
在分類問題中,我們的最后一層一般是全連接層,然后對應標簽的one-hot編碼,即把對應類別的值編碼為1,其他為0。這種編碼方式和通過降低交叉熵損失來調整參數的方式結合起來,會有一些問題。這種方式會鼓勵模型對不同類別的輸出分數差異非常大,或者說,模型過分相信它的判斷。但是,對于一個由多人標注的數據集,不同人標注的準則可能不同,每個人的標注也可能會有一些錯誤。模型對標簽的過分相信會導致過擬合。
標簽平滑(Label-smoothing regularization,LSR)是應對該問題的有效方法之一,它的具體思想是降低我們對于標簽的信任,例如我們可以將損失的目標值從1稍微降到0.9,或者將從0稍微升到0.1。標簽平滑最早在inception-v2[4]中被提出,它將真實的概率改造為:

其中,ε是一個小的常數,K是類別的數目,y是圖片的真正的標簽,i代表第i個類別,q_i是圖片為第i類的概率。
總的來說,LSR是一種通過在標簽y中加入噪聲,實現對模型約束,降低模型過擬合程度的一種正則化方法。
LSR代碼如下:
importtorch
importtorch.nn asnn
classLSR(nn.Module):
def__init__(self, e=0.1, reduction=‘mean’):
super().__init__()
self.log_softmax = nn.LogSoftmax(dim=1)
self.e = e
self.reduction = reduction
def_one_hot(self, labels, classes, value=1):
“”“
Convert labels to one hot vectors
Args:
labels: torch tensor in format [label1, label2, label3, 。..]
classes: int, number of classes
value: label value in one hot vector, default to 1
Returns:
return one hot format labels in shape [batchsize, classes]
”“”
one_hot = torch.zeros(labels.size(0), classes)
#labels and value_added size must match
labels = labels.view(labels.size(0), -1)
value_added = torch.Tensor(labels.size(0), 1).fill_(value)
value_added = value_added.to(labels.device)
one_hot = one_hot.to(labels.device)
one_hot.scatter_add_(1, labels, value_added)
returnone_hot
def_smooth_label(self, target, length, smooth_factor):
“”“convert targets to one-hot format, and smooth
them.
Args:
target: target in form with [label1, label2, label_batchsize]
length: length of one-hot format(number of classes)
smooth_factor: smooth factor for label smooth
Returns:
smoothed labels in one hot format
”“”
one_hot = self._one_hot(target, length, value=1- smooth_factor)
one_hot += smooth_factor / length
returnone_hot.to(target.device)
Random image cropping and patching
Random image cropping and patching (RICAP)[7]方法隨機裁剪四個圖片的中部分,然后把它們拼接為一個圖片,同時混合這四個圖片的標簽。
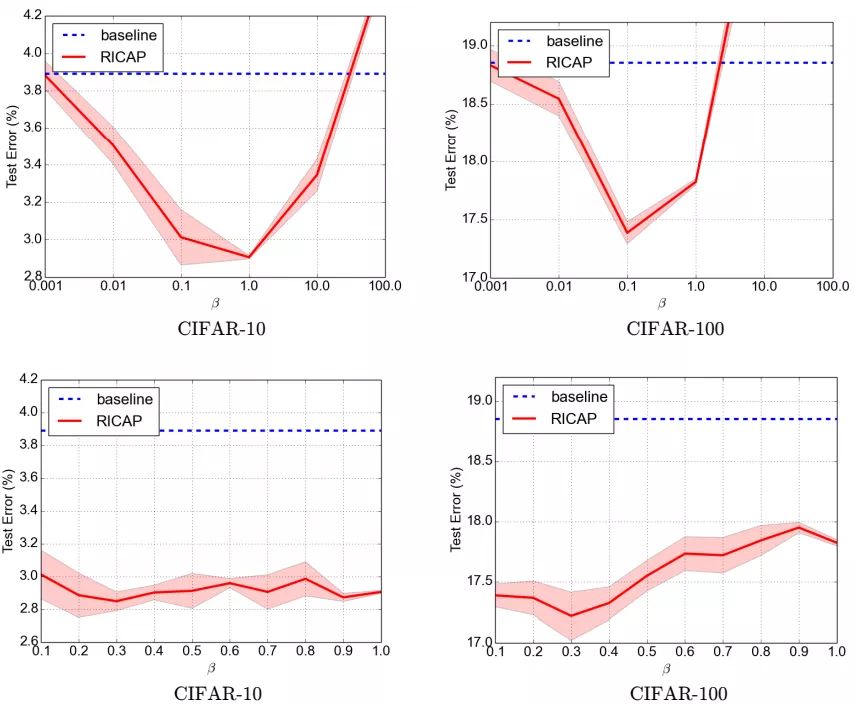
RICAP在caifar10上達到了2.19%的錯誤率。
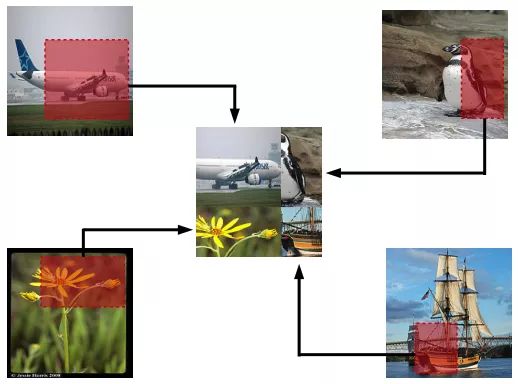
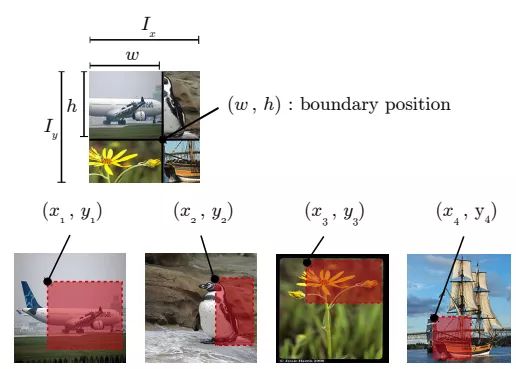
如下圖所示,Ix, Iy是原始圖片的寬和高。w和h稱為boundary position,它決定了四個裁剪得到的小圖片的尺寸。w和h從beta分布Beta(β, β)中隨機生成,β也是RICAP的超參數。最終拼接的圖片尺寸和原圖片尺寸保持一致。
RICAP的代碼如下:
beta = 0.3# hyperparameter
for(images, targets) intrain_loader:
# get the image size
I_x, I_y = images.size()[2:]
# draw a boundry position (w, h)
w = int(np.round(I_x * np.random.beta(beta, beta)))
h = int(np.round(I_y * np.random.beta(beta, beta)))
w_ = [w, I_x - w, w, I_x - w]
h_ = [h, h, I_y - h, I_y - h]
# select and crop four images
cropped_images = {}
c_ = {}
W_ = {}
fork inrange(4):
index = torch.randperm(images.size(0))
x_k = np.random.randint(0, I_x - w_[k] + 1)
y_k = np.random.randint(0, I_y - h_[k] + 1)
cropped_images[k] = images[index][:, :, x_k:x_k + w_[k], y_k:y_k + h_[k]]
c_[k] = target[index].cuda()
W_[k] = w_[k] * h_[k] / (I_x * I_y)
# patch cropped images
patched_images = torch.cat(
(torch.cat((cropped_images[0], cropped_images[1]), 2),
torch.cat((cropped_images[2], cropped_images[3]), 2)),
3)
#patched_images = patched_images.cuda()
# get output
output = model(patched_images)
# calculate loss and accuracy
loss = sum([W_[k] * criterion(output, c_[k]) fork inrange(4)])
acc = sum([W_[k] * accuracy(output, c_[k])[0] fork inrange(4)])
Knowledge Distillation
提高幾乎所有機器學習算法性能的一種非常簡單的方法是在相同的數據上訓練許多不同的模型,然后對它們的預測進行平均。但是使用所有的模型集成進行預測是比較麻煩的,并且可能計算量太大而無法部署到大量用戶。Knowledge Distillation(知識蒸餾)[8]方法就是應對這種問題的有效方法之一。
在知識蒸餾方法中,我們使用一個教師模型來幫助當前的模型(學生模型)訓練。教師模型是一個較高準確率的預訓練模型,因此學生模型可以在保持模型復雜度不變的情況下提升準確率。比如,可以使用ResNet-152作為教師模型來幫助學生模型ResNet-50訓練。在訓練過程中,我們會加一個蒸餾損失來懲罰學生模型和教師模型的輸出之間的差異。
給定輸入,假定p是真正的概率分布,z和r分別是學生模型和教師模型最后一個全連接層的輸出。之前我們會用交叉熵損失l(p,softmax(z))來度量p和z之間的差異,這里的蒸餾損失同樣用交叉熵。所以,使用知識蒸餾方法總的損失函數是

上式中,第一項還是原來的損失函數,第二項是添加的用來懲罰學生模型和教師模型輸出差異的蒸餾損失。其中,T是一個溫度超參數,用來使softmax的輸出更加平滑的。實驗證明,用ResNet-152作為教師模型來訓練ResNet-50,可以提高后者的準確率。
Cutout
Cutout[9]是一種新的正則化方法。原理是在訓練時隨機把圖片的一部分減掉,這樣能提高模型的魯棒性。它的來源是計算機視覺任務中經常遇到的物體遮擋問題。通過cutout生成一些類似被遮擋的物體,不僅可以讓模型在遇到遮擋問題時表現更好,還能讓模型在做決定時更多地考慮環境(context)。
代碼如下:
importtorch
importnumpy asnp
classCutout(object):
“”“Randomly mask out one or more patches from an image.
Args:
n_holes (int): Number of patches to cut out of each image.
length (int): The length (in pixels) of each square patch.
”“”
def__init__(self, n_holes, length):
self.n_holes = n_holes
self.length = length
def__call__(self, img):
“”“
Args:
img (Tensor): Tensor image of size (C, H, W)。
Returns:
Tensor: Image with n_holes of dimension length x length cut out of it.
”“”
h = img.size(1)
w = img.size(2)
mask = np.ones((h, w), np.float32)
forn inrange(self.n_holes):
y = np.random.randint(h)
x = np.random.randint(w)
y1 = np.clip(y - self.length // 2, 0, h)
y2 = np.clip(y + self.length // 2, 0, h)
x1 = np.clip(x - self.length // 2, 0, w)
x2 = np.clip(x + self.length // 2, 0, w)
mask[y1: y2, x1: x2] = 0.
mask = torch.from_numpy(mask)
mask = mask.expand_as(img)
img = img * mask
returnimg
效果如下圖,每個圖片的一小部分被cutout了。
Random erasing
Random erasing[6]其實和cutout非常類似,也是一種模擬物體遮擋情況的數據增強方法。區別在于,cutout是把圖片中隨機抽中的矩形區域的像素值置為0,相當于裁剪掉,random erasing是用隨機數或者數據集中像素的平均值替換原來的像素值。而且,cutout每次裁剪掉的區域大小是固定的,Random erasing替換掉的區域大小是隨機的。
Random erasing代碼如下:
from__future__ importabsolute_import
fromtorchvision.transforms import*
fromPIL importImage
importrandom
importmath
importnumpy asnp
importtorch
classRandomErasing(object):
‘’‘
probability: The probability that the operation will be performed.
sl: min erasing area
sh: max erasing area
r1: min aspect ratio
mean: erasing value
’‘’
def__init__(self, probability = 0.5, sl = 0.02, sh = 0.4, r1 = 0.3, mean=[0.4914, 0.4822, 0.4465]):
self.probability = probability
self.mean = mean
self.sl = sl
self.sh = sh
self.r1 = r1
def__call__(self, img):
ifrandom.uniform(0, 1) 》 self.probability:
returnimg
forattempt inrange(100):
area = img.size()[1] * img.size()[2]
target_area = random.uniform(self.sl, self.sh) * area
aspect_ratio = random.uniform(self.r1, 1/self.r1)
h = int(round(math.sqrt(target_area * aspect_ratio)))
w = int(round(math.sqrt(target_area / aspect_ratio)))
ifw 《 img.size()[2] andh 《 img.size()[1]:
x1 = random.randint(0, img.size()[1] - h)
y1 = random.randint(0, img.size()[2] - w)
ifimg.size()[0] == 3:
img[0, x1:x1+h, y1:y1+w] = self.mean[0]
img[1, x1:x1+h, y1:y1+w] = self.mean[1]
img[2, x1:x1+h, y1:y1+w] = self.mean[2]
else:
img[0, x1:x1+h, y1:y1+w] = self.mean[0]
returnimg
returnimg
Cosine learning rate decay
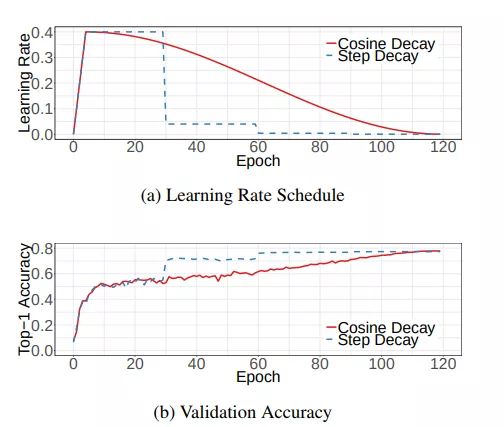
在warmup之后的訓練過程中,學習率不斷衰減是一個提高精度的好方法。其中有step decay和cosine decay等,前者是隨著epoch增大學習率不斷減去一個小的數,后者是讓學習率隨著訓練過程曲線下降。
對于cosine decay,假設總共有T個batch(不考慮warmup階段),在第t個batch時,學習率η_t為:

這里,η代表初始設置的學習率。這種學習率遞減的方式稱之為cosine decay。
下面是帶有warmup的學習率衰減的可視化圖[4]。其中,圖(a)是學習率隨epoch增大而下降的圖,可以看出cosine decay比step decay更加平滑一點。圖(b)是準確率隨epoch的變化圖,兩者最終的準確率沒有太大差別,不過cosine decay的學習過程更加平滑。
在pytorch的torch.optim.lr_scheduler中有更多的學習率衰減的方法,至于哪個效果好,可能對于不同問題答案是不一樣的。對于step decay,使用方法如下:
# Assuming optimizer uses lr = 0.05 for all groups
# lr = 0.05 if epoch 《 30
# lr = 0.005 if 30 《= epoch 《 60
# lr = 0.0005 if 60 《= epoch 《 90
fromtorch.optim.lr_scheduler importStepLR
scheduler = StepLR(optimizer, step_size=30, gamma=0.1)
forepoch inrange(100):
scheduler.step()
train(。..)
validate(。..)
Mixup training
Mixup[10]是一種新的數據增強的方法。Mixup training,就是每次取出2張圖片,然后將它們線性組合,得到新的圖片,以此來作為新的訓練樣本,進行網絡的訓練,如下公式,其中x代表圖像數據,y代表標簽,則得到的新的xhat, yhat。

其中,λ是從Beta(α, α)隨機采樣的數,在[0,1]之間。在訓練過程中,僅使用(xhat, yhat)。
Mixup方法主要增強了訓練樣本之間的線性表達,增強網絡的泛化能力,不過mixup方法需要較長的時間才能收斂得比較好。
Mixup代碼如下:
for(images, labels) intrain_loader:
l = np.random.beta(mixup_alpha, mixup_alpha)
index = torch.randperm(images.size(0))
images_a, images_b = images, images[index]
labels_a, labels_b = labels, labels[index]
mixed_images = l * images_a + (1- l) * images_b
outputs = model(mixed_images)
loss = l * criterion(outputs, labels_a) + (1- l) * criterion(outputs, labels_b)
acc = l * accuracy(outputs, labels_a)[0] + (1- l) * accuracy(outputs, labels_b)[0]
AdaBound
AdaBound是最近一篇論文[5]中提到的,按照作者的說法,AdaBound會讓你的訓練過程像adam一樣快,并且像SGD一樣好。
如下圖所示,使用AdaBound會收斂速度更快,過程更平滑,結果更好。
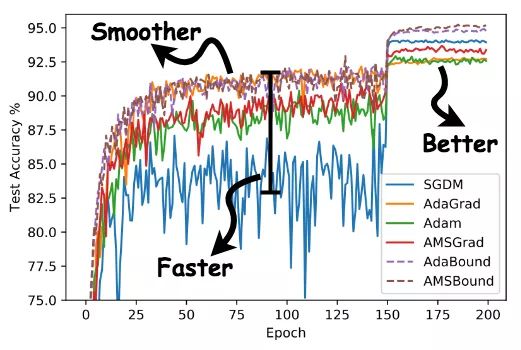
另外,這種方法相對于SGD對超參數的變化不是那么敏感,也就是說魯棒性更好。但是,針對不同的問題還是需要調節超參數的,只是所用的時間可能變少了。
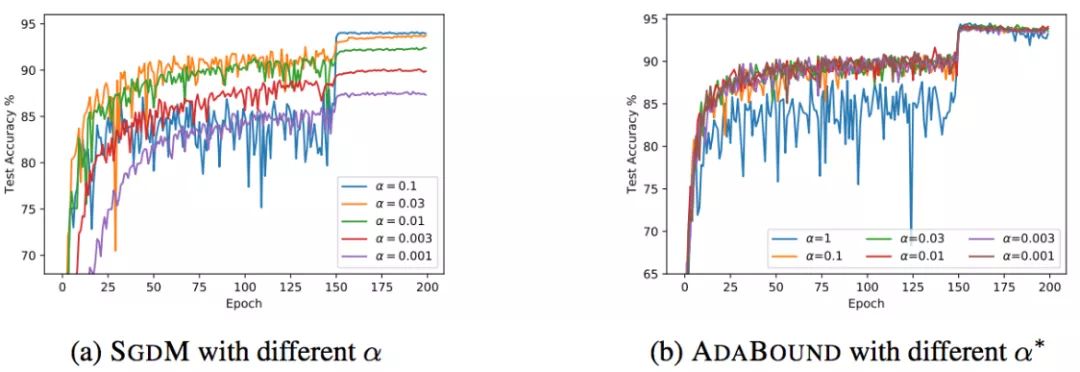
當然,AdaBound還沒有經過普遍的檢驗,也有可能只是對于某些問題效果好。
使用方法如下:安裝AdaBound
pip install adabound
使用AdaBound(和其他PyTorch optimizers用法一致)
optimizer = adabound.AdaBound(model.parameters(), lr=1e-3, final_lr=0.1)
AutoAugment
數據增強在圖像分類問題上有很重要的作用,但是增強的方法有很多,并非一股腦地用上所有的方法就是最好的。那么,如何選擇最佳的數據增強方法呢?AutoAugment[11]就是一種搜索適合當前問題的數據增強方法的方法。該方法創建一個數據增強策略的搜索空間,利用搜索算法選取適合特定數據集的數據增強策略。此外,從一個數據集中學到的策略能夠很好地遷移到其它相似的數據集上。
AutoAugment在cifar10上的表現如下表,達到了98.52%的準確率。

其他經典的tricks
常用的正則化方法為
Dropout
L1/L2正則
Batch Normalization
Early stopping
Random cropping
Mirroring
Rotation
Color shifting
PCA color augmentation
。..
其他
Xavier init[12]
。..
參考
[1] Deep Residual Learning for Image Recognition(https://arxiv.org/pdf/1512.03385.pdf)
[2] http://cs231n.github.io/neural-networks-2/
[3] Accurate, Large Minibatch SGD:Training ImageNet in 1 Hour(https://arxiv.org/pdf/1706.02677v2.pdf)
[4] Rethinking the Inception Architecture for Computer Vision(https://arxiv.org/pdf/1512.00567v3.pdf)
[4]Bag of Tricks for Image Classification with Convolutional Neural Networks(https://arxiv.org/pdf/1812.01187.pdf)
[5] Adaptive Gradient Methods with Dynamic Bound of Learning Rate(https://www.luolc.com/publications/adabound/)
[6] Random erasing(https://arxiv.org/pdf/1708.04896v2.pdf)
[7] RICAP(https://arxiv.org/pdf/1811.09030.pdf)
[8] Distilling the Knowledge in a Neural Network(https://arxiv.org/pdf/1503.02531.pdf)
[9] Improved Regularization of Convolutional Neural Networks with Cutout(https://arxiv.org/pdf/1708.04552.pdf)
[10] Mixup: BEYOND EMPIRICAL RISK MINIMIZATION(https://arxiv.org/pdf/1710.09412.pdf)
[11] AutoAugment:Learning Augmentation Policies from Data(https://arxiv.org/pdf/1805.09501.pdf)
[12] Understanding the difficulty of training deep feedforward neural networks(http://proceedings.mlr.press/v9/glorot10a/glorot10a.pdf)
編輯:lyn
-
神經網絡
+關注
關注
42文章
4772瀏覽量
100808 -
圖像分類
+關注
關注
0文章
90瀏覽量
11923 -
計算機視覺
+關注
關注
8文章
1698瀏覽量
46005 -
深度學習
+關注
關注
73文章
5503瀏覽量
121206
原文標題:深度學習圖像分類任務中那些不得不看的技巧總結
文章出處:【微信號:vision263com,微信公眾號:新機器視覺】歡迎添加關注!文章轉載請注明出處。
發布評論請先 登錄
相關推薦
主動學習在圖像分類技術中的應用:當前狀態與未來展望

利用Matlab函數實現深度學習算法
深度學習中的時間序列分類方法
計算機視覺怎么給圖像分類
深度學習模型訓練過程詳解
請問PSoC? Creator IDE可以支持IMAGIMOB機器學習嗎?
一種利用光電容積描記(PPG)信號和深度學習模型對高血壓分類的新方法
深度解析深度學習下的語義SLAM

關于MCU選型不得不知的學問
利用卷積神經網絡實現SAR目標分類的研究
計算機最核心的——CPU
詳解深度學習、神經網絡與卷積神經網絡的應用


 關于深度學習圖像分類不得不說的技巧詳解


評論