在本章中,我們將討論機器學習技術在圖像處理中的應用。首先,定義機器學習,并學習它的兩種算法——監督算法和無監督算法;其次,討論一些流行的無監督機器學習技術的應用,如聚類和圖像分割等問題。
我們還將研究監督機器學習技術在圖像分類和目標檢測等問題上的應用。使用非常流行的scikit-learn庫,以及scikit-image和Python-OpenCV(cv2)來實現用于圖像處理的機器學習算法。在本章中,我們將帶領讀者深入了解機器學習算法及其解決的問題。
本章主要包括以下內容:
監督與無監督學習;
無監督機器學習——聚類、PCA和特征臉;
監督機器學習——基于手寫數字數據集的圖像分類;
監督機器學習——目標檢測。
Part1 監督與無監督學習
機器學習算法主要有以下兩種類型。
(1)監督學習:在這種類型的學習中,我們得到輸入數據集和正確的標簽,需要學習輸入和輸出之間的關系(作為函數)。手寫數字分類問題是監督(分類)問題的一個例子。
(2)無監督學習:在這種類型的學習中,很少或根本不知道輸出應該是什么樣的。人們可以推導得到數據的結構而不必知道變量影響。聚類(也可以看作分割)就是一個很好的例子,在圖像處理技術中,并不知道哪個像素屬于哪個段。
如果計算機程序在T上的性能正如P所度量的,隨著經驗E而提高,那么對于某些任務T和某些性能度量P,計算機程序被設計成能夠從經驗E中學習。
例如,假設有一組手寫數字圖像及其標簽(從0到9的數字),需要編寫一個Python程序,該程序學習了圖片和標簽(經驗E)之間的關聯,然后自動標記一組新的手寫數字圖像。
在本例中,任務T是為圖像分配標簽(即對數字圖像進行分類或標識),程序中能夠正確識別的新圖像的比例為性能P(準確率)。在這種情況下,這個程序可以說是一個學習程序。
本章將描述一些可以使用機器學習算法(無監督或監督)解決的圖像處理問題。讀者將從學習一些無監督機器學習技術在解決圖像處理問題中的應用開始。
Part2 無監督機器學習
本節將討論一些流行的機器學習算法及其在圖像處理中的應用。從某些聚類算法及其在顏色量化和圖像分割中的應用開始。使用scikit-learn庫實現這些聚類算法。
01
基于圖像分割與顏色量化的k均值聚類算法
本節將演示如何對pepper圖像執行像素矢量量化(VQ),將顯示圖像所需的顏色數量從250種減少到4種,同時保持整體外觀質量。在本例中,像素在三維空間中表示,使用k均值查找4個顏色簇。
在圖像處理文獻中,碼本是從k均值(簇群中心)獲得的,稱為調色板。在調色板中,使用1個字節最多可尋址256種顏色,而RGB編碼要求每個像素3個字節。GIF文件格式使用這樣的調色板。為了進行比較,還使用隨機碼本(隨機選取的顏色)的量化圖像。
在使用k均值聚類算法對圖像進行分割前,加載所需的庫和輸入圖像,如下面的代碼所示:
import numpy as np
import matplotlib.pyplot as plt
from sklearn.cluster import KMeans
from sklearn.metrics import pairwise_distances_argmin
from skimage.io import imread
from sklearn.utils import shuffle
from skimage import img_as_float
from time import time


pepper = imread("../images/pepper.jpg")


# Display the original image
plt.figure(1), plt.clf()
ax = plt.axes([0, 0, 1, 1])
plt.axis('off'), plt.title('Original image (%d colors)'
%(len(np.unique(pepper)))), plt.imshow(pepper)
輸入的辣椒原始圖像如圖1所示。
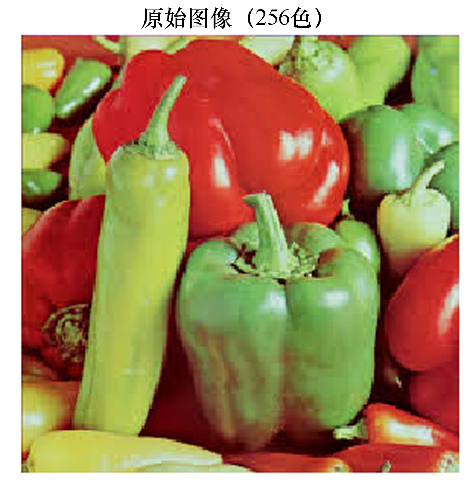
圖1辣椒圖像
現在,應用k均值聚類算法對圖像進行分割,如下面的代碼所示:
n_colors = 64


# Convert to floats instead of the default 8 bits integer coding. Dividingby
# 255 is important so that plt.imshow behaves works well on float data
# (need tobe in the range [0-1])
pepper = np.array(pepper, dtype=np.float64) / 255


# Load Image and transform to a 2D numpy array.
w, h, d = original_shape = tuple(pepper.shape)
assert d == 3
image_array = np.reshape(pepper, (w * h, d))


def recreate_image(codebook, labels, w, h):
    """Recreate the (compressed) image from the code book & labels"""
    d = codebook.shape[1]
    image = np.zeros((w, h, d))
    label_idx = 0
    for i in range(w):
        for j in range(h):
              image[i][j] = codebook[labels[label_idx]]
              label_idx += 1
return image


# Display all results, alongside original image
plt.figure(1)
plt.clf()
ax = plt.axes([0, 0, 1, 1])
plt.axis('off')
plt.title('Original image (96,615 colors)')
plt.imshow(pepper)


plt.figure(2, figsize=(10,10))
plt.clf()
i = 1
for k in [64, 32, 16, 4]:
    t0 = time()
    plt.subplot(2,2,i)
    plt.axis('off')
    image_array_sample = shuffle(image_array, random_state=0)[:1000]
    kmeans = KMeans(n_clusters=k, random_state=0).fit(image_array_sample)
    print("done in %0.3fs." % (time() - t0))
    # Get labels for all points
    print("Predicting color indices on the full image (k-means)")
    t0 = time()
    labels = kmeans.predict(image_array)
    print("done in %0.3fs." % (time() - t0))
    plt.title('Quantized image (' + str(k) + ' colors, K-Means)')
    plt.imshow(recreate_image(kmeans.cluster_centers_, labels, w, h))
    i += 1
plt.show()
plt.figure(3, figsize=(10,10))
plt.clf()
i = 1
for k in [64, 32, 16, 4]:
    t0 = time()
    plt.subplot(2,2,i)
    plt.axis('off')
    codebook_random = shuffle(image_array, random_state=0)[:k + 1]
    print("Predicting color indices on the full image (random)")
    t0 = time()
    labels_random = pairwise_distances_argmin(codebook_random,image_array,axis=0)


     print("done in %0.3fs." % (time() - t0))
     plt.title('Quantized image (' + str(k) + ' colors, Random)')
     plt.imshow(recreate_image(codebook_random, labels_random, w, h))
     i += 1
plt.show()
運行上述代碼,輸出結果如圖2所示。可以看到,在保留的圖像質量方面,k均值聚類算法對于顏色量化的效果總是比使用隨機碼本要好。
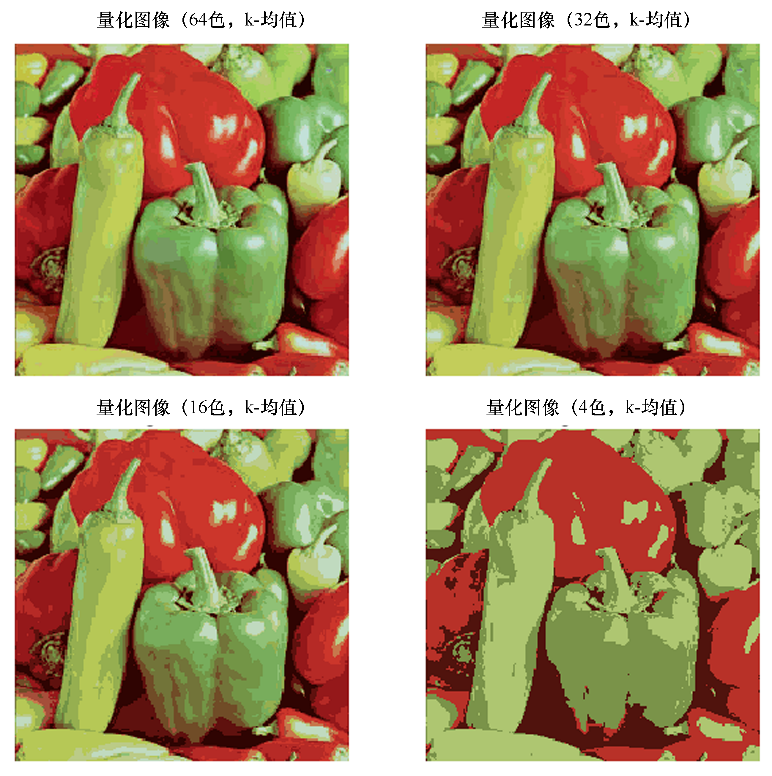
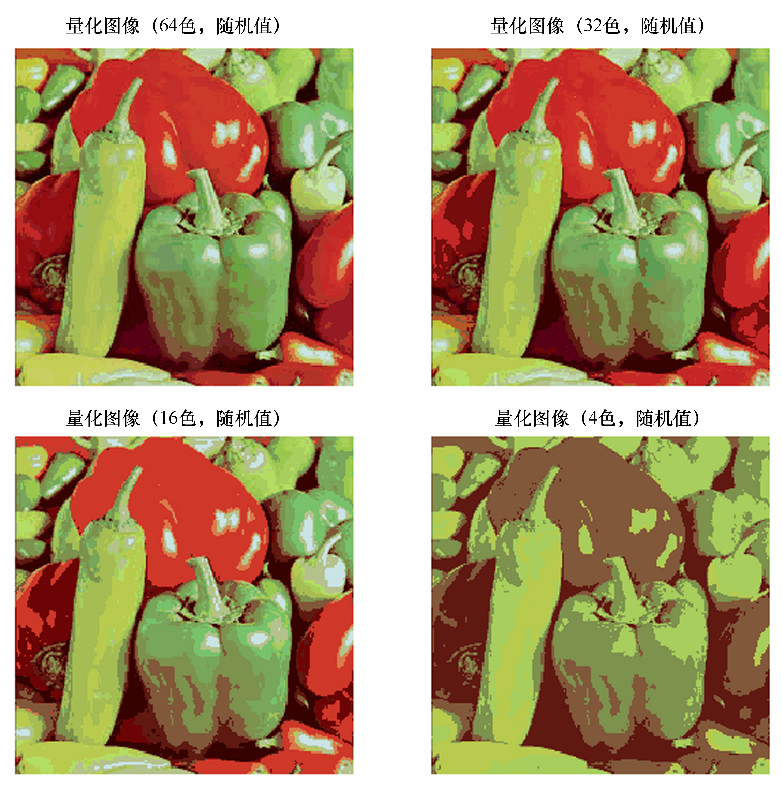
圖2使用k均值聚類算法進行辣椒圖像分割與顏色量化
02
由于圖像分割的譜聚類算法
本節將演示如何將譜聚類技術用于圖像分割。在這些設置中,譜聚類方法解決了稱為歸一化圖割的問題——圖像被看作一個連通像素的圖,譜聚類算法的實質是選擇定義區域的圖切分,同時最小化沿著切分的梯度與區域體積的比值。來自scikit-learn聚類模塊的SpectralClustering()將用于將圖像分割為前景和背景。
將使用譜聚類算法得到的圖像分割結果與使用k均值聚類得到的二值分割結果進行對比,如下面的代碼所示:
from sklearn import cluster
from skimage.io import imread
from skimage.color import rgb2gray
from scipy.misc import imresize
import matplotlib.pylab as pylab
im = imresize(imread('../images/me14.jpg'), (100,100,3))
img = rgb2gray(im)
k = 2 # binary segmentation, with 2 output clusters / segments
X = np.reshape(im, (-1, im.shape[-1]))
two_means = cluster.MiniBatchKMeans(n_clusters=k, random_state=10)
two_means.fit(X)
y_pred = two_means.predict(X)
labels = np.reshape(y_pred, im.shape[:2])
pylab.figure(figsize=(20,20))
pylab.subplot(221), pylab.imshow(np.reshape(y_pred, im.shape[:2])),
pylab.title('k-means segmentation (k=2)', size=30)
pylab.subplot(222), pylab.imshow(im), pylab.contour(labels == 0,
contours=1, colors='red'), pylab.axis('off')
pylab.title('k-means contour (k=2)', size=30)
spectral = cluster.SpectralClustering(n_clusters=k, eigen_solver='arpack',
affinity="nearest_neighbors", n_neighbors=100, random_state=10)
spectral.fit(X)
y_pred = spectral.labels_.astype(np.int)
labels = np.reshape(y_pred, im.shape[:2])
pylab.subplot(223), pylab.imshow(np.reshape(y_pred, im.shape[:2])),
pylab.title('spectral segmentation (k=2)', size=30)
pylab.subplot(224), pylab.imshow(im), pylab.contour(labels == 0,
contours=1, colors='red'), pylab.axis('off'), pylab.title('spectral contour
(k=2)', size=30), pylab.tight_layout()
pylab.show()
運行上述代碼,輸出結果如圖3所示。可以看到,譜聚類算法相比k均值聚類算法對圖像的分割效果更好。
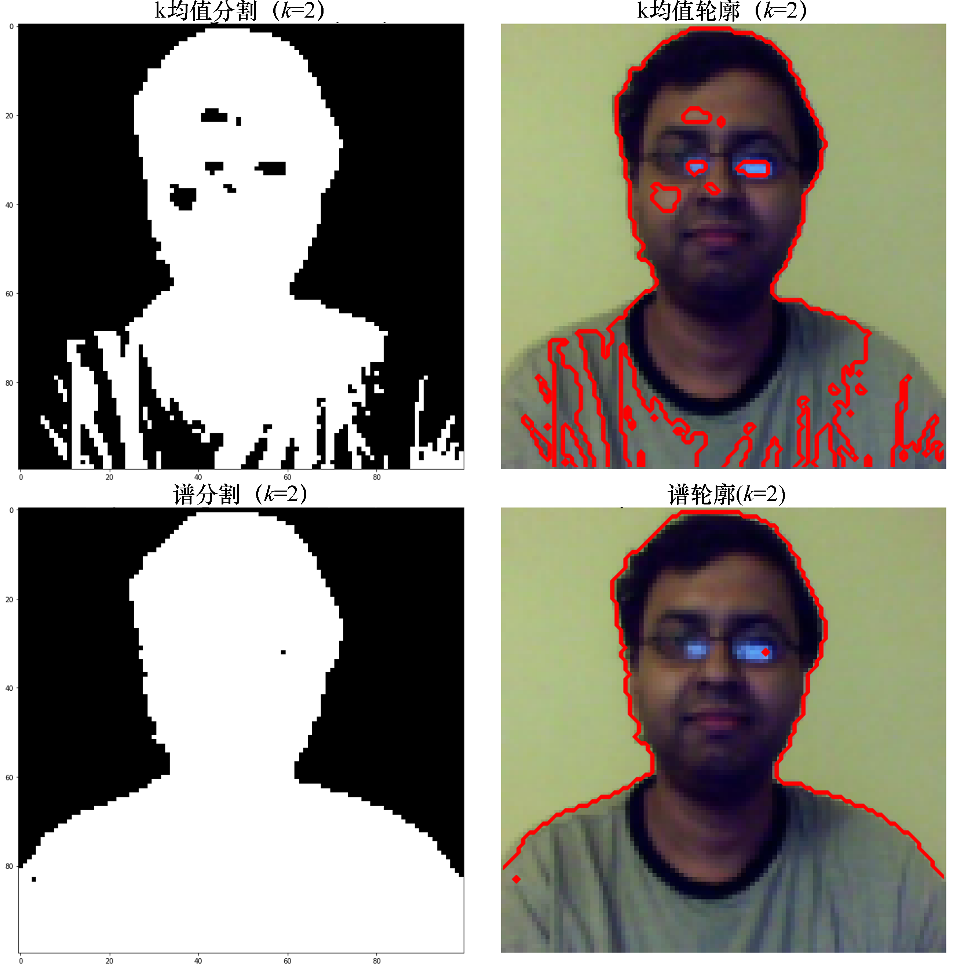
圖3使用譜聚類與k均值聚類算法得到的圖像分割結果對比
03
PCA與特征臉
主成分分析(PCA)是一種統計/非監督機器學習方法,它使用一個正交變換將一組觀測可能相關的變量轉化為一組線性不相關的變量的值,從而在數據集中發現最大方向的方差(沿著主要成分)。
這可以用于(線性)降維(只有幾個突出的主成分在大多數情況下捕獲數據集中的幾乎所有方差)和具有多個維度的數據集的可視化(在二維空間中)。PCA的一個應用是特征面,找到一組可以(從理論上)表示任意面(作為這些特征面的線性組合)的特征面。
1.用PCA降維及可視化
在本節中,我們將使用scikit-learn的數字數據集,其中包含1797張手寫數字的圖像(每張圖像的大小為8×8像素)。每一行表示數據矩陣中的一幅圖像。用下面的代碼加載并顯示數據集中的前25位數字:
import numpy as np
import matplotlib.pylab as plt
from sklearn.datasets import load_digits
from sklearn.preprocessing import StandardScaler
from sklearn.decomposition import PCA
from sklearn.pipeline import Pipeline


digits = load_digits()
#print(digits.keys())
print(digits.data.shape)
j = 1
np.random.seed(1)
fig = plt.figure(figsize=(3,3))
fig.subplots_adjust(left=0, right=1, bottom=0, top=1, hspace=0.05,wspace=0.05)
for i in np.random.choice(digits.data.shape[0], 25):
    plt.subplot(5,5,j), plt.imshow(np.reshape(digits.data[i,:], (8,8)),cmap='binary'),
plt.axis('off')
    j += 1
plt.show()
運行上述代碼,輸出數據集中的前25位手寫數字,如圖4所示。
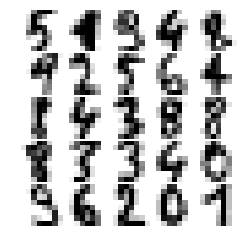
圖4數據集中的前25個數字
二維投影與可視化。從加載的數據集可以看出,它是一個64維的數據集。現在,首先利用scikit-learn的PCA()函數來找到這個數據集的兩個主要成分并將數據集沿著兩個維度進行投影;其次利用Matplotlib和表示圖像(數字)的每個數據點,對投影數據進行散點繪圖,數字標簽用一種獨特的顏色表示,如下面的代碼所示:
pca_digits=PCA(2)
digits.data_proj = pca_digits.fit_transform(digits.data)
print(np.sum(pca_digits.explained_variance_ratio_))
# 0.28509364823696987
plt.figure(figsize=(15,10))
plt.scatter(digits.data_proj[:, 0], digits.data_proj[:, 1], lw=0.25,
c=digits.target, edgecolor='k', s=100, cmap=plt.cm.get_cmap('cubehelix',10))
plt.xlabel('PC1', size=20), plt.ylabel('PC2', size=20), plt.title('2D
Projection of handwritten digits with PCA', size=25)
plt.colorbar(ticks=range(10), label='digit value')
plt.clim(-0.5, 9.5)
運行上述代碼,輸出結果如圖5所示。可以看到,在沿PC1和PC2兩個方向的二維投影中,數字有某種程度的分離(雖然有些重疊),而相同的數字值則出現在集群附近。
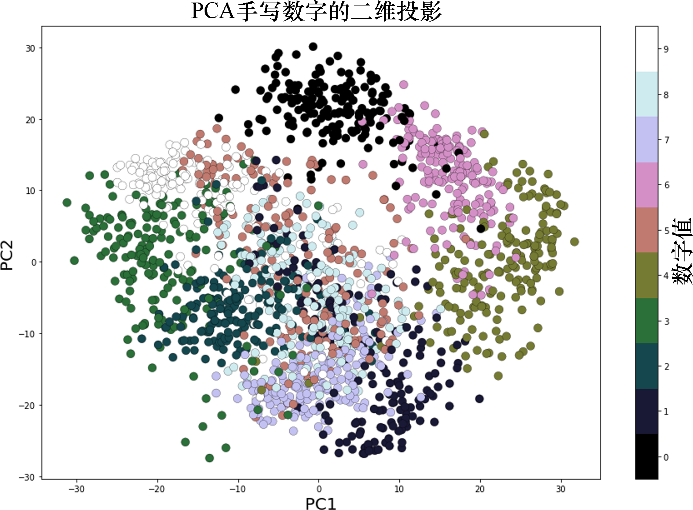
圖5利用PCA進行手寫數字的二維投影的顏色散布圖
2.基于PCA的特征臉
加載scikit-learn包的olivetti人臉數據集,其中包含400張人臉圖像,每張圖像的大小為64×64像素。如下代碼顯示了數據集中的一些隨機面孔:
from sklearn.datasets import fetch_olivetti_faces
faces = fetch_olivetti_faces().data
print(faces.shape) # there are 400 faces each of them is of 64x64=4096 pixels
fig = plt.figure(figsize=(5,5))
fig.subplots_adjust(left=0, right=1, bottom=0, top=1, hspace=0.05, wspace=0.05)
# plot 25 random faces
j = 1
np.random.seed(0)
for i in np.random.choice(range(faces.shape[0]), 25):
    ax = fig.add_subplot(5, 5, j, xticks=[], yticks=[])
    ax.imshow(np.reshape(faces[i,:],(64,64)), cmap=plt.cm.bone,interpolation='nearest')
    j += 1
plt.show()
運行上述代碼,輸出從數據集中隨機選取的25張人臉圖像,如圖6所示。
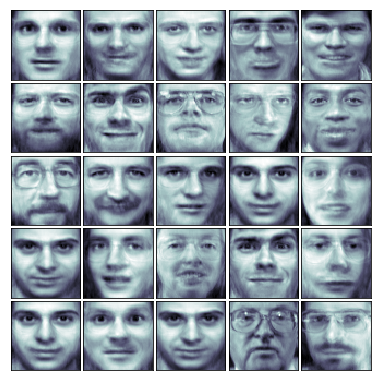
圖6從數據集中隨機選取的人臉圖像
接下來,對數據集進行預處理,在對圖像應用PCA之前先執行z分數歸一化(從所有人臉中減去平均人臉,然后除以標準差),這是必要的步驟;然后,使用PCA()計算主成分,只選取64個(而不是4096個)主成分,并將數據集投射到PC方向上,如下面的代碼所示,并通過選擇越來越多的主成分來可視化圖像數據集的方差。
from sklearn.preprocessing import StandardScaler
from sklearn.decomposition import PCA
from sklearn.pipeline import Pipeline
n_comp =64
pipeline = Pipeline([('scaling', StandardScaler()), ('pca',PCA(n_components=n_comp))])
faces_proj = pipeline.fit_transform(faces)
print(faces_proj.shape)
# (400, 64)
mean_face = np.reshape(pipeline.named_steps['scaling'].mean_, (64,64))
sd_face = np.reshape(np.sqrt(pipeline.named_steps['scaling'].var_),(64,64))
pylab.figure(figsize=(8, 6))
pylab.plot(np.cumsum(pipeline.named_steps['pca'].explained_variance_ratio_)
, linewidth=2)
pylab.grid(), pylab.axis('tight'), pylab.xlabel('n_components'),
pylab.ylabel('cumulative explained_variance_ratio_')
pylab.show()
pylab.figure(figsize=(10,5))
pylab.subplot(121), pylab.imshow(mean_face, cmap=pylab.cm.bone),
pylab.axis('off'), pylab.title('Mean face')
pylab.subplot(122), pylab.imshow(sd_face, cmap=pylab.cm.bone),
pylab.axis('off'), pylab.title('SD face')
pylab.show()
運行上述代碼,輸出結果如圖7所示。可以看到,大約90%的方差僅由前64個主成分所主導。
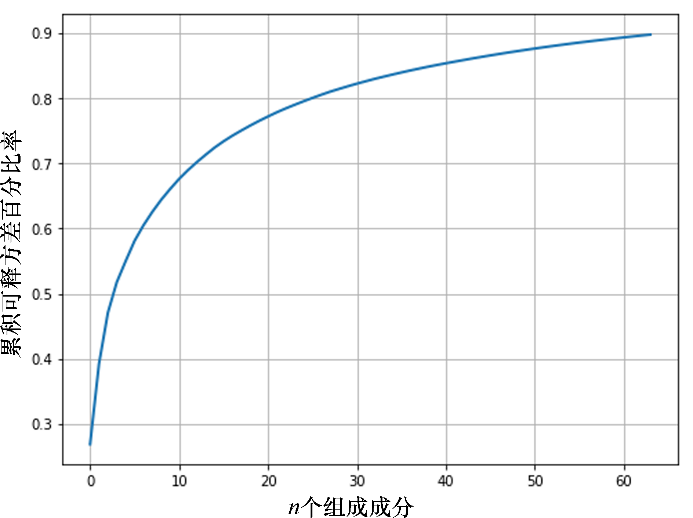
圖764個主成分的累積方差占比
從數據集中計算得到的人臉圖像的均值和標準差如圖8所示。
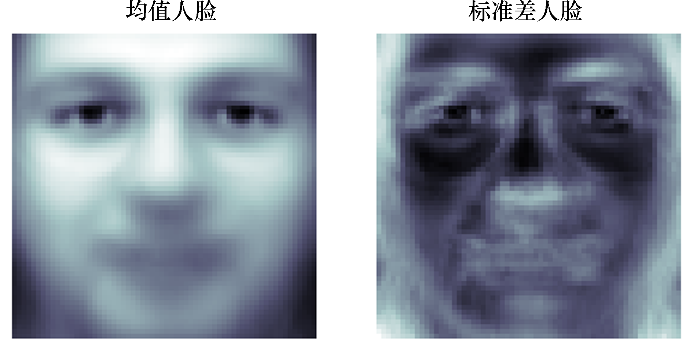
圖8人臉圖像數據集的均值與標準差圖像
(1)特征臉。在主成分分析的基礎上,計算得到的兩PC方向相互正交,每個PC包含4096個像素,并且可以重構成大小的64×64像素的圖像。稱這些主成分為特征臉(因為它們也是特征向量)。
可以看出,特征臉代表了人臉的某些屬性。如下代碼用于顯示一些計算出來的特征臉:
fig = plt.figure(figsize=(5,2))
fig.subplots_adjust(left=0, right=1, bottom=0, top=1, hspace=0.05,wspace=0.05)
# plot the first 10 eigenfaces
for i in range(10):
    ax = fig.add_subplot(2, 5, i+1, xticks=[], yticks=[])
    ax.imshow(np.reshape(pipeline.named_steps['pca'].components_[i,:],
    (64,64)), cmap=plt.cm.bone, interpolation='nearest')
運行上述代碼,輸出前10張特征臉,如圖9所示。
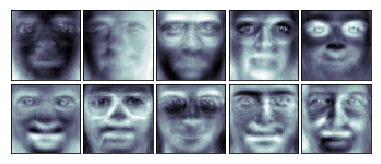
圖9主成分重構的前10張特征臉
(2)重建。如下代碼演示了如何將每張人臉近似地表示成這64張主要特征臉的線性組合。使用scikit-learn中的inverse_transform()函數變換回到原空間,但是只基于這64張主特征臉,而拋棄所有其他特征臉。
# face reconstruction
faces_inv_proj = pipeline.named_steps['pca'].inverse_transform(faces_proj)
#reshaping as 400 images of 64x64 dimension
fig = plt.figure(figsize=(5,5))
fig.subplots_adjust(left=0, right=1, bottom=0, top=1, hspace=0.05,wspace=0.05)
# plot the faces, each image is 64 by 64 dimension but 8x8 pixels
j = 1
np.random.seed(0)
for i in np.random.choice(range(faces.shape[0]), 25):
    ax = fig.add_subplot(5, 5, j, xticks=[], yticks=[])
    ax.imshow(mean_face + sd_face*np.reshape(faces_inv_proj,(400,64,64))
     [i,:], cmap=plt.cm.bone, interpolation='nearest')
    j += 1
運行上述代碼,從64張特征人臉中隨機選擇25張重建的人臉圖像,如圖10所示。可以看到,它們看起來很像原始的人臉(沒有很多明顯的錯誤)。
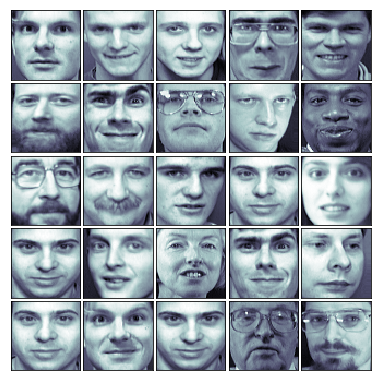
圖10由特征人臉重建的人臉圖像
如下代碼有助于更近距離地觀察原始人臉,并將其與重建后的人臉進行對比:如下代碼的輸出結果如圖11所示。可以看到,重構后的人臉與原始人臉近似,但存在某種程度的失真。
orig_face = np.reshape(faces[0,:], (64,64))
reconst_face =np.reshape(faces_proj[0,:]@pipeline.named_steps['pca'].components_,
(64,64))
reconst_face = mean_face + sd_face*reconst_face
plt.figure(figsize=(10,5))
plt.subplot(121), plt.imshow(orig_face, cmap=plt.cm.bone,
interpolation='nearest'), plt.axis('off'), plt.title('original', size=20)
plt.subplot(122), plt.imshow(reconst_face, cmap=plt.cm.bone,
interpolation='nearest'), plt.axis('off'), plt.title('reconstructed',
size=20)
plt.show()
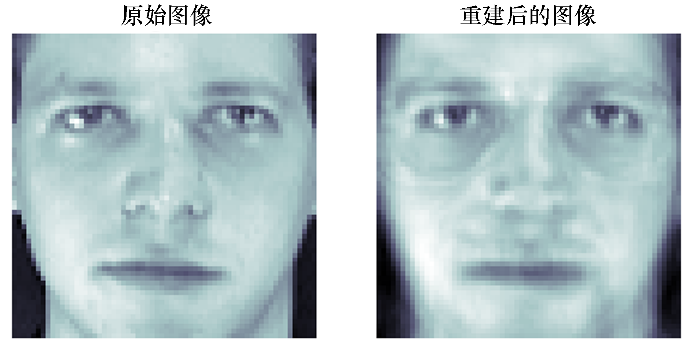
圖11重建后的人臉圖像與原始人臉圖像對比
(3)特征分解。每張人臉都可以表示為64張特征臉的線性組合。每張特征臉對于不同的人臉圖像有不同的權重(負載)。圖12顯示了如何用特征臉表示人臉,并顯示了前幾個相應的權重。其實現代碼留給讀者作為練習。

圖12由特征臉進行線性組合,重建人臉圖像
Part3 監督機器學習
在本節中,我們將討論圖像分類問題。使用的輸入數據集是MNIST,這是機器學習中的一個經典數據集,由28像素×28像素的手寫數字的灰度圖像組成。
原始訓練數據集包含60000個樣本(手寫數字圖像和標簽,用于訓練機器學習模型),測試數據集包含10000個樣本(手寫數字圖像和標簽作為基本事實,用于測試所學習模型的準確性)。給定一組手寫數字和圖像及其標簽(0~9),目標是學習一種機器學習模型,該模型可以自動識別不可見圖像中的數字,并為圖像分配一個標簽(0~9)。具體步驟如下。
(1)首先,使用訓練數據集訓練一些監督機器學習(多類分類)模型(分類器)。
(2)其次,它們將用于預測來自測試數據集的圖像的標簽。
(3)然后將預測的標簽與基本真值標簽進行比較,以評估分類器的性能。
訓練、預測和評估基本分類模型的步驟如圖13所示。當在訓練數據集上訓練更多不同的模型(可能是使用不同的算法,或者使用相同的算法但算法具有不同的超參數值)時,為了選擇最好的模型,需要第三個數據集,也就是驗證數據集(訓練數據集分為兩部分,一個用于訓練,另一個待驗證),用于模型選擇和超參調優。
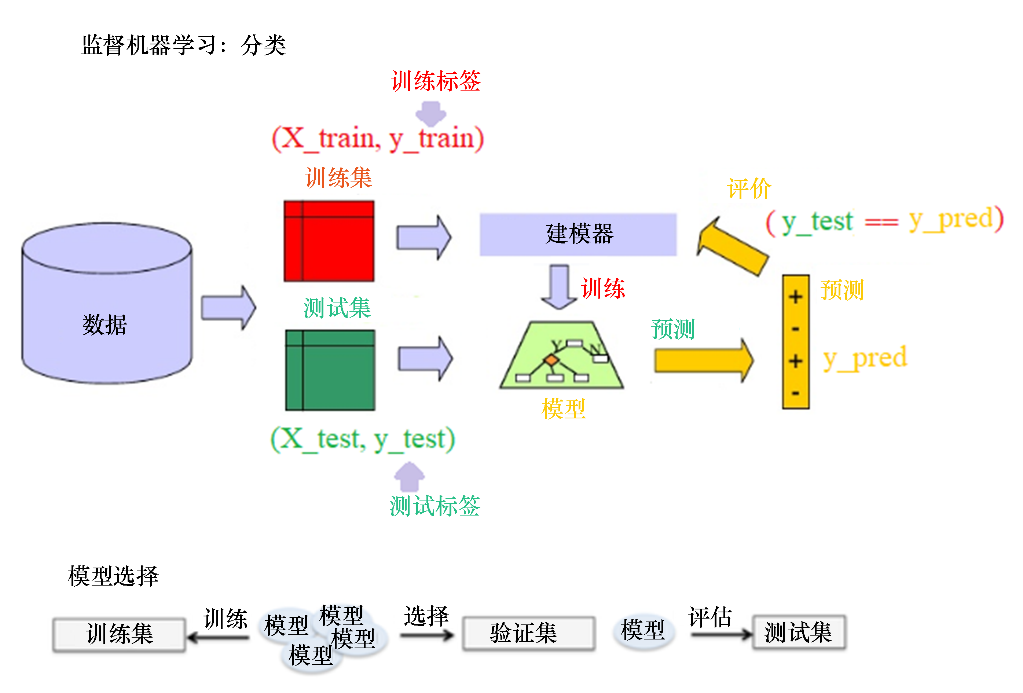
圖13監督機器學習圖像分類的流程
同樣,先導入所需的庫,如下面的代碼所示:
%matplotlib inline
import gzip, os, sys
import numpy as np
from scipy.stats import multivariate_normal
from urllib.request import urlretrieve
import matplotlib.pyplot as pylab
01
下載MNIST(手寫數字)數據集
從下載MNIST數據集開始。如下代碼展示了如何下載訓練數據集和測試數據集:
# Function that downloads a specified MNIST data file from Yann Le Cun's website
def download(filename, source='http://yann.lecun.com/exdb/mnist/'):
    print("Downloading %s" % filename)
    urlretrieve(source + filename, filename)


# Invokes download() if necessary, then reads in images
def load_mnist_images(filename):
    if not os.path.exists(filename):
        download(filename)
    with gzip.open(filename, 'rb') as f:
        data = np.frombuffer(f.read(), np.uint8, offset=16)
    data = data.reshape(-1,784)
    return data
def load_mnist_labels(filename):
    if not os.path.exists(filename):
        download(filename)
    with gzip.open(filename, 'rb') as f:
        data = np.frombuffer(f.read(), np.uint8, offset=8)
    return data


## Load the training set
train_data = load_mnist_images('train-images-idx3-ubyte.gz')
train_labels = load_mnist_labels('train-labels-idx1-ubyte.gz')
## Load the testing set
test_data = load_mnist_images('t10k-images-idx3-ubyte.gz')
test_labels = load_mnist_labels('t10k-labels-idx1-ubyte.gz')


print(train_data.shape)
# (60000, 784) ## 60k 28x28 handwritten digits
print(test_data.shape)
# (10000, 784) ## 10k 2bx28 handwritten digits
02
可視化數據集
每個數據點存儲為784維向量。為了可視化一個數據點,需要將其重塑為一個28像素×28像素的圖像。如下代碼展示了如何顯示測試數據集中的手寫數字:
## Define a function that displays a digit given its vector representation
def show_digit(x, label):
 pylab.axis('off')
 pylab.imshow(x.reshape((28,28)), cmap=pylab.cm.gray)
 pylab.title('Label ' + str(label))


pylab.figure(figsize=(10,10))
for i in range(25):
 pylab.subplot(5, 5, i+1)
 show_digit(test_data[i,], test_labels[i])
pylab.tight_layout()
pylab.show()
圖14所示的是來自測試數據集的前25個手寫數字及其真相 (true)標簽。在訓練數據集上訓練的KNN分類器對這個未知的測試數據集的標簽進行預測,并將預測的標簽與真相標簽進行比較,以評價分類器的準確性。
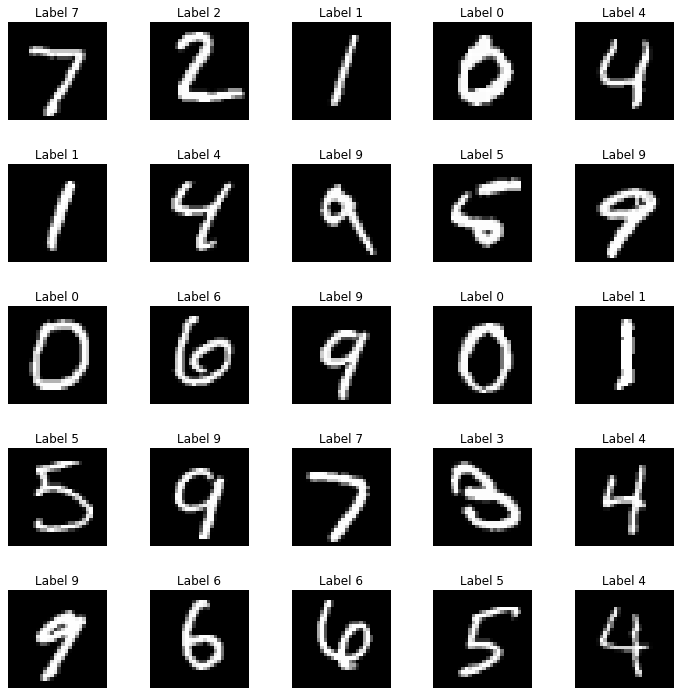
圖14測試數據集的前25個手寫數字及其真相標簽
03
通過訓練KNN、高斯貝葉斯和SVM模型對MNIST數據集分類
用scikit-learn庫函數實現以下分類器:K最近鄰分類算法、高斯貝葉斯分類器(生成模型)、支持向量機分類器。
從K最近鄰分類器開始介紹。
1.K最近鄰分類器
本節將構建一個分類器,該分類器用于接收手寫數字的圖像,并使用一種稱為最近鄰分類器的特別簡單的策略輸出標簽(0~9)。預測看不見的測試數字圖像的方法是非常簡單的。首先,只需要從訓練數據集中找到離測試圖像最近的k個實例;其次,只需要簡單地使用多數投票來計算測試圖像的標簽,也就是說,來自k個最近的訓練數據點的大部分數據點的標簽將被分配給測試圖像(任意斷開連接)。
(1)歐氏距離平方。欲計算數據集中的最近鄰,必須計算數據點之間的距離。自然距離函數是歐氏距離,對于兩個向量x, y∈Rd,其歐氏距離定義為:

通常省略平方根,只計算歐氏距離的平方。對于最近鄰計算,這兩個是等價的:對于3個向量x, y, z∈Rd,當且僅當||x?y||2≤||x?z||2時,才有||x?y||≤||x?z||成立。因此,現在只需要計算歐氏距離的平方。
(2)計算最近鄰。k最近鄰的一個簡單實現就是掃描每個測試圖像的每個訓練圖像。以這種方式實施的最近鄰分類需要遍歷訓練集才能對單個點進行分類。如果在Rd中有N個訓練點,時間花費將為O (Nd),這是非常緩慢的。幸運的是,如果愿意花一些時間對訓練集進行預處理,就有更快的方法來執行最近鄰查找。scikit-learn庫有兩個有用的最近鄰數據結構的快速實現:球樹和k-d樹。如下代碼展示了如何在訓練時創建一個球樹數據結構,然后在測試1?NN(k=1)時將其用于快速最近鄰計算:
import time
from sklearn.neighbors import BallTree


## Build nearest neighbor structure on training data
t_before = time.time()
ball_tree = BallTree(train_data)
t_after = time.time()


## Compute training time
t_training = t_after - t_before
print("Time to build data structure (seconds): ", t_training)


## Get nearest neighbor predictions on testing data
t_before = time.time()
test_neighbors = np.squeeze(ball_tree.query(test_data, k=1,return_distance=False))
test_predictions = train_labels[test_neighbors]
t_after = time.time()


## Compute testing time
t_testing = t_after - t_before
print("Time to classify test set (seconds): ", t_testing)
# Time to build data structure (seconds): 20.65474772453308
# Time to classify test set (seconds): 532.3929145336151
(3)評估分類器的性能。接下來將評估分類器在測試數據集上的性能。如下代碼展示了如何實現這一點:
# evaluate the classifier
t_accuracy = sum(test_predictions == test_labels) / float(len(test_labels))
t_accuracy
# 0.96909999999999996


import pandas as pd
import seaborn as sn
from sklearn import metrics


cm = metrics.confusion_matrix(test_labels,test_predictions)
df_cm = pd.DataFrame(cm, range(10), range(10))
sn.set(font_scale=1.2)#for label size
sn.heatmap(df_cm, annot=True,annot_kws={"size": 16}, fmt="g")
運行上述代碼,輸出混淆矩陣,如圖15所示。可以看到,雖然訓練數據集的整體準確率達到96.9%,但仍存在一些錯誤分類的測試圖像。
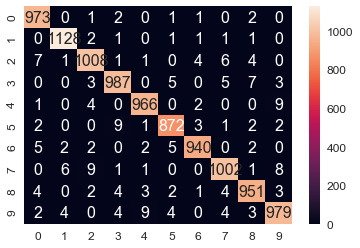
圖15混淆矩陣
圖16中,當1-NN預測標簽和,True標簽均為0時,預測成功;當1-NN預測標簽為2,True標簽為3時,預測失敗。
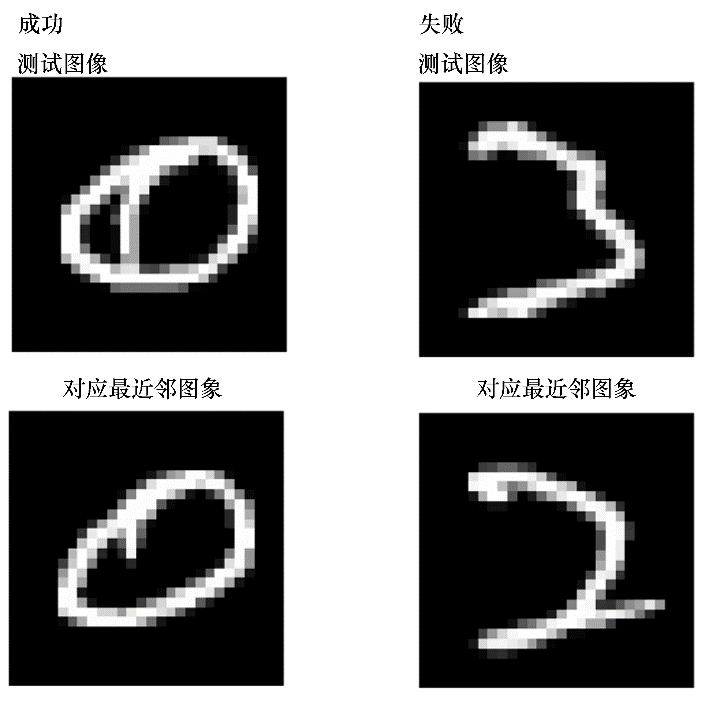
圖16預測數字成功與失敗的情形
其中預測數字成功和失敗情形的代碼留給讀者作為練習。
2.貝葉斯分類器(高斯生成模型)
正如我們在上一小節所看到的,1-NN分類器對手寫數字MNIST數據集的測試錯誤率為3.09%。現在,我們將構建一個高斯生成模型,使其幾乎可以達到同樣的效果,但明顯更快、更緊湊。同樣,必須像上次一樣首先加載MNIST訓練數據集和測試數據集,然后將高斯生成模型擬合到訓練數據集中。
(1)訓練生成模型——計算高斯參數的最大似然估計。下面定義了一個函數fit_generative_model(),它接收一個訓練集(x數據和y標簽)作為輸入,并將高斯生成模型與之匹配。對于每個標簽j = 0,1,…,9,返回以下幾種生成模型的參數。
πj:標簽的頻率(即優先的);
μj:784維平均向量;
∑j:784×784協方差矩陣。這意味著π是10×1、μ是10×784、∑是10×784×784的矩陣。最大似然估計(Maximum Likelihood Estimates,MLE)為經驗估計,如圖17所示。
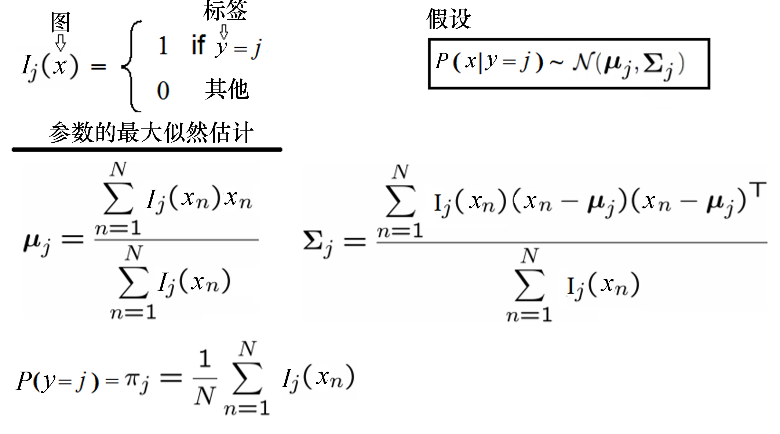
圖17最大似然估計
經驗協方差很可能是奇異的(或接近奇異),這意味著不能用它們來計算,因此對這些矩陣進行正則化是很重要的。這樣做的標準方法是加上c*I,其中c是一個常數,I是784維單位矩陣(換言之,先計算經驗協方差,然后將它們的對角元素增加某個常數c)。
對于任何c > 0,無論c多么小,這樣修改可以確保產生非奇異的協方差矩陣。現在c成為一個(正則化)參數,通過適當地設置它,可以提高模型的性能。為此,應該選擇一個好的c值。然而至關重要的是需要單獨使用訓練集來完成,通過將部分訓練集作為驗證集,或者使用某種交叉驗證。這將作為練習留給讀者完成。特別地,display_char()函數將用于可視化前3位數字的高斯均值,如下面的代碼所示:
def display_char(image):
    plt.imshow(np.reshape(image, (28,28)), cmap=plt.cm.gray)
    plt.axis('off'),plt.show()


def fit_generative_model(x,y):
    k = 10 # labels 0,1,...,k-1
    d = (x.shape)[1] # number of features
    mu = np.zeros((k,d))
    sigma = np.zeros((k,d,d))
    pi = np.zeros(k)
    c = 3500 #10000 #1000 #100 #10 #0.1 #1e9
    for label in range(k):
          indices = (y == label)
          pi[label] = sum(indices) / float(len(y))
          mu[label] = np.mean(x[indices,:], axis=0)
          sigma[label] = np.cov(x[indices,:], rowvar=0, bias=1) + c*np.eye(d)
return mu, sigma, pi


mu, sigma, pi = fit_generative_model(train_data, train_labels)
display_char(mu[0])
display_char(mu[1])
display_char(mu[2])
運行上述代碼,輸出前3位數字的平均值的最大似然估計,如圖18所示。

圖18前3位數字的平均值的最大似然估計
(2)計算后驗概率,以對試驗數據進行預測和模型評價。為了預測新圖像的標簽x,需要找到標簽j,其后驗概率Pr(y = j|x)最大。可以用貝葉斯規則計算,如圖19所示。

圖19貝葉斯計算規則
如下代碼展示了如何使用生成模型預測測試數據集的標簽,以及如何計算模型在測試數據集上產生錯誤的數量。可以看出,測試數據集的準確率為95.6%,略低于1-NN分類器。
# Compute log Pr(label|image) for each [test image,label] pair.
k = 10
score = np.zeros((len(test_labels),k))
for label in range(0,k):
 rv = multivariate_normal(mean=mu[label], cov=sigma[label])
 for i in range(0,len(test_labels)):
      score[i,label] = np.log(pi[label]) + rv.logpdf(test_data[i,:])
test_predictions = np.argmax(score, axis=1)
# Finally, tally up score
errors = np.sum(test_predictions != test_labels)
print("The generative model makes " + str(errors) + " errors out of 10000")
# The generative model makes 438 errors out of 10000
t_accuracy = sum(test_predictions == test_labels) / float(len(test_labels)
t_accuracy
# 0.95620000000000005
3.SVM分類器
本節將使用MNIST訓練數據集訓練(多類)支持向量機(SVM)分類器,然后用它預測來自MNIST測試數據集的圖像的標簽。
支持向量機是一種非常復雜的二值分類器,它使用二次規劃來最大化分離超平面之間的邊界。利用1︰全部或1︰1技術,將二值SVM分類器擴展到處理多類分類問題。使用scikit-learn的實現SVC(),它具有多項式核(二次),利用訓練數據集來擬合(訓練)軟邊緣(核化)SVM分類器,然后用score()函數預測測試圖像的標簽。
如下代碼展示了如何使用MNIST數據集訓練、預測和評估SVM分類器。可以看到,使用該分類器在測試數據集上所得到的準確率提高到了98%。
from sklearn.svm import SVC
clf = SVC(C=1, kernel='poly', degree=2)
clf.fit(train_data,train_labels)
print(clf.score(test_data,test_labels))
# 0.9806
test_predictions = clf.predict(test_data)
cm = metrics.confusion_matrix(test_labels,test_predictions)
df_cm = pd.DataFrame(cm, range(10), range(10))
sn.set(font_scale=1.2)
sn.heatmap(df_cm, annot=True,annot_kws={"size": 16}, fmt="g")
運行上述代碼,輸出混淆矩陣,如圖20所示。
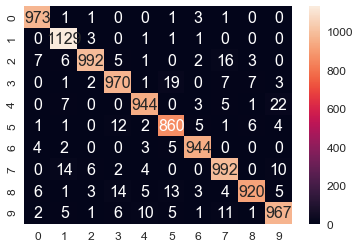
圖20混淆矩陣
接下來,找到SVM分類器預測錯誤標簽的測試圖像(與真實標簽不同)。
如下代碼展示了如何找到這樣一幅圖像,并將其與預測的和真實的標簽一起顯示:
wrong_indices = test_predictions != test_labels
wrong_digits, wrong_preds, correct_labs = test_data[wrong_indices],
test_predictions[wrong_indices], test_labels[wrong_indices]
print(len(wrong_pred))
# 194
pylab.title('predicted: ' + str(wrong_preds[1]) +', actual: ' +str(correct_labs[1]))
display_char(wrong_digits[1])
運行上述代碼,輸出結果如圖21所示。可以看到,測試圖像具有真實的標簽2,但圖像看起來卻更像7,因此SVM預測為7。
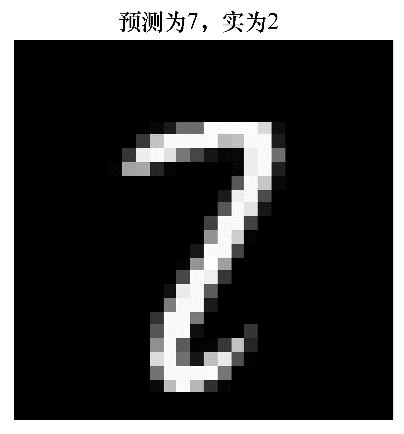
圖21預測為7而實際為2的情形
-
圖像處理
+關注
關注
27文章
1296瀏覽量
56819 -
圖像分類
+關注
關注
0文章
90瀏覽量
11943 -
機器學習
+關注
關注
66文章
8428瀏覽量
132835
原文標題:【光電智造】圖像處理中的經典機器學習方法
文章出處:【微信號:今日光電,微信公眾號:今日光電】歡迎添加關注!文章轉載請注明出處。
發布評論請先 登錄
相關推薦
機器視覺在布匹生產在線檢測系統應用
機器視覺表面缺陷檢測技術
基于深度學習技術的智能機器人
圖像分類的方法之深度學習與傳統機器學習
如何使用深度學習進行視頻行人目標檢測


 機器學習技術在圖像分類和目標檢測上的應用


評論