Arduino對于不是電子背景的人來說是一個福音,可以輕松構建東西。這是一個很棒的原型工具,或者嘗試一些很酷的東西,在這個項目中,我們將使用 Arduino 構建一架小而有趣的鋼琴。這架鋼琴非常簡單,只有8個按鈕和蜂鳴器。它使用Arduino的tone()函數在揚聲器上創建各種類型的鋼琴音符。為了給它增添趣味,我們在項目中添加了錄音功能,這使我們能夠播放一首曲子,并在需要時重復播放。聽起來很有趣吧!!所以讓我們開始建設吧。
所需材料:
Arduino Uno
16 * 2液晶顯示器
蜂鳴器
修剪器 10k
單刀雙擲開關
按鈕 (8 否)
電阻器 (10k, 560R, 1.5k, 2.6k, 3.9, 5.6k, 6.8k, 8.2k, 10k)
面包板
連接線
電路圖:
完整的Arduino鋼琴項目可以構建在帶有一些連接線的面包板上。使用弗里茨制作的電路圖顯示了項目的試驗板視圖,如下所示
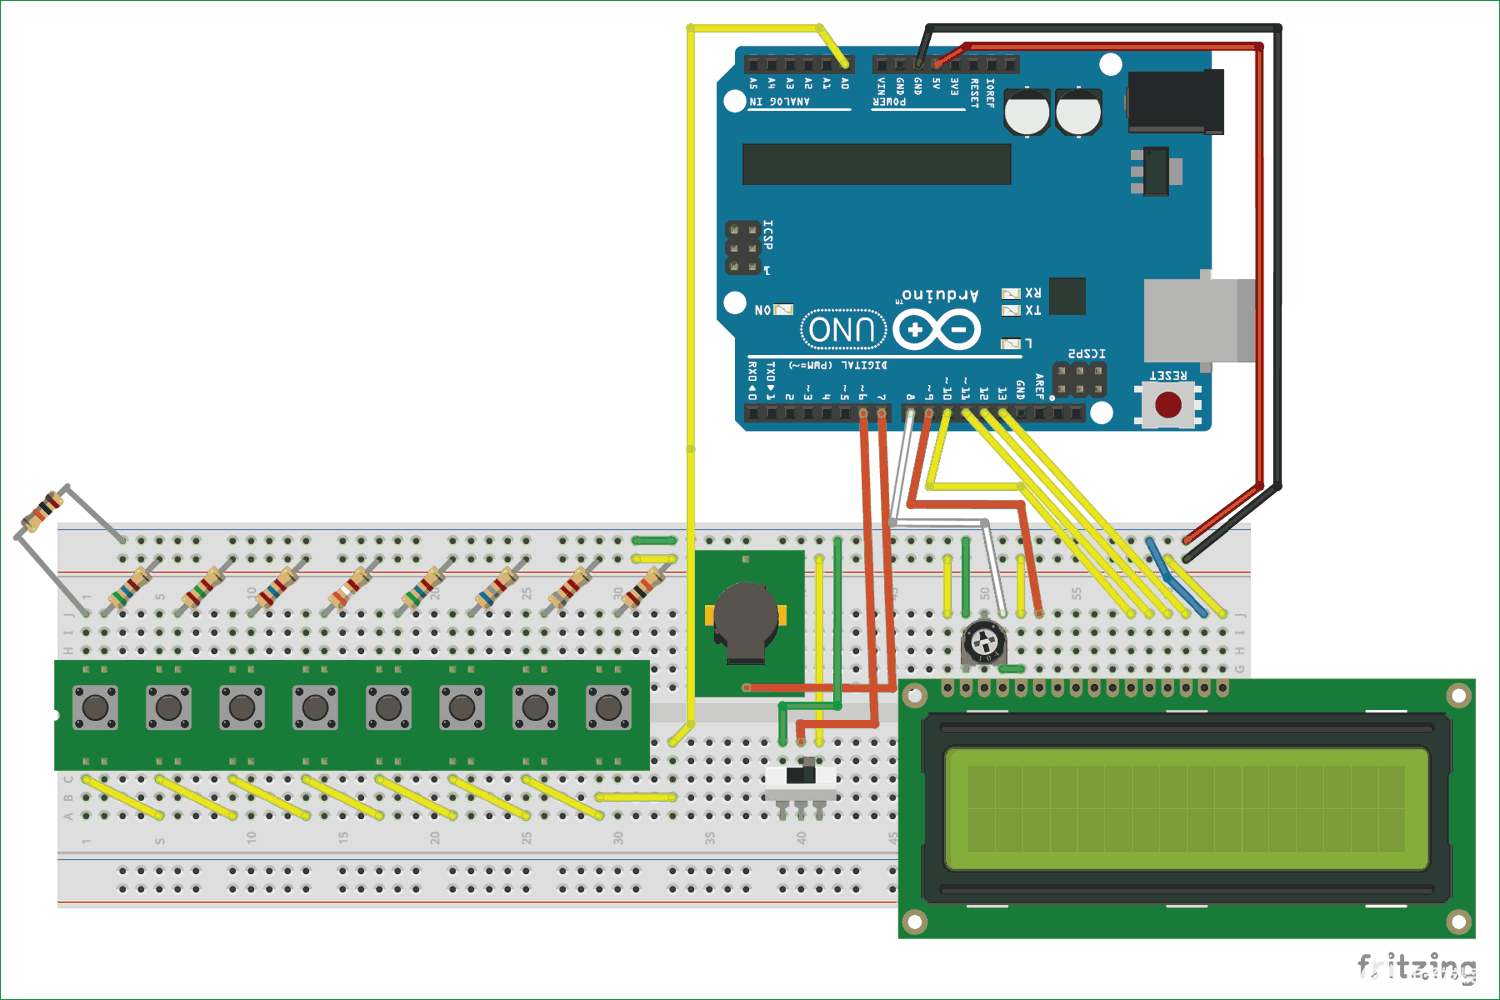
只需按照電路圖并相應地連接電線,按鈕和蜂鳴器與PCB模塊一起使用,但在實際硬件中,我們只使用了開關和蜂鳴器,它不應該讓您感到困惑,因為它們具有相同類型的引腳輸出。您還可以參考下面的硬件圖像進行連接。
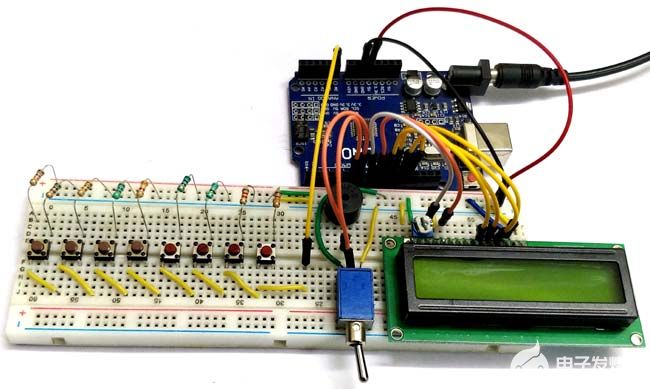
左起電阻值按以下順序排列,10k、560R、1.5k、2.6k、3.9、5.6k、6.8k、8.2k 和 10k。如果您沒有相同的DPST開關,則可以使用普通的撥動開關,如上面的電路圖所示。現在讓我們看看項目的原理圖,以了解為什么我們進行了以下連接。
原理圖和解釋:
上面顯示的電路圖原理圖如下,也是使用Fritzing制作的。
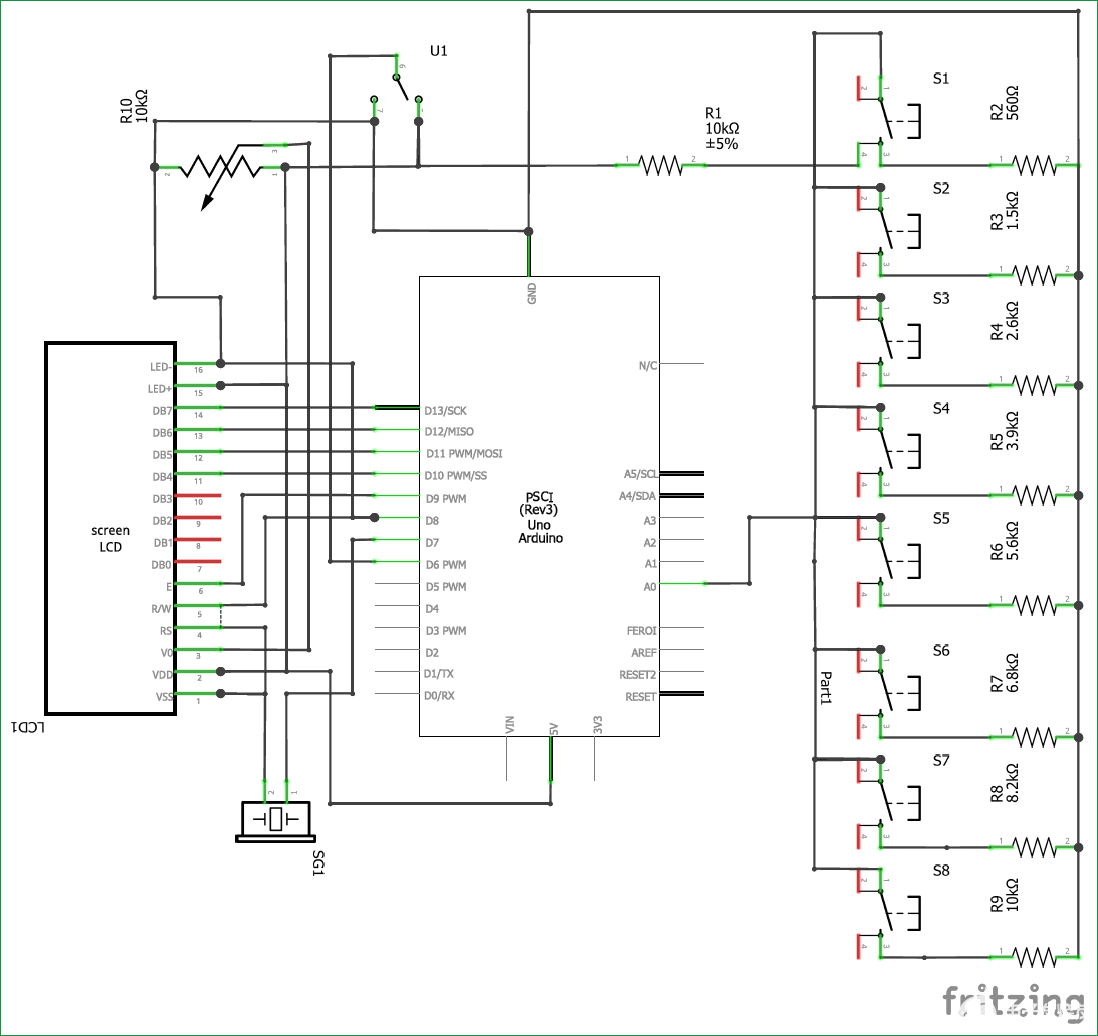
我們必須了解的一個主要連接是我們如何通過模擬A8引腳將8個按鈕連接到Arduino。基本上我們需要 8 個輸入引腳,可以連接到 8 個輸入按鈕,但對于這樣的項目,我們不能將微控制器的 8 個引腳僅用于按鈕,因為我們可能需要它們供以后使用。在我們的例子中,我們有要接口的LCD顯示器。
因此,我們使用Arduino的模擬引腳,并形成具有不同電阻值的電位分壓器來完成電路。這樣,當按下每個按鈕時,將向模擬引腳提供不同的模擬電壓。下面顯示了僅具有兩個電阻和兩個按鈕的示例電路。
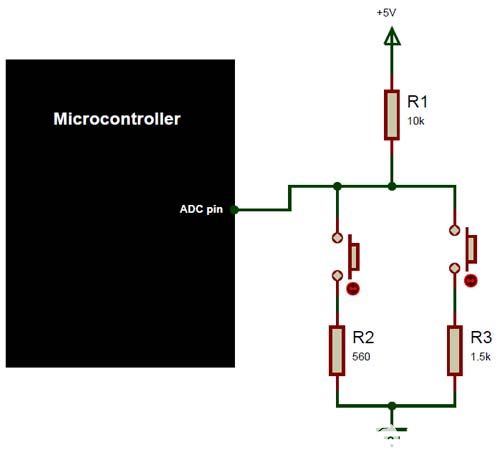
在這種情況下,當按鈕未按下時,ADC引腳將接收+5V,如果按下第一個按鈕,則電位分壓器通過560R電阻完成,如果按下第二個按鈕,則使用1.5k電阻競爭電位分壓器。這樣,ADC引腳接收到的電壓將根據分壓器的公式而變化。如果您想了解更多關于分壓器的工作原理以及如何計算ADC引腳接收到的電壓值,則可以使用此電位分壓器計算器頁面。
除此之外,所有連接都是直截了當的,LCD 連接到引腳 8、9、10、11 和 12。蜂鳴器連接到引腳 7,SPDT 開關連接到 Arduino 的引腳 6。整個項目通過筆記本電腦的USB端口供電。您還可以通過直流插孔將Arduino連接到9V或12V電源,項目仍將正常工作。
了解 Arduino 的Tone()函數:
Arduino有一個方便的tone()函數,可用于生成不同的頻率信號,這些信號可用于使用蜂鳴器產生不同的聲音。因此,讓我們了解該功能的工作原理以及如何將其與Arduino一起使用。
在此之前,我們應該知道壓電蜂鳴器的工作原理.我們可能在我們學校了解過壓電晶體, 它只不過是一種將機械振動轉化為電能的晶體,反之亦然.在這里,我們應用一個可變的電流(頻率),晶體振動從而產生聲音。因此,為了使壓電蜂鳴器產生一些噪音,我們必須使壓電晶體振動,噪聲的音調和音調取決于晶體振動的速度.因此,可以通過改變電流頻率來控制音調和音高。
好的,那么我們如何從Arduino獲得可變頻率呢?這就是音調()函數的用武之地。音調()可以在特定引腳上生成特定頻率。如果需要,也可以提及持續時間。音調 () 的語法是
Syntax
tone(pin, frequency) tone(pin, frequency, duration)
pin: the pin on which to generate the tone frequency: the frequency of the tone in hertz – unsigned int duration: the duration of the tone in milliseconds (optional1) – unsigned long
引腳的值可以是您的任何數字引腳。我在這里使用了引腳 8。可以生成的頻率取決于Arduino板中計時器的大小。對于UNO和大多數其他常見板,可以產生的最小頻率為31Hz,可以產生的最大頻率為65535Hz。然而,我們人類只能聽到2000Hz到5000Hz之間的頻率。
在Arduino上彈奏鋼琴音調:
好的,在我開始這個話題之前,讓我明確一點,我是一個音符或鋼琴的新手,所以如果這個標題下提到的任何內容都是胡言亂語,請原諒我。
我們現在知道我們可以使用 Arduino 中的音調功能來產生一些聲音,但是我們如何使用相同的音調來播放特定音符的音調。幸運的是,有一個名為“pitches.h”的圖書館,由Brett Hagman編寫。該庫包含有關哪個頻率等同于鋼琴上哪個音符的所有信息。我很驚訝這個圖書館實際上可以很好地工作并演奏鋼琴上的幾乎每個音符,我用同樣的東西來彈奏加勒比海盜、瘋狂青蛙、馬里奧甚至泰坦尼克號的鋼琴音符,它們聽起來很棒。哎呀!我們在這里有點偏離主題,所以如果你對此感興趣,請查看使用Arduino項目播放旋律。您還可以在該項目中找到有關pitches.h庫的更多解釋。
我們的項目只有 8 個按鈕,因此每個按鈕只能播放一個特定的音符,因此我們總共只能播放 8 個音符。我選擇了鋼琴上最常用的音符,但是您可以選擇任何8個,甚至可以使用更多按鈕擴展項目并添加更多音符。
此項目中選擇的音符是音符 C4、D4、E4、F4、G4、A4、B4 和 C5,可以分別使用按鈕 1 到 8 演奏。
對 Arduino 進行編程:
足夠的理論讓我們進入Arduino編程的有趣部分。完整的Arduino程序在本頁末尾給出,如果您渴望或進一步閱讀以了解代碼的工作原理,您可以跳下來。
在我們的Arduino程序中,我們必須從引腳A0讀取模擬電壓,然后預測按下了哪個按鈕并播放該按鈕的相應音調。在執行此操作時,我們還應該記錄用戶按下了哪個按鈕以及他/她按下了多長時間,以便我們可以重新創建用戶稍后播放的音調。
在進入邏輯部分之前,我們必須聲明我們將演奏哪 8 個音符。然后從 pitches.h 庫中獲取音符的相應頻率,然后形成如下所示的數組。這里演奏音符C4的頻率是262,依此類推。
int notes[] = {262, 294, 330, 349, 392, 440, 494, 523}; // Set frequency for C4, D4, E4, F4, G4, A4, B4,
接下來我們必須提到LCD顯示器連接到哪些引腳。如果您遵循上面給出的完全相同的原理圖,則無需在此處更改任何內容。
const int rs = 8, en = 9, d4 = 10, d5 = 11, d6 = 12, d7 = 13; //Pins to which LCD is connected
LiquidCrystal lcd(rs, en, d4, d5, d6, d7);
接下來,在我們的設置功能中,我們只需初始化LCD模塊和串行監視器以進行調試。我們還會顯示介紹消息,以確保事情按計劃進行。接下來,在主循環函數中,我們有兩個 while 循環。
只要將SPDT開關放置在錄制更多內容中,就會執行一個while循環。在錄制模式下,用戶可以支付所需的音調,同時正在播放的音調也將保存。所以 while 循環如下所示
while (digitalRead(6) == 0) //If the toggle switch is set in recording mode { lcd.setCursor(0, 0); lcd.print("Recording.."); lcd.setCursor(0, 1); Detect_button(); Play_tone(); }
您可能已經注意到,我們在 while 循環中有兩個函數。第一個函數Detect_button() 用于查找用戶按下的按鈕,第二個函數Play_tone()用于播放相應的音調。除了這個函數之外,Detect_button() 函數還記錄按下了哪個按鈕,Play_tone() 函數記錄按下了多長時間。
在Detect_button()函數中,我們從引腳 A0 讀取模擬電壓,并將其與一些預定義的值進行比較,以找出按下了哪個按鈕。該值可以通過使用上面的分壓器計算器或使用串行監視器檢查每個按鈕讀取的模擬值來確定。
void Detect_button()
{
analogVal = analogRead(A0); //read the analog voltag on pin A0
pev_button = button; //remember the previous button pressed by the user
if (analogVal < 550)
button = 8;
if (analogVal < 500)
button = 7;
if (analogVal < 450)
button = 6;
if (analogVal < 400)
button = 5;
if (analogVal < 300)
button = 4;
if (analogVal < 250)
button = 3;
if (analogVal < 150)
button = 2;
if (analogVal < 100)
button = 1;
if (analogVal > 1000)
button = 0;
/****Rcord the pressed buttons in a array***/
if (button != pev_button && pev_button != 0)
{
recorded_button[button_index] = pev_button;
button_index++;
recorded_button[button_index] = 0;
button_index++;
}
/**End of Recording program**/
}
如前所述,在此功能中,我們還記錄按下按鈕的順序。記錄的值存儲在名為 recorded_button[] 的數組中。我們首先檢查是否按下了新按鈕,如果按下,我們還檢查它是否不是按鈕 0。其中按鈕 0 什么都沒有,但沒有按下按鈕。在 if 循環中,我們將值存儲在變量 button_index 給出的索引位置上,然后我們還增加此索引值,這樣我們就不會在同一位置過度寫入。
/****Rcord the pressed buttons in a array***/
if (button != pev_button && pev_button != 0)
{
recorded_button[button_index] = pev_button;
button_index++;
recorded_button[button_index] = 0;
button_index++;
}
/**End of Recording program**/
在Play_tone()函數中,我們將使用多個 if 條件播放按下按鈕的相應音調。我們還將使用一個名為 recorded_time[] 的數組,在其中我們將保存按下按鈕的持續時間。該操作類似于記錄按鈕序列,我們使用 millis() 函數來確定每個按鈕被按下了多長時間,也是為了減小變量的大小,我們將值除以 10。對于按鈕 0,這意味著用戶沒有按下任何內容,我們在相同的持續時間內沒有播放任何音調。函數內的完整代碼如下所示。
void Play_tone()
{
/****Rcord the time delay between each button press in a array***/
if (button != pev_button)
{
lcd.clear(); //Then clean it
note_time = (millis() - start_time) / 10;
recorded_time[time_index] = note_time;
time_index++;
start_time = millis();
}
/**End of Recording program**/
if (button == 0)
{
noTone(7);
lcd.print("0 -> Pause..");
}
if (button == 1)
{
tone(7, notes[0]);
lcd.print("1 -> NOTE_C4");
}
if (button == 2)
{
tone(7, notes[1]);
lcd.print("2 -> NOTE_D4");
}
if (button == 3)
{
tone(7, notes[2]);
lcd.print("3 -> NOTE_E4");
}
if (button == 4)
{
tone(7, notes[3]);
lcd.print("4 -> NOTE_F4");
}
if (button == 5)
{
tone(7, notes[4]);
lcd.print("5 -> NOTE_G4");
}
if (button == 6)
{
tone(7, notes[5]);
lcd.print("6 -> NOTE_A4");
}
if (button == 7)
{
tone(7, notes[6]);
lcd.print("7 -> NOTE_B4");
}
if (button == 8)
{
tone(7, notes[7]);
lcd.print("8 -> NOTE_C5");
}
}
最后,在錄制后,用戶必須將DPST切換到另一個方向才能播放錄制的音調。完成此操作后,程序將脫離上一個 while 循環并進入第二個 while 循環,我們按照按下的按鈕順序播放音符,持續時間為先前錄制的持續時間。執行相同操作的代碼如下所示。
while (digitalRead(6) == 1) //If the toggle switch is set in Playing mode
{
lcd.clear();
lcd.setCursor(0, 0); lcd.print("Now Playing..");
for (int i = 0; i < sizeof(recorded_button) / 2; i++)
{
delay((recorded_time[i]) * 10); //Wait for before paying next tune
if (recorded_button[i] == 0)
noTone(7); //user dint touch any button
else
tone(7, notes[(recorded_button[i] - 1)]); //play the sound corresponding to the button touched by the user
}
}
}
播放,錄制,重播和重復!:
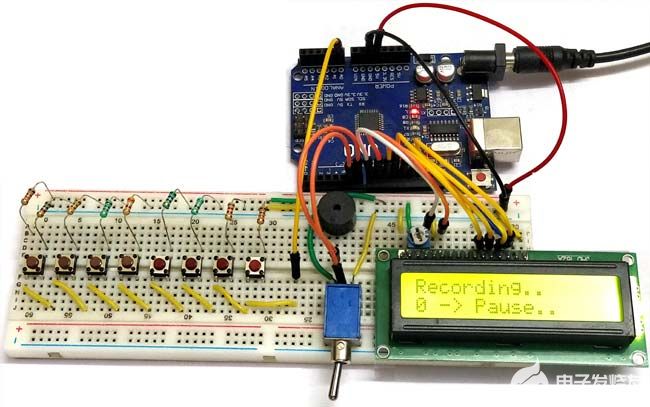
按照所示電路圖制作硬件,并將代碼上傳到Arduino板及其顯示的時間。將SPDT置于錄制模式并開始播放您選擇的音調,按下每個按鈕將產生不同的音調。在此模式下,LCD將顯示“正在錄制...”,在第二行,您將看到當前正在按下的筆記的名稱,如下所示
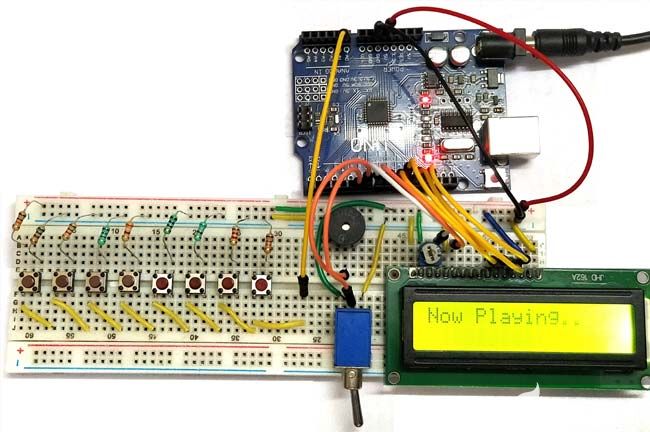
播放完音調后,將SPDT開關切換到另一側,液晶屏應顯示“正在播放....”,然后開始播放剛剛播放的音調。只要撥動開關保持在下圖所示的位置,就會一遍又一遍地播放相同的音調。
/*
Arduino based Piano and Record and play option
Code by: B. Aswinth Raj
Dated: 22-05-2017
*/
#include
int notes[] = {262, 294, 330, 349, 392, 440, 494, 523}; // Set frequency for C4, D4, E4, F4, G4, A4, B4, C5
const int rs = 8, en = 9, d4 = 10, d5 = 11, d6 = 12, d7 = 13; //Pins to which LCD is connected
LiquidCrystal lcd(rs, en, d4, d5, d6, d7);
char button = 0;
int analogVal;
char REC = 0;
int recorded_button[200];
int pev_button;
int recorded_time [200];
char time_index;
char button_index = 0;
unsigned long start_time;
int note_time;
void setup() {
Serial.begin(9600);
pinMode (6, INPUT);
lcd.begin(16, 2); //We are using a 16*2 LCD display
lcd.print("Arduino Piano"); //Display a intro message
lcd.setCursor(0, 1); // set the cursor to column 0, line 1
lcd.print("-CircuitDigest"); //Display a intro message
delay(2000); //Wait for display to show info
lcd.clear(); //Then clean it
}
void loop()
{
while (digitalRead(6) == 0) //If the toggle switch is set in recording mode
{
lcd.setCursor(0, 0); lcd.print("Recording..");
lcd.setCursor(0, 1);
Detect_button();
Play_tone();
}
while (digitalRead(6) == 1) //If the toggle switch is set in Playing mode
{
lcd.clear();
lcd.setCursor(0, 0); lcd.print("Now Playing..");
for (int i = 0; i < sizeof(recorded_button) / 2; i++)
{
delay((recorded_time[i]) * 10); //Wait for before paying next tune
if (recorded_button[i] == 0)
noTone(7); //user dint touch any button
else
tone(7, notes[(recorded_button[i] - 1)]); //play the sound corresponding to the button touched by the user
}
}
}
void Detect_button()
{
analogVal = analogRead(A0); //read the analog voltag on pin A0
pev_button = button; //remember the previous button pressed by the user
if (analogVal < 550)
button = 8;
if (analogVal < 500)
button = 7;
if (analogVal < 450)
button = 6;
if (analogVal < 400)
button = 5;
if (analogVal < 300)
button = 4;
if (analogVal < 250)
button = 3;
if (analogVal < 150)
button = 2;
if (analogVal < 100)
button = 1;
if (analogVal > 1000)
button = 0;
/****Rcord the pressed buttons in a array***/
if (button != pev_button && pev_button != 0)
{
recorded_button[button_index] = pev_button;
button_index++;
recorded_button[button_index] = 0;
button_index++;
}
/**End of Recording program**/
}
void Play_tone()
{
/****Rcord the time delay between each button press in a array***/
if (button != pev_button)
{
lcd.clear(); //Then clean it
note_time = (millis() - start_time) / 10;
recorded_time[time_index] = note_time;
time_index++;
start_time = millis();
}
/**End of Recording program**/
if (button == 0)
{
noTone(7);
lcd.print("0 -> Pause..");
}
if (button == 1)
{
tone(7, notes[0]);
lcd.print("1 -> NOTE_C4");
}
if (button == 2)
{
tone(7, notes[1]);
lcd.print("2 -> NOTE_D4");
}
if (button == 3)
{
tone(7, notes[2]);
lcd.print("3 -> NOTE_E4");
}
if (button == 4)
{
tone(7, notes[3]);
lcd.print("4 -> NOTE_F4");
}
if (button == 5)
{
tone(7, notes[4]);
lcd.print("5 -> NOTE_G4");
}
if (button == 6)
{
tone(7, notes[5]);
lcd.print("6 -> NOTE_A4");
}
if (button == 7)
{
tone(7, notes[6]);
lcd.print("7 -> NOTE_B4");
}
if (button == 8)
{
tone(7, notes[7]);
lcd.print("8 -> NOTE_C5");
}
}
-
揚聲器
+關注
關注
29文章
1308瀏覽量
63123 -
蜂鳴器
+關注
關注
12文章
892瀏覽量
46024 -
Arduino
+關注
關注
188文章
6474瀏覽量
187431
發布評論請先 登錄
相關推薦
Arduino新玩法:在紙上畫一架能彈的鋼琴
請教一個日版100V電鋼琴電源問題
第一架四軸原理圖共享
有趣的激光豎琴制作 電子資料
華夏航空迎來了2019年第一架空客A320飛機
怎么樣才能設計一架航模飛機
如何使用Arduino制作觸控電容式鋼琴
基于Arduino的鋼琴機器人
基于Arduino UNO的迷你鋼琴
基于Arduino設計的簡單小鋼琴
鋼琴老師:Arduino+LEDs+MIDI鍵盤+MuseScore


 如何使用Arduino構建一架小而有趣的鋼琴


評論