容器鏡像是一個(gè)不可變的只讀文件,基于相同鏡像文件創(chuàng)建啟動(dòng)的容器,都將獲得完全相同的Docker容器。容器是鏡像的實(shí)例,具有生命周期。
之前幾期使用的openGauss鏡像是云和恩墨提供的,openGauss源碼中已經(jīng)提供了制作腳本,可以直接使用,本篇介紹根據(jù)openGauss開(kāi)源代碼倉(cāng)已有的Docker build腳本來(lái)制作openGauss 3.0.0鏡像,自己制作的鏡像會(huì)更加安全可靠,也更方便DevOps用戶的安裝、配置和環(huán)境設(shè)置。

環(huán)境準(zhǔn)備
本篇使用的是:x86 ECS云服務(wù)器+CentOS 7.6
另外,ARM64 openEuler 20.03 LTS也是支持的。
PS:鏡像制作的話請(qǐng)盡量使用公網(wǎng)環(huán)境,內(nèi)網(wǎng)的話可能會(huì)遇到各種奇怪的問(wèn)題,即使配置好了內(nèi)網(wǎng)yum源等也還是報(bào)錯(cuò)。
docker 安裝&配置
1、參考之前《【云原生】使用Docker部署openGauss》的步驟安裝并啟動(dòng)docker服務(wù)。yum源使用的是華為云。
yum install -y yum-utils
wget -O /etc/yum.repos.d/docker-ce.repo http://repo.huaweicloud.com/docker-ce/linux/centos/docker-ce.repo
sudo sed -i 's+download.docker.com+repo.huaweicloud.com/docker-ce+' /etc/yum.repos.d/docker-ce.repo
sudo yum makecache fast
sudo yum install docker-ce
systemctl enable docker
systemctl start docker
systemctl status docker
2、設(shè)置docker加速。由于國(guó)內(nèi)直接訪問(wèn)`docker hub`網(wǎng)速很慢,拉取鏡像的時(shí)間很長(zhǎng)。通常我們使用鏡像加速或者從國(guó)內(nèi)的一些平臺(tái)鏡像倉(cāng)庫(kù)上拉取。新建`daemon.json`文件。
[]
[]
total 4
-rw------- 1 root root 244 Aug 2 21:21 key.json
[]
配置幾條國(guó)內(nèi)的加速地址。我這分別是Docker中國(guó)區(qū)的、網(wǎng)易的和中國(guó)科技大學(xué)的。
{

        "registry-mirrors": [
        "https://registry.docker-cn.com",
        "http://hub-mirror.c.163.com",
              "https://docker.mirrors.ustc.edu.cn"]

}
貼完以后, `:wq`重啟docker服務(wù)使配置生效。
[]
[]
Redirecting to /bin/systemctl restart docker.service
使用Docker build的方式生成openGauss 3.0.0鏡像鏡像
1、獲取openGauss企業(yè)版3.0.0的安裝包和源碼文件。這里我用的是CentOS,選擇的是企業(yè)版。對(duì)于只是想體驗(yàn)一下的同學(xué)來(lái)說(shuō)選擇輕量版就足夠了,步驟和主要功能是一樣的,優(yōu)點(diǎn)是包更小,占用存儲(chǔ)空間更少,缺點(diǎn)是裁掉了一些功能,具體差別見(jiàn)官方文檔。
[]
[]
環(huán)境沒(méi)有`unzip` ,自己先裝一個(gè)。然把源碼包master.zip解壓得到`openGauss-server-master`文件夾,軟件安裝包`openGauss-3.0.0-CentOS-64bit-all.tar.gz`解壓獲得二進(jìn)制安裝包`openGauss-3.0.0-CentOS-64bit.tar.bz2`。
[root@iZ2zegavrsiopm50rp12ygZ opt]# yum install unzip
[root@iZ2zegavrsiopm50rp12ygZ opt]# unzip master.zip
[root@iZ2zegavrsiopm50rp12ygZ opt]# tar -zvxf openGauss-3.0.0-CentOS-64bit-all.tar.gz

[root@iZ2zegavrsiopm50rp12ygZ opt]# ll
total 424680
-rw-r--r--  1 root root 201796837 Aug  2 21:04 master.zip
-rw-r--r--  1 root root 116068945 Apr  1 18:39 openGauss-3.0.0-CentOS-64bit-all.tar.gz
-rw-r--r--  1 root root       105 Apr  1 18:26 openGauss-3.0.0-CentOS-64bit-cm.sha256
-rw-r--r--  1 root root   6201097 Apr  1 18:26 openGauss-3.0.0-CentOS-64bit-cm.tar.gz
-rw-r--r--  1 root root        65 Apr  1 18:25 openGauss-3.0.0-CentOS-64bit-om.sha256
-rw-r--r--  1 root root  14139662 Apr  1 18:25 openGauss-3.0.0-CentOS-64bit-om.tar.gz
-rw-r--r--  1 root root        65 Apr  1 18:26 openGauss-3.0.0-CentOS-64bit.sha256
-rw-r--r--  1 root root  96246093 Apr  1 18:26 openGauss-3.0.0-CentOS-64bit.tar.bz2
drwxr-xr-x 13 root root      4096 Aug  2 19:27 openGauss-server-master
-rw-------  1 root root        65 Apr  1 18:24 upgrade_sql.sha256
-rw-------  1 root root    383932 Apr  1 18:24 upgrade_sql.tar.gz

2、因?yàn)楝F(xiàn)在要制作的是`3.0.0`版本的鏡像包,源碼下面并沒(méi)有這個(gè)版本,所以需要修改一些配置。將dockerfiles代碼庫(kù)1.1.0拷貝一份另存為3.0.0。將二進(jìn)制安裝包`openGauss-3.0.0-CentOS-64bit.tar.bz2`放到`dockerfiles`文件夾下面。因?yàn)槲业氖?/span>X86架構(gòu)修改`dockerfile_amd`文件,主要是替換版本號(hào)。使用arm架構(gòu)的同學(xué)則需要修改`dockerfile_arm`。
[]
[]
[]
[]
[]
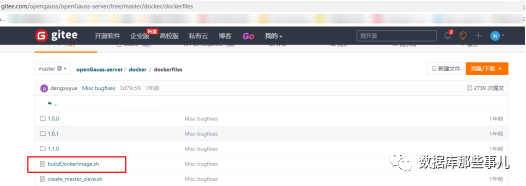
3、在dockerfiles文件夾下運(yùn)行`buildDockerImage.sh`。`-i` 表示不對(duì)二進(jìn)制包進(jìn)行MD5檢查。`-v`表示設(shè)置的版本參數(shù)。`buildDockerImage.sh`是封裝后的制作腳本,它執(zhí)行時(shí)會(huì)根據(jù)當(dāng)前OS的架構(gòu)是X86還是Arm去調(diào)用真正的制作鏡像的`dockerfile`文件。`dockerfile`文件就像是一個(gè)配方,將作鏡像需要的工具、依賴庫(kù)、系統(tǒng)等統(tǒng)統(tǒng)寫(xiě)進(jìn)來(lái)。有興趣的小伙伴可以觀察一下整個(gè)的鏡像生成流程。
[root@iZ2zegavrsiopm50rp12ygZ dockerfiles]# sh buildDockerImage.sh -v 3.0.0 -i
Checking Docker version.
Ignored MD5 checksum.
==========================
DOCKER info:
Client:
 Context:    default
 Debug Mode: false
 Plugins:
  app: Docker App (Docker Inc., v0.9.1-beta3)
  buildx: Docker Buildx (Docker Inc., v0.8.2-docker)
  scan: Docker Scan (Docker Inc., v0.17.0)

Server:
 Containers: 0
  Running: 0
  Paused: 0
  Stopped: 0
 Images: 0

 ...此處省略若干回顯
 ---> 7e3ef9a88226
Successfully built 7e3ef9a88226
Successfully tagged opengauss:3.0.0

  openGauss Docker Image  3.0.0 is ready to be extended:

    --> opengauss:3.0.0

  Build completed in 73 seconds.
整個(gè)過(guò)程用了大概一分鐘。
根據(jù)官方說(shuō)明,運(yùn)行buildDockerImage.sh腳本時(shí),如果不指定-i參數(shù),此時(shí)默認(rèn)提供MD5檢查,需要您手動(dòng)將校驗(yàn)結(jié)果寫(xiě)入md5_file_amd64文件。
## 在dockerfiles/3.0.0目錄下修改md5校驗(yàn)文件內(nèi)容
md5sum openGauss-3.0.0-CentOS-64bit.tar.bz2
## 將校驗(yàn)信息寫(xiě)入校驗(yàn)文件md5_file_amd64中
echo "58b9a029719f2d9d32b7d619c850735c openGauss-3.0.0-CentOS64bit.tar.bz2" > md5_file_amd64
4、查看制作的鏡像,第一條opengauss 3.0.0 就是。體積稍微有點(diǎn)大,到了664M。
[root@iZ2zegavrsiopm50rp12ygZ dockerfiles]# docker images
REPOSITORY   TAG        IMAGE ID       CREATED         SIZE
opengauss    3.0.0      7e3ef9a88226   2 minutes ago   664MB
centos       7.6.1810   f1cb7c7d58b7   3 years ago     202MB

驗(yàn)證容器鏡像
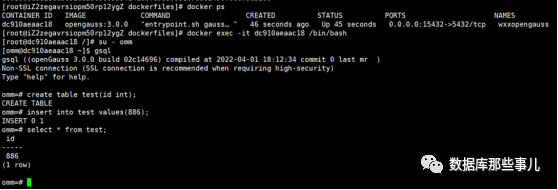
使用鏡像啟動(dòng)然后登錄容器,連接openGauss數(shù)據(jù)庫(kù)進(jìn)行驗(yàn)證。
[root@iZ2zegavrsiopm50rp12ygZ dockerfiles]#docker run --name wxxopengauss --privileged=true -d -e GS_PASSWORD=Gauss@123 -p 15432:5432 -v /var/lib/opengauss opengauss:3.0.0
[root@iZ2zegavrsiopm50rp12ygZ dockerfiles]# docker ps
CONTAINER ID   IMAGE             COMMAND                  CREATED          STATUS          PORTS                     NAMES
dc910aeaac18   opengauss:3.0.0   "entrypoint.sh gauss…"   46 seconds ago   Up 45 seconds   0.0.0.0:15432->5432/tcp   wxxopengauss
[root@iZ2zegavrsiopm50rp12ygZ dockerfiles]# docker exec -it dc910aeaac18 /bin/bash
[root@dc910aeaac18 /]# su - omm
[omm@dc910aeaac18 ~]$ gsql
omm=# create user wxx with password "Gauss@123";
omm=# alter user wxx sysadmin;
omm=# grant all on schema public to wxx;
omm=# create table test(id int);
omm=# insert into test values(886);
omm=# select * from test;
數(shù)據(jù)庫(kù)使用正常,鏡像制作成功。

openGauss: 一款高性能、高安全、高可靠的企業(yè)級(jí)開(kāi)源關(guān)系型數(shù)據(jù)庫(kù)。
審核編輯 :李倩
-
數(shù)據(jù)庫(kù)
+關(guān)注
關(guān)注
7文章
3803瀏覽量
64409 -
容器
+關(guān)注
關(guān)注
0文章
495瀏覽量
22063 -
鏡像
+關(guān)注
關(guān)注
0文章
165瀏覽量
10737
原文標(biāo)題:使用Dockerfile制作openGauss鏡像
文章出處:【微信號(hào):OSC開(kāi)源社區(qū),微信公眾號(hào):OSC開(kāi)源社區(qū)】歡迎添加關(guān)注!文章轉(zhuǎn)載請(qǐng)注明出處。
發(fā)布評(píng)論請(qǐng)先 登錄
相關(guān)推薦
矚目!海量數(shù)據(jù)再獲2024年度openGauss社區(qū)突出貢獻(xiàn)單位

軟通動(dòng)力榮膺“openGauss社區(qū)突出貢獻(xiàn)單位”
提升DevOps效率,從基礎(chǔ)到進(jìn)階的Dockerfile編寫(xiě)技巧

使用Dockerfile搭建潤(rùn)和WS63E的開(kāi)發(fā)環(huán)境
躍昉科技正式加入openGauss社區(qū)
rk3588 安裝了ubuntu20.04版本的系統(tǒng),配置了軟件環(huán)境,怎么導(dǎo)出一個(gè)鏡像包
手動(dòng)構(gòu)建Docker鏡像的方法

ARM平臺(tái)實(shí)現(xiàn)Docker容器技術(shù)
ARM平臺(tái)實(shí)現(xiàn)Docker容器技術(shù)
中軟國(guó)際亮相openGauss Developer Day 2024
華中科技大學(xué)開(kāi)源鏡像站上線44個(gè)軟件鏡像,歡迎下載
UltralIOS制作啟動(dòng)盤(pán)步驟

【LicheeRV-Nano開(kāi)發(fā)套件試用連載體驗(yàn)】 + 2、鏡像燒錄
UltralIOS制作啟動(dòng)盤(pán)步驟


 使用Dockerfile制作openGauss鏡像


評(píng)論