使用環境
- SpringBoot+FastDfs+thumbnailator
- fdfs環境自己搞吧
基于 Spring Boot + MyBatis Plus + Vue & Element 實現的后臺管理系統 + 用戶小程序,支持 RBAC 動態權限、多租戶、數據權限、工作流、三方登錄、支付、短信、商城等功能
- 項目地址:https://github.com/YunaiV/ruoyi-vue-pro
- 視頻教程:https://doc.iocoder.cn/video/
thumbnailator
maven依賴:
<dependency>
<groupId>net.coobirdgroupId>
<artifactId>thumbnailatorartifactId>
<version>0.4.8version>
dependency>
工具類:
importnet.coobird.thumbnailator.Thumbnails;
importnet.coobird.thumbnailator.geometry.Positions;
importorg.springframework.stereotype.Component;
importjavax.imageio.ImageIO;
importjava.io.File;
importjava.io.IOException;

@Component
publicclassPictureUtil{

/**
*水印圖片
*/
privatestaticFilemarkIco=null;

//開機靜態加載水印圖片
static{
try{
markIco=newFile(newFile("").getCanonicalPath()+"/icon.png");
LogUtil.info(PictureUtil.class,"水印圖片加載"+(markIco.exists()?"成功":"失敗"));
}catch(Exceptione){
}
}

/**
*加水印
*/
publicvoidphotoMark(FilesourceFile,FiletoFile)throwsIOException{
Thumbnails.of(sourceFile)
.size(600,450)//尺寸
.watermark(Positions.BOTTOM_CENTER/*水印位置:中央靠下*/,
ImageIO.read(markIco),0.7f/*質量,越大質量越高(1)*/)
//.outputQuality(0.8f)
.toFile(toFile);//保存為哪個文件
}

/**
*生成圖片縮略圖
*/
publicvoidphotoSmaller(FilesourceFile,FiletoFile)throwsIOException{
Thumbnails.of(sourceFile)
.size(200,150)//尺寸
//.watermark(Positions.CENTER,ImageIO.read(markIco),0.1f)
.outputQuality(0.4f)//縮略圖質量
.toFile(toFile);
}

/**
*生成視頻縮略圖(這塊還沒用到呢)
*/
publicvoidphotoSmallerForVedio(FilesourceFile,FiletoFile)throwsIOException{
Thumbnails.of(sourceFile)
.size(440,340)
.watermark(Positions.BOTTOM_CENTER,ImageIO.read(markIco),0.1f)
.outputQuality(0.8f)
.toFile(toFile);
}
}
這個插件很好用,只需集成調用即可,我記得我還試過另外幾個,需要另外在linux下配置.so文件的依賴等等,查了半天也沒弄明白,很麻煩,這個方便。
這個插件又很不好用,必須要先調整尺寸,才能加水印,而且調整尺寸簡直是負壓縮。壓了分辨率圖片還能變大那種。但是簡單嘛,這塊不是重點。
基于 Spring Cloud Alibaba + Gateway + Nacos + RocketMQ + Vue & Element 實現的后臺管理系統 + 用戶小程序,支持 RBAC 動態權限、多租戶、數據權限、工作流、三方登錄、支付、短信、商城等功能
- 項目地址:https://github.com/YunaiV/yudao-cloud
- 視頻教程:https://doc.iocoder.cn/video/
線程池
使用springboot線程池,方便易用,只需配置和加注解即可。
importorg.springframework.context.annotation.Bean;
importorg.springframework.context.annotation.Configuration;
importorg.springframework.core.task.TaskExecutor;
importorg.springframework.scheduling.annotation.EnableAsync;
importorg.springframework.scheduling.concurrent.ThreadPoolTaskExecutor;
importjava.util.concurrent.ThreadPoolExecutor;

@Configuration
@EnableAsync
publicclassPoolConfig{
@Bean//returnnewAsyncResult<>(res);
publicTaskExecutortaskExecutor(){
ThreadPoolTaskExecutorexecutor=newThreadPoolTaskExecutor();
executor.initialize();//設置核心線程數
executor.setCorePoolSize(4);//設置最大線程數
executor.setMaxPoolSize(32);//設置隊列容量
executor.setQueueCapacity(512);//設置線程活躍時間(秒)
executor.setKeepAliveSeconds(60);//設置默認線程名稱
executor.setThreadNamePrefix("ThreadPool-");//設置拒絕策略
executor.setRejectedExecutionHandler(newThreadPoolExecutor.CallerRunsPolicy());//等待所有任務結束后再關閉線程池
executor.setWaitForTasksToCompleteOnShutdown(true);
returnexecutor;
}
}
避坑知識點:配置springboot線程池,類上需要
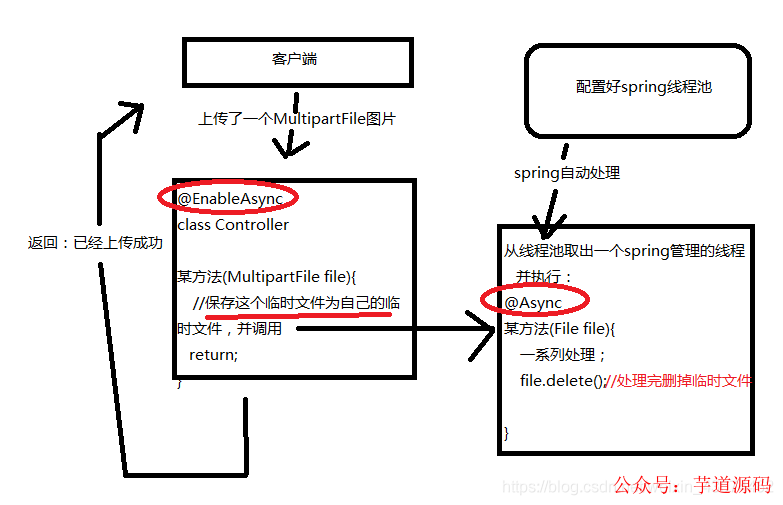
@Configuration、@EnableAsync這兩個注解,實際調用時,需要遵守一個規則,即在調用的方法的類上必須使用注解@EnableAsync,調用一個帶有@Async的方法。
比如A類使用了注解@EnableAsync 在A類中調用B類的有@Async的方法,只有這樣多線程才生效,A類內調用A類的@Async方法不生效。可以理解為Controller層使用@EnableAsync注解,Service層方法上標注@Async。這樣在Controller層調用的Service方法會從線程池調用線程來執行。
異步邏輯:為什么要用多線程?
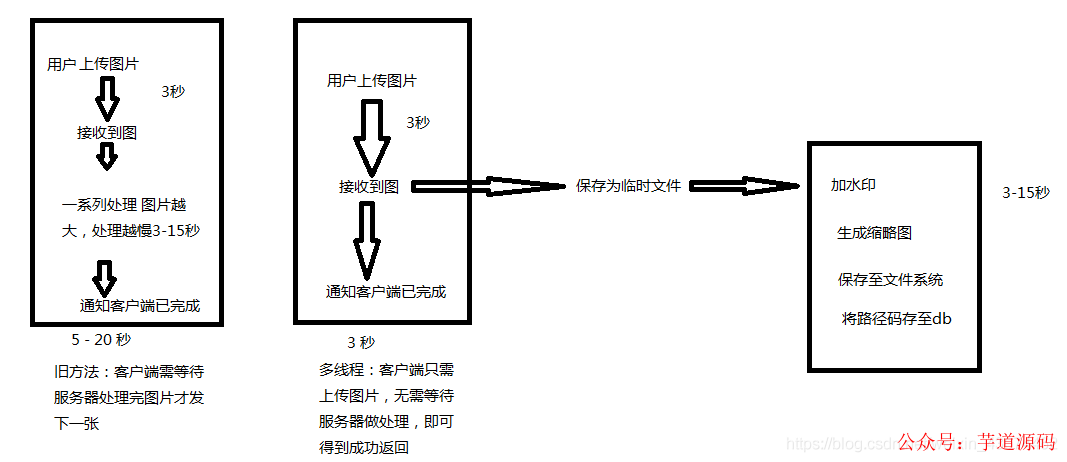
我畫了一張簡單的示意圖,在這個項目中,客戶端一次上傳10多張圖片,每個圖片單獨上傳,等待所有圖片上傳返回200后,繼續執行操作,如果一步一步處理,客戶端需等待服務器處理完所有邏輯,這樣浪費沒必要的時間。顧使用異步操作,客戶端只需上傳圖片,無需等待服務器處理(我們服務器很辣雞,一個10M的圖可能要搞10多秒,見笑)
業務代碼
@ApiOperation("上傳業務圖片")
@PostMapping("/push/photo/{id}/{name}")
publicRpushHousingPhotoMethod(
@ApiParam("SourceId")@PathVariableIntegerid,
@ApiParam("圖片名稱不約束,可不填則使用原名,可使用隨機碼或原名稱,但必須帶擴展名")@PathVariable(required=false)Stringname,
@RequestParamMultipartFilefile)throwsInterruptedException,ExecutionException,IOException{
StringfileName=file.getOriginalFilename();
Stringext=StringUtils.substring(fileName,fileName.lastIndexOf('.'),fileName.length());
FiletempPhoto=File.createTempFile(UUIDUtil.make32BitUUID(),ext);
file.transferTo(tempPhoto);//轉儲臨時文件
service.pushPhoto(id,name,tempPhoto);
returnnewR();
}
業務代碼里隱藏了一些項目相關的信息,就是某些名改了,嗯。
可以看到,使用StringUtils.substring(fileName, fileName.lastIndexOf(’.’),fileName.length());這句代碼,調用apache.common.lang3工具類獲取出了擴展名,因為擴展名對圖片處理工具類有用,他通過擴展名識別圖片格式,所以這個必須有,如代碼,生成了一個使用隨機碼命名,但帶有.png擴展名的臨時文件,保存在默認臨時路徑以供處理。File.createTempFile(UUIDUtil.make32BitUUID(), ext);是生成臨時文件的方法,UUIDUtil也很簡單,我貼出來吧,省著還要找
注意:controller類上需要標注注解@EnableAsync
/**
*生成一個32位無橫杠的UUID
*/
publicsynchronizedstaticStringmake32BitUUID(){
returnUUID.randomUUID().toString().replace("-","");
}
避坑知識點:Spring使用MultipartFile接收文件,但不能直接把MultipartFile傳下去處理,而是保存為臨時文件,并不是多此一舉。因為MultipartFile也是臨時文件,他的銷毀時間是你這個Controller層方法return的時候。
如果不使用異步,是可以在調用的方法里去處理MultipartFile文件的,但如果使用異步處理,肯定是這邊線程還沒處理完,那邊Controller層已經return了,這個MultipartFile就被刪除了,于是你的異步線程就找不到這張圖了。那還處理個啥,對吧。所以需要手動保存為自己創建的臨時文件,再在線程中處理完把他刪掉。
貼Service層Impl實現類代碼
@Async
publicvoidpushHousingPhoto(Integerid,Stringname,Filefile)throwsInterruptedException,ExecutionException,IOException{
//存儲FDFS表id
LongstartTime=System.currentTimeMillis();
Integer[]numb=fastDfsService.upLoadPhoto(StringUtils.isBlank(name)?file.getName():name,file).get();
SourcePhotosContextcontext=newSourcePhotosContext();
context.setSourceId(id);
context.setNumber(numb[0]);
context.setNumber2(numb[1]);
//保存圖片關系
sourcePhotosContextService.insertNew(context);
LongendTime=System.currentTimeMillis();
LogUtil.info(this.getClass(),"source["+id+"]綁定圖片["+name+"]成功,內部處理耗時["+(endTime-startTime)+"ms]");
//returnnewR();
}
這里的number和number2分別是帶水印的原圖和縮略圖,context是個表,用來存圖片和縮略圖對應fdfs路徑的,就不貼了。可見這個方法上帶有注解@Async 所以整個方法會異步執行。
加水印處理寫到fdfs的service里了,這樣不算規范,可以不要學我:
@Override
publicFutureupLoadPhoto(StringfileName,MultipartFilefile)throwsIOException{
Stringext=StringUtils.substring(fileName,fileName.lastIndexOf('.'));
//創建臨時文件
FilesourcePhoto=File.createTempFile(UUIDUtil.make32BitUUID(),ext);
file.transferTo(sourcePhoto);
returnupLoadPhoto(fileName,sourcePhoto);
}

@Override
publicFutureupLoadPhoto(StringfileName,FilesourcePhoto)throwsIOException{
Stringext=StringUtils.substring(fileName,fileName.lastIndexOf('.'));
//創建臨時文件
FilemarkedPhoto=File.createTempFile(UUIDUtil.make32BitUUID(),ext);
FilesmallerPhoto=File.createTempFile(UUIDUtil.make32BitUUID(),ext);
//加水印縮圖
pictureUtil.photoMark(sourcePhoto,markedPhoto);
pictureUtil.photoSmaller(markedPhoto,smallerPhoto);
//上傳
IntegermarkedPhotoNumber=upLoadPhotoCtrl(fileName,markedPhoto);
IntegersmallerPhotoNumber=upLoadPhotoCtrl("mini_"+fileName,smallerPhoto);
//刪除臨時文件
sourcePhoto.delete();
markedPhoto.delete();
smallerPhoto.delete();
Integer[]res=newInteger[]{markedPhotoNumber,smallerPhotoNumber};
returnnewAsyncResult(res);
}
使用了方法重載,一個調用了另一個,方便以后處理MultipartFile和File格式的圖片都能使用,可以見到使用了Future這個東西作為返回值,完全可以不這么做,正常返回就行。我懶得改了,這也是不斷探索多線程處理圖片的過程中,遺留下來的東西。
在service中fastDfsService.upLoadPhoto(StringUtils.isBlank(name) ? file.getName() : name, file).get()這句就是得到了這個future的內容,可以去掉.get() 和Future<>。可見這一個小小的異步功能,其實走過了很多彎路。future其實是異步調用方法時,從.get()等待異步處理的結果,等待得到結果后獲取內容并執行。現在使用spring線程池處理,已經不需要這樣做了。
以上,希望你在實現這個功能時可以少走彎路。
附總體示意圖:
審核編輯 :李倩
-
多線程
+關注
關注
0文章
278瀏覽量
19956 -
spring
+關注
關注
0文章
340瀏覽量
14343
原文標題:Spring 多線程異步上傳圖片、處理水印、縮略圖
文章出處:【微信號:芋道源碼,微信公眾號:芋道源碼】歡迎添加關注!文章轉載請注明出處。
發布評論請先 登錄
相關推薦
socket 多線程編程實現方法
Python中多線程和多進程的區別
從多線程設計模式到對 CompletableFuture 的應用
百度搜索重磅推出AI圖片助手
bootloader開多線程做引導程序,跳app初始化后直接進hardfualt,為什么?
鴻蒙OS開發實例:【ArkTS類庫多線程CPU密集型任務TaskPool】
鴻蒙OS開發實例:【ArkTS類庫多線程I/O密集型任務開發】
鴻蒙APP開發:【ArkTS類庫多線程】TaskPool和Worker的對比


 Spring多線程異步上傳圖片、處理水印、縮略圖


評論