開發(fā)環(huán)境
騰訊云主機(jī)配置:
操作系統(tǒng) Ubuntu Server 16.04.1 LTS 64位
CPU 1 核
內(nèi)存 2 GB
公網(wǎng)帶寬 1 Mbps
官方推薦的安裝條件
Ubuntu 16.04或Ubuntu 18.04
內(nèi)存至少為1GB的服務(wù)器
注冊(cè)域名
在開始之前,首先去解析域名,指向服務(wù)器的IP地址并確保它正確解析。必須提前完成此操作,以便在安裝過程中正確配置SSL。
開始操作
1. 創(chuàng)建一個(gè)新用戶
打開終端并以root用戶身份登錄服務(wù)器,創(chuàng)建一個(gè)非root用戶,官方不推薦在root下安裝ghost(注意這里很多坑,搞不定就重裝系統(tǒng)吧,我已經(jīng)重裝很多次了)
創(chuàng)建一個(gè)新用戶(非root),命令如下:sudo adduser blog,期間會(huì)讓你輸入兩次新用戶的密碼
sudo adduser
將新創(chuàng)建的用戶添加到組。
usermod -aG sudo
輸入完一些信息就Yes下一步。
注意事項(xiàng):如果使用用戶名“ghost”會(huì)導(dǎo)致與Ghost-CLI沖突,不允許使用“ghost”這個(gè)用戶名。
2. 更新包
確保包列表和已安裝的包是最新的。
sudo apt-get update
sudo apt-get upgrade
3. 安裝Node.js
執(zhí)行以下命令,安裝Node.js
sudo curl -sL https://deb.nodesource.com/setup_10.x | sudo -E bash -
sudo apt-get install -y nodejs
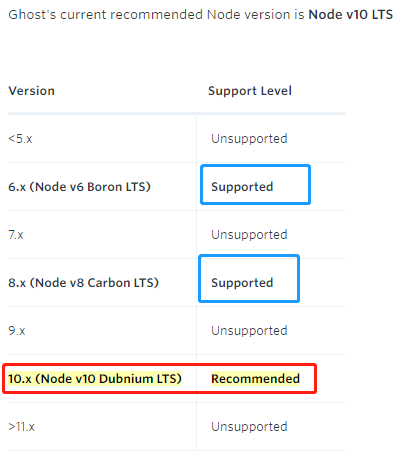
注意了,ghost支持的版本如下:

推薦使用10.x
如果想選擇其他版本的話,可以在安裝的時(shí)候修改sudo curl -sL https://deb.nodesource.com/setup_10.x | sudo -E bash -中的setup_10.x,改為你需要的版本即可。
安裝完成后,執(zhí)行以下命令查看Node.js版本和npm版本。
node -v
npm -v
回顯信息:
ubuntu@VM-0-10-ubuntu:~$ node -v
v10.15.1
ubuntu@VM-0-10-ubuntu:~$ npm -v
6.4.1
4. 安裝NGINX
Ghost使用NGINX服務(wù)器,SSL配置需要NGINX 1.9.5或更高版本。
執(zhí)行命令:
sudo apt-get update
sudo apt-get install nginx
UFW(Uncomplicated Firewall)是一個(gè) iptables 的接口,可以簡(jiǎn)化配置防火墻的過程。Ubuntu 默認(rèn)安裝了 UFW,執(zhí)行以下命令查看防火墻的狀態(tài)。
sudo ufw status
如果你沒有也不想開啟防火墻,則可以直接跳過此步驟,如果你想要開啟防火墻可以通過以下命令實(shí)現(xiàn)。
sudo ufw enable
之后再次檢查防火墻狀態(tài)驗(yàn)證是否成功開啟防火墻。
在測(cè)試Nginx之前,需要重新配置我們的防火墻軟件以允許訪問Nginx。執(zhí)行以下命令,將Nginx自動(dòng) 注冊(cè)在 UFW。
sudo ufw app list
如果ufw已激活,則防火墻允許HTTP和HTTPS連接。打開防火墻:
sudo ufw allow 'Nginx Full'
輸出信息:
ubuntu@VM-0-10-ubuntu:~$ sudo ufw app list
Available applications:
  Nginx Full
  Nginx HTTP
  Nginx HTTPS
  OpenSSH
配置Nginx
# 新建配置文件
sudo vim /etc/nginx/sites-available/ghost.conf
把以下配置內(nèi)容粘貼進(jìn)你的配置文件中,修改server_name 的內(nèi)容
server {
    listen 80;
    server_name 119.3.xx.xxx.com;     #這里寫你的域名或者ip地址
    location / {
        proxy_set_header   X-Real-IP $remote_addr;
        proxy_set_header   Host      $http_host;
        proxy_pass         http://127.0.0.1:2368;
    }
}
把配置文件軟鏈接到sites-enabled中:
sudo ln -s /etc/nginx/sites-available/ghost.conf /etc/nginx/sites-enabled/ghost.conf
重啟Nginx
sudo service nginx restart
驗(yàn)證Nginx是否正常工作
在瀏覽器中通過域名或者 IP 地址進(jìn)行訪問Nginx,如果Nginx正常啟動(dòng)則會(huì)打開Welcome to nginx的歡迎頁面。
使用瀏覽器訪問 http://云服務(wù)器IP地址,顯示如下頁面,說明Nginx安裝成功。

安裝Nginx成功
5. 安裝MySQL
安裝MySQL以用作數(shù)據(jù)庫。
sudo apt-get update
sudo apt-get install mysql-server
安裝的過程中會(huì)讓你輸入密碼,安裝輸入即可,我是為了方便記錄,用戶、數(shù)據(jù)庫都輸入了一樣的密碼。
執(zhí)行這個(gè)命令
mysql_secure_installation
根據(jù)提示,前兩項(xiàng)是 n ,后面的y即可
Securing the MySQL server deployment.

Enter password for user root:    #輸入上一步驟中獲取的安裝MySQL時(shí)自動(dòng)設(shè)置的root用戶密碼
The existing password for the user account root has expired. Please set a new password.

Estimated strength of the password: 100
Change the password for root ? ((Press y|Y for Yes, any other key for No) : N   #是否更改root用戶密碼,輸入N

Remove anonymous users? (Press y|Y for Yes, any other key for No) : Y   #是否刪除匿名用戶,輸入Y
Success.

Disallow root login remotely? (Press y|Y for Yes, any other key for No) : Y   #禁止root遠(yuǎn)程登錄,輸入Y
Success.

Remove test database and access to it? (Press y|Y for Yes, any other key for No) : Y   #是否刪除test庫和對(duì)它的訪問權(quán)限,輸入Y
 - Dropping test database...
Success.

Reload privilege tables now? (Press y|Y for Yes, any other key for No) : Y   #是否重新加載授權(quán)表,輸入Y
Success.

All done!
測(cè)試數(shù)據(jù)庫狀態(tài):
systemctl status mysql.service
結(jié)果如下:(按Ctrl+C退出)
ubuntu@VM-0-10-ubuntu:~$ systemctl status mysql.service
● mysql.service - MySQL Community Server
   Loaded: loaded (/lib/systemd/system/mysql.service; enabled; vendor preset: en
   Active: active (running) since Sun 2019-02-24 13:56:36 CST; 1h 3min ago
 Main PID: 7203 (mysqld)
   CGroup: /system.slice/mysql.service
           └─7203 /usr/sbin/mysqld

Feb 24 13:56:35 VM-0-10-ubuntu systemd[1]: Stopped MySQL Community Server.
Feb 24 13:56:35 VM-0-10-ubuntu systemd[1]: Starting MySQL Community Server...
Feb 24 13:56:36 VM-0-10-ubuntu systemd[1]: Started MySQL Community Server.
lines 1-10/10 (END)
ubuntu@VM-0-10-ubuntu:~$
為了避免數(shù)據(jù)庫存放的中文是亂碼,執(zhí)行以下命令設(shè)置Mysql的編碼:
sudo vi /etc/my.cnf
復(fù)制粘貼以下內(nèi)容:
[client]
default-character-set=utf8
[mysql]
default-character-set=utf8
[mysqld]
character-set-server=utf8
collation-server=utf8_general_ci
保存退出,執(zhí)行以下命令重啟 Mysql 生效:
sudo /usr/sbin/service mysql restart
建立ghost依賴的數(shù)據(jù)庫
以 root 身份登錄MySql然后創(chuàng)建一個(gè)名為 ghost 的數(shù)據(jù)庫并驗(yàn)證創(chuàng)建結(jié)果,強(qiáng)調(diào)!!!進(jìn)入數(shù)據(jù)庫必須是root(超級(jí)用戶,比如默認(rèn)用戶 ubuntu )。
首先執(zhí)行命令:(他會(huì)提示你輸入密碼)
mysql -u root -p;
進(jìn)入數(shù)據(jù)庫界面:
執(zhí)行創(chuàng)建數(shù)據(jù)庫,名字隨意,我使用的是ghost(注意要有分號(hào))
create database ghost;
創(chuàng)建完顯示一下當(dāng)前數(shù)據(jù)庫:
show databases;
結(jié)果(當(dāng)然我這里有好幾個(gè)數(shù)據(jù)庫,列表中有你的數(shù)據(jù)庫名稱就行了)
mysql> show databases;
+--------------------+
| Database           |
+--------------------+
| information_schema |
| blog               |
| ghost              |
| mysql              |
| performance_schema |
| sys                |
+--------------------+
6 rows in set (0.00 sec)
由于很多教程都是沒有讓數(shù)據(jù)庫給非root用戶(即我們剛開始創(chuàng)建的用戶)分配權(quán)限,在這里我們要補(bǔ)充這點(diǎn)。
數(shù)據(jù)庫分配權(quán)限
執(zhí)行:
grant all privileges on mysql_name.* to 'user_name'@'%' identified by 'xxxxxxxxx';
參數(shù)說明:
mysql_name:在前面創(chuàng)建數(shù)據(jù)庫時(shí)候的名稱,我的是ghost
user_nam:在剛開始創(chuàng)建的用戶名稱,我的是blog
xxxxxxxxx:是訪問數(shù)據(jù)庫的密碼(口令),要記牢
結(jié)果:
mysql> grant all privileges on ghost.* to 'blog'@'%' identified by '************';
Query OK, 0 rows affected, 1 warning (0.00 sec)
退出數(shù)據(jù)庫
mysql> exit
最好在這里重啟一下數(shù)據(jù)庫
sudo /usr/sbin/service mysql restart
Ghost 安裝與配置
安裝Ghost-CLI
Ghost v1.0.0 及以上版本已加入了Ghost-CLI,因此可以直接安裝配置Ghost-CLI。
Ghost-CLI是一個(gè)命令行工具,可幫助您快速輕松地安裝和配置Ghost。可以用npm或安裝yarn。
sudo npm i -g ghost-cli
安裝后,可以運(yùn)行ghost help以查看可用命令列表。
安裝Ghost
正確設(shè)置服務(wù)器并ghost-cli安裝后,即可安裝Ghost。
注意:在/root或home/目錄中安裝Ghost會(huì)導(dǎo)致設(shè)置損壞。始終使用具有正確配置權(quán)限的自定義目錄。
首先創(chuàng)建一個(gè)文件夾,官方推薦在 /var/www/目錄下安裝ghost
sudo mkdir -p /var/www/ghost
配置文件夾權(quán)限:
sudo chown [user]:[user] /var/www/ghost
其中[user]替換為一開始創(chuàng)建的用戶(我的是blog)
sudo chown blog:blog /var/www/ghost
配值文件夾權(quán)限:
sudo chmod 775 /var/www/ghost
切換路徑:
cd /var/www/ghost
由于官方指定安裝ghost不允許在root用戶下,因此我們?nèi)サ揭婚_始創(chuàng)建的用戶(非root用戶)下安裝,
su
結(jié)果可以看到ubuntu用戶已經(jīng)切換為blog用戶。
ubuntu@VM-0-10-ubuntu:/var/www/ghost$ su blog
Password:
blog@VM-0-10-ubuntu:/var/www/ghost$ ls
如果你已經(jīng)做到了這一點(diǎn),說明已經(jīng)完成90%了,是時(shí)候用一個(gè)命令安裝Ghost了
ghost install
結(jié)果:
blog@VM-0-10-ubuntu:/var/www/ghost$ ghost install
? Downloading and installing Ghost v2.15.0
? Finishing install process
? Enter your blog URL: http://jiejietop.cn                #輸入博客的路徑
? Enter your MySQL hostname: localhost                    #使用本地?cái)?shù)據(jù)庫
? Enter your MySQL username: blog                        #用戶名字
? Enter your MySQL password: [hidden]                    #密碼(為了方便用戶名與數(shù)據(jù)庫最好設(shè)置為一樣的密碼)
? Enter your Ghost database name: ghost                    #數(shù)據(jù)庫名字
? Configuring Ghost
? Setting up instance
+ sudo chown -R ghost:ghost /var/www/ghost/content
? Sudo Password [hidden]                                    #輸入密碼
? Setting up "ghost" system user
? Setting up "ghost" mysql user [skipped]
+ sudo ln -sf /etc/nginx/sites-available/jiejietop.cn.conf /etc/nginx/sites-enabled/jiejietop.cn.conf
+ sudo nginx -s reload
? Setting up Nginx
? Setting up Nginx
? Do you wish to set up SSL? Yes                    #輸入 Y
? Enter your email (For SSL Certificate) 1161959934@qq.com            #你自己的郵箱,可能是防止忘了密碼吧
+ sudo /etc/letsencrypt/acme.sh --issue --home /etc/letsencrypt --domain jiejietop.cn --webroot /var/www/ghost/system/nginx-root --reloadcmd "nginx -s reload" --accountema
il 1161959934@qq.com
? Creating ssl config file at /var/www/ghost/system/files/jiejietop.cn-ssl.conf
+ sudo ln -sf /var/www/ghost/system/files/jiejietop.cn-ssl.conf /etc/nginx/sites-available/jiejietop.cn-ssl.conf
+ sudo ln -sf /etc/nginx/sites-available/jiejietop.cn-ssl.conf /etc/nginx/sites-enabled/jiejietop.cn-ssl.conf
+ sudo nginx -s reload
? Setting up SSL
? Do you wish to set up Systemd? Yes                #輸入 Y
? Creating systemd service file at /var/www/ghost/system/files/ghost_jiejietop-cn.service
+ sudo ln -sf /var/www/ghost/system/files/ghost_jiejietop-cn.service /lib/systemd/system/ghost_jiejietop-cn.service
+ sudo systemctl daemon-reload
? Setting up Systemd
? Do you want to start Ghost? Yes                    #輸入 Y
+ sudo systemctl is-active ghost_jiejietop-cn
? Ensuring user is not logged in as ghost user
? Checking if logged in user is directory owner
? Checking current folder permissions
+ sudo systemctl is-active ghost_jiejietop-cn
? Validating config
? Checking folder permissions
? Checking file permissions
? Checking content folder ownership
? Checking memory availability
+ sudo systemctl start ghost_jiejietop-cn
? Starting Ghost
+ sudo systemctl is-enabled ghost_jiejietop-cn
+ sudo systemctl enable ghost_jiejietop-cn --quiet
? Enabling Ghost instance startup on server boot

Ghost uses direct mail by default. To set up an alternative email method read our docs at https://docs.ghost.org/concepts/config/#mail

------------------------------------------------------------------------------

Ghost was installed successfully! To complete setup of your publication, visit:

    http://jiejietop.cn/ghost/                    #表示安裝正常,通過這個(gè)就能配置你的博客
雖然啥都沒有,但是搭起來還是很爽的,我是踩了很多坑的,什么數(shù)據(jù)庫分配權(quán)限啥的,還有配置ghost文件夾權(quán)限什么的,還有root用戶,亂七八糟的東西,也是一步步查資料解決的

博客配置界面
搭建ghost參考:
如何在Ubuntu上安裝Ghost
手工搭建Ghost博客(Ubuntu 16.04)
Ghost 安裝在 Ubuntu 環(huán)境底下
Ghost博客安裝、使用、更新一條龍教程-中文版
解決問題參考:
MySQL學(xué)習(xí)筆記(一)Ubuntu16.04中MySQL安裝配置(5.6優(yōu)化、錯(cuò)誤日志、DNS解決)
MySQL列出所有數(shù)據(jù)庫
【MySQL】創(chuàng)建普通用戶,分配權(quán)限,取消權(quán)限
同時(shí)還要感謝 谷歌翻譯 ,它解決了我很多問題!!
-
服務(wù)器
+關(guān)注
關(guān)注
12文章
9164瀏覽量
85429 -
ip地址
+關(guān)注
關(guān)注
0文章
303瀏覽量
17055 -
SSL
+關(guān)注
關(guān)注
0文章
125瀏覽量
25740
發(fā)布評(píng)論請(qǐng)先 登錄
相關(guān)推薦
如何在Ubuntu 22.04上搭建ftp服務(wù)器

Ubuntu環(huán)境搭建
【推薦體驗(yàn)】騰訊云自然語言處理
云服務(wù)器搭建嵌入式Linux開發(fā)環(huán)境的步驟
AT指令對(duì)接騰訊云的使用方法
【迪文COF結(jié)構(gòu)智能屏試用體驗(yàn)】結(jié)合騰訊云搭建在線聊天室--文本對(duì)話
【合作伙伴】騰訊云--產(chǎn)業(yè)智變,云啟未來
Fibocom 公有云之騰訊云 技術(shù)資料
Linux Ubuntu教程之Linux Ubuntu14.04如何進(jìn)行開發(fā)環(huán)境的搭建
云主機(jī)對(duì)比物理服務(wù)器,云主機(jī)的性價(jià)比更高
使用 ubuntu + emqx + nodered 方式搭建屬于自己的IOT平臺(tái)
Ghost frame:使用Adafruit PyPortal顯示Ghost

Ubuntu替代Windows?使用Station主機(jī)打造桌面操作系統(tǒng)!


 騰訊云Ubuntu主機(jī)搭建Ghost


評(píng)論