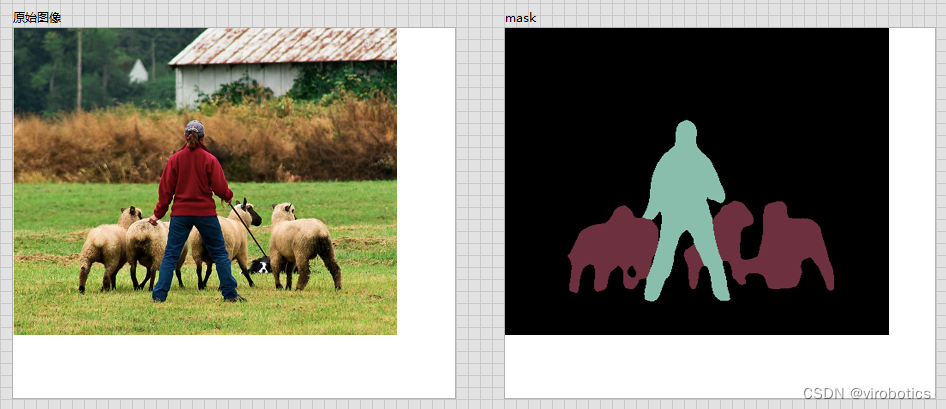
在 第 14.3 節-第 14.8 節討論對象檢測任務時,矩形邊界框用于標記和預測圖像中的對象。本節將討論語義分割問題,重點關注如何將圖像劃分為屬于不同語義類的區域。與目標檢測不同,語義分割在像素級別識別和理解圖像中的內容:它對語義區域的標記和預測是在像素級別。 圖 14.9.1顯示了語義分割中圖像的狗、貓和背景的標簽。與目標檢測相比,語義分割中標記的像素級邊界明顯更細粒度。
圖 14.9.1語義分割中圖像的狗、貓和背景的標簽。
14.9.1。圖像分割和實例分割
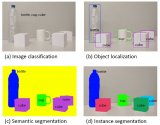
計算機視覺領域還有兩個與語義分割類似的重要任務,即圖像分割和實例分割。我們將如下簡要地將它們與語義分割區分開來。
圖像分割將圖像分成幾個組成區域。這類問題的方法通常利用圖像中像素之間的相關性。它在訓練時不需要圖像像素的標簽信息,也不能保證分割后的區域在預測時具有我們希望得到的語義。以圖 14.9.1中的圖像 作為輸入,圖像分割可以將狗分成兩個區域:一個覆蓋以黑色為主的嘴巴和眼睛,另一個覆蓋以黃色為主的身體其余部分。
實例分割也稱為同時檢測和分割。它研究如何識別圖像中每個對象實例的像素級區域。與語義分割不同,實例分割不僅需要區分語義,還需要區分不同的對象實例。例如,如果圖像中有兩只狗,實例分割需要區分一個像素屬于這兩只狗中的哪一只。
14.9.2。Pascal VOC2012 語義分割數據集
最重要的語義分割數據集之一是Pascal VOC2012。下面,我們將看看這個數據集。
%matplotlib inline
import os
import torch
import torchvision
from d2l import torch as d2l
%matplotlib inline
import os
from mxnet import gluon, image, np, npx
from d2l import mxnet as d2l

npx.set_np()
數據集的 tar 文件大約 2 GB,因此下載文件可能需要一段時間。提取的數據集位于 ../data/VOCdevkit/VOC2012.
#@save
d2l.DATA_HUB['voc2012'] = (d2l.DATA_URL + 'VOCtrainval_11-May-2012.tar',
              '4e443f8a2eca6b1dac8a6c57641b67dd40621a49')

voc_dir = d2l.download_extract('voc2012', 'VOCdevkit/VOC2012')
Downloading ../data/VOCtrainval_11-May-2012.tar from http://d2l-data.s3-accelerate.amazonaws.com/VOCtrainval_11-May-2012.tar...
#@save
d2l.DATA_HUB['voc2012'] = (d2l.DATA_URL + 'VOCtrainval_11-May-2012.tar',
              '4e443f8a2eca6b1dac8a6c57641b67dd40621a49')

voc_dir = d2l.download_extract('voc2012', 'VOCdevkit/VOC2012')
進入路徑后../data/VOCdevkit/VOC2012,我們可以看到數據集的不同組成部分。該ImageSets/Segmentation路徑包含指定訓練和測試樣本的文本文件,而 JPEGImages和SegmentationClass路徑分別存儲每個示例的輸入圖像和標簽。這里的label也是image格式的,和它的labeled input image大小一樣。此外,任何標簽圖像中具有相同顏色的像素屬于同一語義類。下面定義了read_voc_images將所有輸入圖像和標簽讀入內存的函數。
#@save
def read_voc_images(voc_dir, is_train=True):
  """Read all VOC feature and label images."""
  txt_fname = os.path.join(voc_dir, 'ImageSets', 'Segmentation',
               'train.txt' if is_train else 'val.txt')
  mode = torchvision.io.image.ImageReadMode.RGB
  with open(txt_fname, 'r') as f:
    images = f.read().split()
  features, labels = [], []
  for i, fname in enumerate(images):
    features.append(torchvision.io.read_image(os.path.join(
      voc_dir, 'JPEGImages', f'{fname}.jpg')))
    labels.append(torchvision.io.read_image(os.path.join(
      voc_dir, 'SegmentationClass' ,f'{fname}.png'), mode))
  return features, labels

train_features, train_labels = read_voc_images(voc_dir, True)
#@save
def read_voc_images(voc_dir, is_train=True):
  """Read all VOC feature and label images."""
  txt_fname = os.path.join(voc_dir, 'ImageSets', 'Segmentation',
               'train.txt' if is_train else 'val.txt')
  with open(txt_fname, 'r') as f:
    images = f.read().split()
  features, labels = [], []
  for i, fname in enumerate(images):
    features.append(image.imread(os.path.join(
      voc_dir, 'JPEGImages', f'{fname}.jpg')))
    labels.append(image.imread(os.path.join(
      voc_dir, 'SegmentationClass', f'{fname}.png')))
  return features, labels

train_features, train_labels = read_voc_images(voc_dir, True)
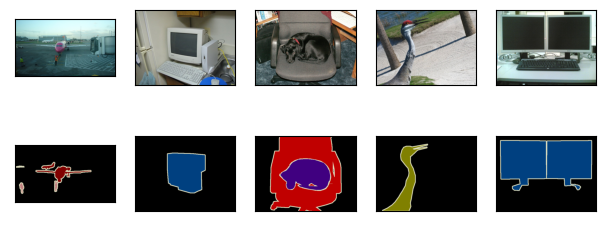
我們繪制前五個輸入圖像及其標簽。在標簽圖像中,白色和黑色分別代表邊框和背景,而其他顏色對應不同的類別。
n = 5
imgs = train_features[:n] + train_labels[:n]
imgs = [img.permute(1,2,0) for img in imgs]
d2l.show_images(imgs, 2, n);
n = 5
imgs = train_features[:n] + train_labels[:n]
d2l.show_images(imgs, 2, n);

接下來,我們枚舉該數據集中所有標簽的 RGB 顏色值和類名。
#@save
VOC_COLORMAP = [[0, 0, 0], [128, 0, 0], [0, 128, 0], [128, 128, 0],
        [0, 0, 128], [128, 0, 128], [0, 128, 128], [128, 128, 128],
        [64, 0, 0], [192, 0, 0], [64, 128, 0], [192, 128, 0],
        [64, 0, 128], [192, 0, 128], [64, 128, 128], [192, 128, 128],
        [0, 64, 0], [128, 64, 0], [0, 192, 0], [128, 192, 0],
        [0, 64, 128]]

#@save
VOC_CLASSES = ['background', 'aeroplane', 'bicycle', 'bird', 'boat',
        'bottle', 'bus', 'car', 'cat', 'chair', 'cow',
        'diningtable', 'dog', 'horse', 'motorbike', 'person',
        'potted plant', 'sheep', 'sofa', 'train', 'tv/monitor']
#@save
VOC_COLORMAP = [[0, 0, 0], [128, 0, 0], [0, 128, 0], [128, 128, 0],
        [0, 0, 128], [128, 0, 128], [0, 128, 128], [128, 128, 128],
        [64, 0, 0], [192, 0, 0], [64, 128, 0], [192, 128, 0],
        [64, 0, 128], [192, 0, 128], [64, 128, 128], [192, 128, 128],
        [0, 64, 0], [128, 64, 0], [0, 192, 0], [128, 192, 0],
        [0, 64, 128]]

#@save
VOC_CLASSES = ['background', 'aeroplane', 'bicycle', 'bird', 'boat',
        'bottle', 'bus', 'car', 'cat', 'chair', 'cow',
        'diningtable', 'dog', 'horse', 'motorbike', 'person',
        'potted plant', 'sheep', 'sofa', 'train', 'tv/monitor']
使用上面定義的兩個常量,我們可以方便地找到標簽中每個像素的類索引。我們定義了voc_colormap2label 構建從上述 RGB 顏色值到類索引的映射的函數,以及voc_label_indices將任何 RGB 值映射到此 Pascal VOC2012 數據集中它們的類索引的函數。
#@save
def voc_colormap2label():
  """Build the mapping from RGB to class indices for VOC labels."""
  colormap2label = torch.zeros(256 ** 3, dtype=torch.long)
  for i, colormap in enumerate(VOC_COLORMAP):
    colormap2label[
      (colormap[0] * 256 + colormap[1]) * 256 + colormap[2]] = i
  return colormap2label

#@save
def voc_label_indices(colormap, colormap2label):
  """Map any RGB values in VOC labels to their class indices."""
  colormap = colormap.permute(1, 2, 0).numpy().astype('int32')
  idx = ((colormap[:, :, 0] * 256 + colormap[:, :, 1]) * 256
      + colormap[:, :, 2])
  return colormap2label[idx]
#@save
def voc_colormap2label():
  """Build the mapping from RGB to class indices for VOC labels."""
  colormap2label = np.zeros(256 ** 3)
  for i, colormap in enumerate(VOC_COLORMAP):
    colormap2label[
      (colormap[0] * 256 + colormap[1]) * 256 + colormap[2]] = i
  return colormap2label

#@save
def voc_label_indices(colormap, colormap2label):
  """Map any RGB values in VOC labels to their class indices."""
  colormap = colormap.astype(np.int32)
  idx = ((colormap[:, :, 0] * 256 + colormap[:, :, 1]) * 256
      + colormap[:, :, 2])
  return colormap2label[idx]
例如,在第一個示例圖像中,飛機前部的類別索引為 1,而背景索引為 0。
y = voc_label_indices(train_labels[0], voc_colormap2label())
y[105:115, 130:140], VOC_CLASSES[1]
(tensor([[0, 0, 0, 0, 0, 0, 0, 0, 0, 1],
     [0, 0, 0, 0, 0, 0, 0, 1, 1, 1],
     [0, 0, 0, 0, 0, 0, 1, 1, 1, 1],
     [0, 0, 0, 0, 0, 1, 1, 1, 1, 1],
     [0, 0, 0, 0, 0, 1, 1, 1, 1, 1],
     [0, 0, 0, 0, 1, 1, 1, 1, 1, 1],
     [0, 0, 0, 0, 0, 1, 1, 1, 1, 1],
     [0, 0, 0, 0, 0, 1, 1, 1, 1, 1],
     [0, 0, 0, 0, 0, 0, 1, 1, 1, 1],
     [0, 0, 0, 0, 0, 0, 0, 0, 1, 1]]),
 'aeroplane')
y = voc_label_indices(train_labels[0], voc_colormap2label())
y[105:115, 130:140], VOC_CLASSES[1]
(array([[0., 0., 0., 0., 0., 0., 0., 0., 0., 1.],
    [0., 0., 0., 0., 0., 0., 0., 1., 1., 1.],
    [0., 0., 0., 0., 0., 0., 1., 1., 1., 1.],
    [0., 0., 0., 0., 0., 1., 1., 1., 1., 1.],
    [0., 0., 0., 0., 0., 1., 1., 1., 1., 1.],
    [0., 0., 0., 0., 1., 1., 1., 1., 1., 1.],
    [0., 0., 0., 0., 0., 1., 1., 1., 1., 1.],
    [0., 0., 0., 0., 0., 1., 1., 1., 1., 1.],
    [0., 0., 0., 0., 0., 0., 1., 1., 1., 1.],
    [0., 0., 0., 0., 0., 0., 0., 0., 1., 1.]]),
 'aeroplane')
14.9.2.1。數據預處理
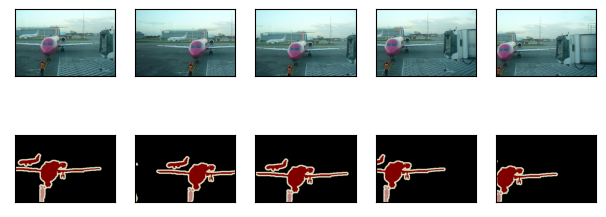
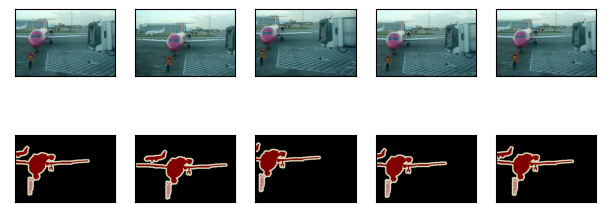
在之前的實驗中,例如 第 8.1 節-第 8.4 節中,圖像被重新縮放以適應模型所需的輸入形狀。然而,在語義分割中,這樣做需要將預測的像素類重新縮放回輸入圖像的原始形狀。這種重新縮放可能不準確,尤其是對于具有不同類別的分段區域。為避免此問題,我們將圖像裁剪為固定形狀而不是重新縮放。具體來說,使用圖像增強的隨機裁剪,我們裁剪輸入圖像和標簽的相同區域。
#@save
def voc_rand_crop(feature, label, height, width):
  """Randomly crop both feature and label images."""
  rect = torchvision.transforms.RandomCrop.get_params(
    feature, (height, width))
  feature = torchvision.transforms.functional.crop(feature, *rect)
  label = torchvision.transforms.functional.crop(label, *rect)
  return feature, label

imgs = []
for _ in range(n):
  imgs += voc_rand_crop(train_features[0], train_labels[0], 200, 300)

imgs = [img.permute(1, 2, 0) for img in imgs]
d2l.show_images(imgs[::2] + imgs[1::2], 2, n);
#@save
def voc_rand_crop(feature, label, height, width):
  """Randomly crop both feature and label images."""
  feature, rect = image.random_crop(feature, (width, height))
  label = image.fixed_crop(label, *rect)
  return feature, label

imgs = []
for _ in range(n):
  imgs += voc_rand_crop(train_features[0], train_labels[0], 200, 300)
d2l.show_images(imgs[::2] + imgs[1::2], 2, n);
14.9.2.2。自定義語義分割數據集類
VOCSegDataset 我們通過繼承Dataset高級 API 提供的類來定義自定義語義分割數據集類。通過實現該__getitem__函數,我們可以任意訪問數據集中索引的輸入圖像idx以及該圖像中每個像素的類索引。由于數據集中的某些圖像的尺寸小于隨機裁剪的輸出尺寸,因此這些示例被自定義函數過濾掉filter。此外,我們還定義了normalize_image函數來標準化輸入圖像的三個 RGB 通道的值。
#@save
class VOCSegDataset(torch.utils.data.Dataset):
  """A customized dataset to load the VOC dataset."""

  def __init__(self, is_train, crop_size, voc_dir):
    self.transform = torchvision.transforms.Normalize(
      mean=[0.485, 0.456, 0.406], std=[0.229, 0.224, 0.225])
    self.crop_size = crop_size
    features, labels = read_voc_images(voc_dir, is_train=is_train)
    self.features = [self.normalize_image(feature)
             for feature in self.filter(features)]
    self.labels = self.filter(labels)
    self.colormap2label = voc_colormap2label()
    print('read ' + str(len(self.features)) + ' examples')

  def normalize_image(self, img):
    return self.transform(img.float() / 255)

  def filter(self, imgs):
    return [img for img in imgs if (
      img.shape[1] >= self.crop_size[0] and
      img.shape[2] >= self.crop_size[1])]

  def __getitem__(self, idx):
    feature, label = voc_rand_crop(self.features[idx], self.labels[idx],
                    *self.crop_size)
    return (feature, voc_label_indices(label, self.colormap2label))

  def __len__(self):
    return len(self.features)
#@save
class VOCSegDataset(gluon.data.Dataset):
  """A customized dataset to load the VOC dataset."""
  def __init__(self, is_train, crop_size, voc_dir):
    self.rgb_mean = np.array([0.485, 0.456, 0.406])
    self.rgb_std = np.array([0.229, 0.224, 0.225])
    self.crop_size = crop_size
    features, labels = read_voc_images(voc_dir, is_train=is_train)
    self.features = [self.normalize_image(feature)
             for feature in self.filter(features)]
    self.labels = self.filter(labels)
    self.colormap2label = voc_colormap2label()
    print('read ' + str(len(self.features)) + ' examples')

  def normalize_image(self, img):
    return (img.astype('float32') / 255 - self.rgb_mean) / self.rgb_std

  def filter(self, imgs):
    return [img for img in imgs if (
      img.shape[0] >= self.crop_size[0] and
      img.shape[1] >= self.crop_size[1])]

  def __getitem__(self, idx):
    feature, label = voc_rand_crop(self.features[idx], self.labels[idx],
                    *self.crop_size)
    return (feature.transpose(2, 0, 1),
        voc_label_indices(label, self.colormap2label))

  def __len__(self):
    return len(self.features)
14.9.2.3。讀取數據集
我們使用自定義VOCSegDataset 類分別創建訓練集和測試集的實例。假設我們指定隨機裁剪圖像的輸出形狀是320×480. 下面我們可以查看訓練集和測試集中保留的示例數量。
crop_size = (320, 480)
voc_train = VOCSegDataset(True, crop_size, voc_dir)
voc_test = VOCSegDataset(False, crop_size, voc_dir)
read 1114 examples
read 1078 examples
crop_size = (320, 480)
voc_train = VOCSegDataset(True, crop_size, voc_dir)
voc_test = VOCSegDataset(False, crop_size, voc_dir)
read 1114 examples
read 1078 examples
將批量大小設置為 64,我們為訓練集定義數據迭代器。讓我們打印第一個小批量的形狀。與圖像分類或目標檢測不同,這里的標簽是三維張量。
batch_size = 64
train_iter = torch.utils.data.DataLoader(voc_train, batch_size, shuffle=True,
                  drop_last=True,
                  num_workers=d2l.get_dataloader_workers())
for X, Y in train_iter:
  print(X.shape)
  print(Y.shape)
  break
torch.Size([64, 3, 320, 480])
torch.Size([64, 320, 480])
batch_size = 64
train_iter = gluon.data.DataLoader(voc_train, batch_size, shuffle=True,
                  last_batch='discard',
                  num_workers=d2l.get_dataloader_workers())
for X, Y in train_iter:
  print(X.shape)
  print(Y.shape)
  break
(64, 3, 320, 480)
(64, 320, 480)
14.9.2.4。把它們放在一起
最后,我們定義以下load_data_voc函數來下載和讀取 Pascal VOC2012 語義分割數據集。它返回訓練和測試數據集的數據迭代器。
#@save
def load_data_voc(batch_size, crop_size):
  """Load the VOC semantic segmentation dataset."""
  voc_dir = d2l.download_extract('voc2012', os.path.join(
    'VOCdevkit', 'VOC2012'))
  num_workers = d2l.get_dataloader_workers()
  train_iter = torch.utils.data.DataLoader(
    VOCSegDataset(True, crop_size, voc_dir), batch_size,
    shuffle=True, drop_last=True, num_workers=num_workers)
  test_iter = torch.utils.data.DataLoader(
    VOCSegDataset(False, crop_size, voc_dir), batch_size,
    drop_last=True, num_workers=num_workers)
  return train_iter, test_iter
#@save
def load_data_voc(batch_size, crop_size):
  """Load the VOC semantic segmentation dataset."""
  voc_dir = d2l.download_extract('voc2012', os.path.join(
    'VOCdevkit', 'VOC2012'))
  num_workers = d2l.get_dataloader_workers()
  train_iter = gluon.data.DataLoader(
    VOCSegDataset(True, crop_size, voc_dir), batch_size,
    shuffle=True, last_batch='discard', num_workers=num_workers)
  test_iter = gluon.data.DataLoader(
    VOCSegDataset(False, crop_size, voc_dir), batch_size,
    last_batch='discard', num_workers=num_workers)
  return train_iter, test_iter
14.9.3。概括
語義分割通過將圖像劃分為屬于不同語義類的區域,以像素級別識別和理解圖像中的內容。
最重要的語義分割數據集之一是 Pascal VOC2012。
在語義分割中,由于輸入圖像和標簽在像素上一一對應,輸入圖像被隨機裁剪成固定形狀而不是重新縮放。
14.9.4。練習
語義分割如何應用于自動駕駛汽車和醫學圖像診斷?你能想到其他應用嗎?
回想一下14.1 節中對數據擴充的描述 。圖像分類中使用的哪種圖像增強方法不能應用于語義分割?
-
數據集
+關注
關注
4文章
1208瀏覽量
24703 -
pytorch
+關注
關注
2文章
808瀏覽量
13226
發布評論請先 登錄
相關推薦
幾大主流公開遙感數據集
廣泛應用的城市語義分割的數據集整理
DeepLab進行語義分割的研究分析
大華股份AI刷新了Cityscapes數據集中語義分割任務的全球最好成績
分析總結基于深度神經網絡的圖像語義分割方法


 PyTorch教程-14.9. 語義分割和數據集



評論