AWorksLP 對外設進行了高度抽象化,為同一類外設提供了相同的接口,應用程序可以輕松跨平臺。本文以MR6450平臺為例,介紹AWorksLP HWTimer 外設基本用法。 簡介在AWorksLP中將硬件定時器分為了4類,即延時型、計數型、周期型和輸入捕獲型硬件定時器。
- 延時型硬件定時器:
由硬件定時器外設提供的延時功能。
- 計數型硬件定時器:
提供較精確的類似時間戳的功能。
- 周期型硬件定時器:
可設置中斷頻率的計數器,不僅能提供計數器的功能,也能根據中斷頻率提供更精確的定時。
- 輸入捕獲定時器:可測量脈沖寬度或者測量頻率。
 接口介紹延時型硬件定時器:
函數原型 | 簡要描述 |
aw_err_t aw_hwtimer_delay (int fd, struct aw_timespec *p_tv); | 延時 |
aw_err_t aw_hwtimer_delay_cancel (int fd); | 取消延時 |
計數型硬件定時器:
函數原型 | 簡要描述 |
aw_err_t aw_hwtimer_count_start (int fd); | 啟動一個計數型硬件定時器 |
aw_err_t aw_hwtimer_count_stop (int fd); | 停止一個計數型硬件定時器 |
aw_err_t aw_hwtimer_count_get (int fd, uint64_t *p_count); | 讀取計數值 |
aw_err_t aw_hwtimer_count_rate_get (int fd, uint32_t *p_rate); | 獲取計數時鐘頻率 |
aw_err_t aw_hwtimer_count_rate_set (int fd, uint32_t rate); | 設置計數時鐘頻率 |
aw_err_t aw_hwtimer_count_rate_set_accurate (int fd, uint32_t rate_numerator, uint32_t rate_denominator); | 以精確化的方式設置計數時鐘頻率 |
aw_err_t aw_hwtimer_count_rate_get_accurate (int fd, uint32_t *p_rate_numerator, uint32_t *p_rate_denominator); | 獲取計數時鐘頻率的精確描述 |
周期型硬件定時器:
函數原型 | 簡要描述 |
aw_err_t aw_hwtimer_period_wait (int fd, uint32_t wait_ms); | 等待定時器周期中斷 |
aw_err_t aw_hwtimer_period_intr (int fd); | 打斷周期型定時器的等待操作 |
aw_err_t aw_hwtimer_period_start (int fd); | 啟動定時器 |
aw_err_t aw_hwtimer_period_stop (int fd); | 停止定時器 |
aw_err_t aw_hwtimer_period_count_get (int fd, uint64_t *p_count); | 讀取計數值 |
aw_err_t aw_hwtimer_period_count_freq_get (int fd, uint32_t *p_rate); | 獲取周期型定時器的硬件計數頻率(不是中斷頻率) |
aw_err_t aw_hwtimer_period_count_freq_get_frac (int fd, aw_hwtimer_rate_t *p_rate); | 以更精確的分數形式獲取周期型定時器的硬件計數頻率(不是中斷頻率) |
aw_err_t aw_hwtimer_period_intr_freq_set (int fd, uint32_t intr_freq); | 設置中斷頻率 |
aw_err_t aw_hwtimer_period_intr_freq_get (int fd, uint32_t *p_intr_freq); | 獲取中斷頻率 |
aw_err_t aw_hwtimer_period_intr_freq_set_frac (int fd, aw_const aw_hwtimer_rate_t *p_intr_freq); | 設置中斷頻率(以更精確的分數形式) |
aw_err_t aw_hwtimer_period_intr_freq_get_frac (int fd, aw_hwtimer_rate_t *p_intr_freq); | 獲取中斷頻率(以更精確的分數形式) |
輸入捕獲型硬件定時器:
函數原型 | 簡要描述 |
aw_err_t aw_hwtimer_cap_start (int fd); | 啟動輸入捕獲型硬件定時器 |
aw_err_t aw_hwtimer_cap_stop (int fd); | 停止輸入捕獲型硬件定時器 |
aw_err_t aw_hwtimer_cap_read (int fd, uint64_t *p_cap_val, uint32_t timeout_ms); | 讀取一個捕獲到的事件的計數值 |
aw_err_t aw_hwtimer_cap_intr (int fd); | 打斷阻塞read讀操作 |
aw_err_t aw_hwtimer_cap_config_set (int fd, aw_const aw_hwtimer_cap_config_t *p_config); | 配置輸入捕獲型硬件定時器 |
aw_err_t aw_hwtimer_cap_config_get (int fd, aw_hwtimer_cap_config_t *p_config); | 獲取輸入捕獲型硬件定時器的配置 |
 使用樣例AWorksLP SDK相關使用請參考《AWorksLP SDK快速入門(MR6450)——開箱體驗》一文,本文不在贅述。1. 周期型定時器{SDK}\demos\peripheral\hwtimer路徑下為硬件定時器例程,默認運行的是demo_hwtimer.c 周期型定時器的代碼,例程關鍵代碼如下:
/** * \brief 硬件定時器中斷服務函數。 * \param[in] p_arg : 任務參數 */static void mytimer_isr (void *p_arg){ aw_gpio_toggle((int)p_arg); aw_kprintf("enter isr \n\r");}
/** * \brief hwtimer 測試函數 */aw_local void* __task_handle (void *arg){ int fd; aw_err_t ret; uint32_t count = 5; aw_hwtimer_rate_t p_intr_freq;
p_intr_freq.rate_denominator = 5; p_intr_freq.rate_numerator = 1;
fd = aw_open(CONFIG_DEMO_HWTIMER_PEROID_DEV_NAME, AW_O_RDWR, 0); if (fd < 0) { ? ? ? ?aw_kprintf("hwtimer open failed:%d \n\r", fd); ? ? ? ?while(1); ? ?}
ret = aw_hwtimer_period_intr_freq_set_frac(fd, &p_intr_freq); while (count) { aw_hwtimer_period_wait(fd, 500); mytimer_isr(arg); count --; }
// 配置每秒中斷2次 ret = aw_hwtimer_period_intr_freq_set(fd, 2);
ret = aw_hwtimer_period_start(fd); if (ret != AW_OK) { aw_kprintf("Timer allocation fail!\n"); }
ret = aw_hwtimer_period_wait(fd, AW_WAIT_FOREVER);
while (1) { aw_hwtimer_period_wait(fd, AW_WAIT_FOREVER); mytimer_isr(arg); }
for (;;) { aw_mdelay(1000); } aw_close(fd);
return 0;}
在代碼中先使用了aw_hwtimer_period_intr_freq_set_frac 接口,以分數的形式設置中斷頻率,使用aw_hwtimer_period_start接口啟動定時器。在循環中使用aw_hwtimer_period_wait 接口阻塞等待中斷的產生、中斷產生后繼續執行mytimer_isr函數使LED 燈狀態翻轉,由于設置的頻率為五分之一,所以5秒LED 燈的狀態翻轉一次;循環一定次數后用aw_hwtimer_period_intr_freq_set 接口設置中斷頻率為2HZ,循環等待中斷、翻轉LED。實驗現象為LED燈先以5s的頻率閃爍,同時串口打印同時信息。閃爍一定次數后以0.5s的頻率LED閃爍,同時串口打印信息。
下表為使用硬件周期型定時器,在中斷中進行引腳翻轉,通過邏輯分析儀所測量出的實際數據,在使用設計時可作為部分參考依據。
定時時間(s) | 實際時間(s) |
0.010000000 | 0.010000115 |
0.020000000 | 0.019999940 |
0.030000000 | 0.029999980 |
0.040000000 | 0.040000035 |
0.050000000 | 0.049999830 |
0.100000000 | 0.100000075 |
0.200000000 | 0.200000020 |
0.500000000 | 0.500000070 |
1.000000000 | 1.000000760 |
2.000000000 | 1.999999340 |
3.000000000 | 3.000002760 |
4.000000000 | 4.000001980 |
5.000000000 | 5.000004310 |
10.000000000 | 10.000008300 |
2.計數型定時器在config配置腳本中選擇hwtimer count計數型定時器測試如圖1所示。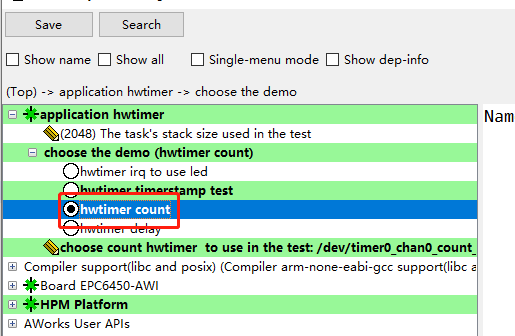 圖1 計數型定時器例程保存后重新Build工程,編譯好后運行的是demo_hwtimer_count.c的代碼,例程關鍵代碼如下:
aw_local void* __task_handle (void *arg){ uint32_t count = 0; int fd, led_fd; int ret; uint32_t start_count; fd = aw_open(CONFIG_DEMO_HWTIMER_PEROID_DEV_NAME, AW_O_RDWR, 0); if (fd < 0) { aw_kprintf("hwtimer open fail! :%d\n",fd); return; } /* 打開設備會點亮LED */ led_fd = aw_open("/dev/led_run", AW_O_RDWR, 0); if (led_fd < 0) { aw_kprintf("led open fail! :%d\n", led_fd); aw_close(fd); return; } ret = aw_hwtimer_count_rate_get(fd, &start_count); if (ret != AW_OK) { aw_kprintf("Timer count rate get fail!\n"); aw_close(fd); aw_close(led_fd); return; } // 設置時鐘頻率 ret = aw_hwtimer_count_rate_set(fd, start_count/2); if (ret != AW_OK) { aw_kprintf("Timer count rate set fail!\n"); aw_close(fd); aw_close(led_fd); return; } ret = aw_hwtimer_count_start(fd); if (ret != AW_OK) { aw_kprintf("Timer start fail!\n"); aw_close(fd); aw_close(led_fd); return; } for (;;) { aw_led_toggle(led_fd); aw_mdelay(500); aw_led_toggle(led_fd); aw_hwtimer_count_get(fd, &count); aw_kprintf("Count is %d\r\n", count); } aw_close(fd); aw_close(led_fd); return 0;}
在上述代碼中使用了aw_hwtimer_count_rate_get接口獲取改定時器時鐘頻率,可以在調試模式下查看獲取到的參數,為100M 如圖2所示。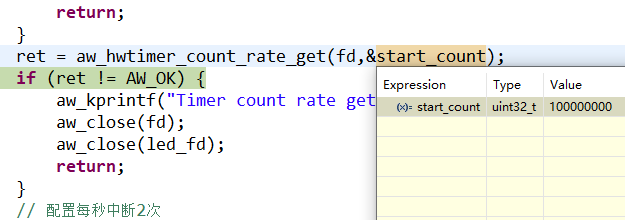 圖2查看參數使用aw_hwtimer_count_rate_set接口設置定時器時鐘的頻率為50M,使用aw_hwtimer_count_start接口開啟定時器,使用aw_hwtimer_count_get接口在循環中每延時500ms獲取一次計數值,并在串口中打印,打印結果如圖3所示。
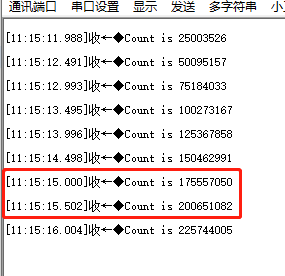
圖3串口打印計數值打印出的計數值中,相鄰兩個計數值之差為25M,是由于設置定時器頻率為50M,每延時500ms計數值增加25M。3.延時型定時器在config配置腳本中選擇hwtimer delay延時型定時器測試如圖4所示。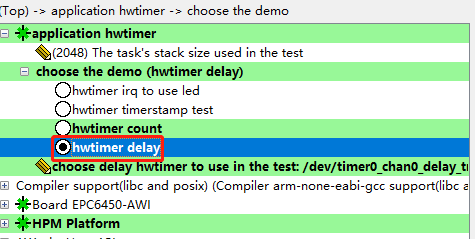 圖4計數型定時器例程保存后重新Build工程,編譯好后運行的是demo_hwtimer_count.c的代碼,例程關鍵代碼如下:
aw_local void* __task_handle (void *arg){ int i; int fd; aw_err_t ret; aw_timespec_t timespec; aw_timestamp_t start_timestamp, stop_timestamp; aw_timestamp_freq_t timestamp_freq; uint64_t delay_ns, diff; uint32_t ns_numerator = 1000000000;
timestamp_freq = aw_timestamp_freq_get(); while (0 == (timestamp_freq % 10)) { timestamp_freq /= 10; ns_numerator /= 10;}
fd = aw_open(CONFIG_DEMO_HWTIMER_DELAY_DEV_NAME, AW_O_RDWR, 0); if (fd < 0) { aw_kprintf("hwtimer open failed:%d \n\r", fd); while(1); }
delay_ns = 2001000; for (i = 0; i < 100; i++) { timespec.tv_sec = delay_ns / 1000000000u; timespec.tv_nsec = (uint32_t)(delay_ns % 1000000000u);
start_timestamp = aw_timestamp_get(); ret = aw_hwtimer_delay(fd, ×pec); if (ret !=AW_OK) { aw_kprintf("hwtimer delay failed:%d \n\r", ret); } aw_barrier(); stop_timestamp = aw_timestamp_get();
stop_timestamp -= start_timestamp; diff = stop_timestamp; diff *= ns_numerator; diff /= timestamp_freq;
diff = diff - delay_ns; aw_kprintf( "hwtimer_delay delay = %u,diff = %u ns\n", (uint32_t)delay_ns, (uint32_t)diff); delay_ns += 100000; } aw_close(fd); return 0;}
上述代碼中在延時開始前使用aw_timestamp_get接口記錄時間戳,使用aw_hwtimer_delay接口進行延時,延時結束后記錄結束時間戳,用兩個時間戳的差值通過換算,用于對比延時不同時間下與timestamp相比的誤差,并在串口中打印,打印后增加延時時間,再次循環,串口打印結果如下圖所示。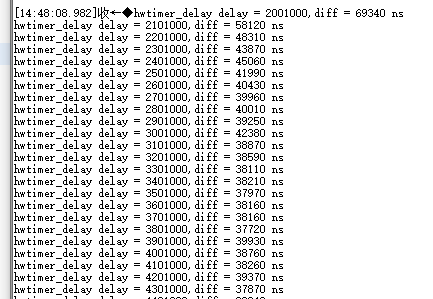 圖5串口打印結果因外設接口調用時代碼執行需要時間以及晶振等硬件會導致誤差,分析例程打印數據可得,延時性定時器的軟件開銷在同一硬件以及接口下,其誤差基本是一致的。4. 捕獲型定時器
{SDK}\demos\peripheral\cap路徑下為捕獲型定時器例程,例程關鍵代碼如下:
/* 單邊沿觸發*/static void test_cap_single_edge( int fd, int gpio_cap, uint32_t ms, aw_hwtimer_cap_config_t *p_config, int is_rising){ uint64_t cap_val1, cap_val2; aw_err_t ret;
// 制造兩次上升沿 mk_edge(gpio_cap, 5); aw_task_delay(ms); mk_edge(gpio_cap, 5);
// 此時應該產生了兩次捕獲事件 // 把它們讀出來 ret = aw_hwtimer_cap_read(fd, &cap_val1, AW_WAIT_FOREVER); if (AW_OK != ret) { aw_kprintf("cap read cap_val1 failed \n"); return; } ret = aw_hwtimer_cap_read(fd, &cap_val2, AW_WAIT_FOREVER); if (AW_OK != ret) { aw_kprintf("cap read cap_val2 failed \n"); return; }
cap_val2 -= cap_val1; cap_val2 *= 1000000; cap_val2 /= p_config->sample_rate;
if (is_rising) { aw_kprintf("two rising edge between %u ms \n", ms + 5); } else { aw_kprintf("two falling edge between %u ms \n", ms + 5); } aw_kprintf("two capture events between %llu us \n", cap_val2);}
static void demo_cap_base(int gpio_cap){ int fd; aw_err_t ret; aw_hwtimer_cap_config_t config;
// 使得測試GPIO輸出為0 aw_gpio_set(gpio_cap, 0);
fd = aw_open(CONFIG_DEMO_HWTIMER_CAP_DEV_NAME, AW_O_RDWR, 0); if (fd < 0) { aw_kprintf("cap open failed!\n"); return; }
// 獲取捕獲定時器的配置 ret = aw_hwtimer_cap_config_get(fd, &config); if (ret != AW_OK) { aw_kprintf("cap config get failed...\r\n"); aw_close(fd); return ; }
#if CONFIG_SINGLE_EDGE int is_rising; // 配置為上升沿觸發捕獲 config.cap_edge_flags = AW_CAPTURE_RISING_EDGE; is_rising = 1; ret = aw_hwtimer_cap_config_set(fd, &config); if (ret != AW_OK) { aw_kprintf("cap config set failed...\r\n"); aw_close(fd); return ; }
ret = aw_hwtimer_cap_start(fd); if (ret != AW_OK) { aw_kprintf("cap start failed...\r\n"); aw_close(fd); return ; } test_cap_single_edge(fd, gpio_cap, 20, &config, is_rising);#endif
aw_close(fd);}
在CAP 例程中默認使用的是timer5_chan0,這個通道對應的引腳是PF08,可以通過查看工程下timer5_chan0對應的.h文件得知所使用的引腳的編號為168,通過查看hpm_pin.h頭文件可知編號168對應的引腳為PF08 如下圖所示。 圖6默認通道
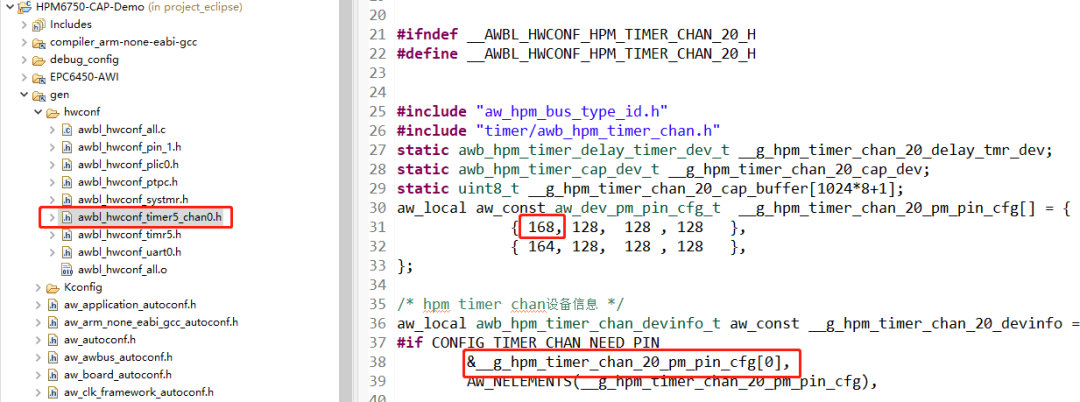 圖7對應引腳編號
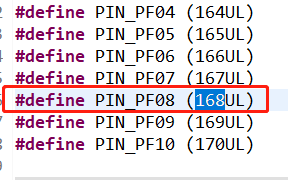
圖8對應引腳本實驗中還用到了PF09 這個引腳,用于產生捕獲事件,PF09 和 PF08 這兩個引腳在開發板上并沒有引出來,不利于這次實驗,需要修改這兩個引腳。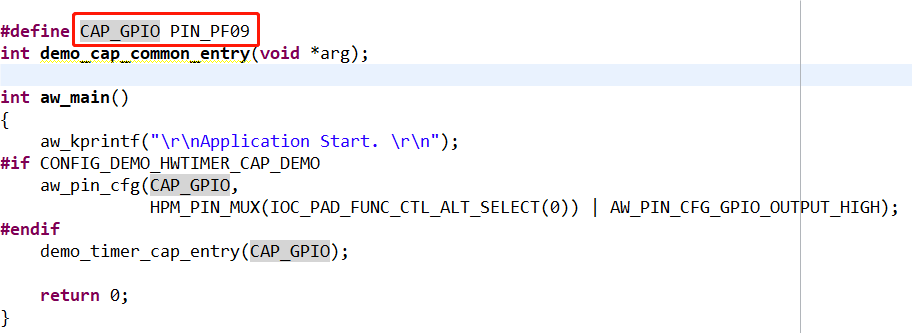 圖9捕獲產生引腳參考{SDK} platforms\platform-hpm-aworks-lp\boards\EPC6450-AWI\dts 下的pins.dts 引腳描述文件,找到timer4_chan1 如圖10所示,timer4_chan1 使用的引腳是PE25, 對應著開發板排針 UTX1 絲印的位置。
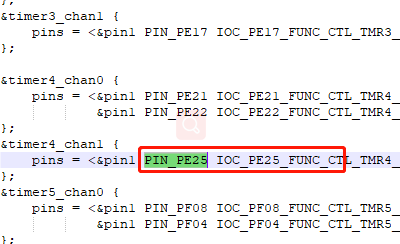 圖10捕獲產生引腳打開配置界面將timer5_chan0修改為timer4_chan1 如圖11所示,修改后點擊保存,重新build工程。
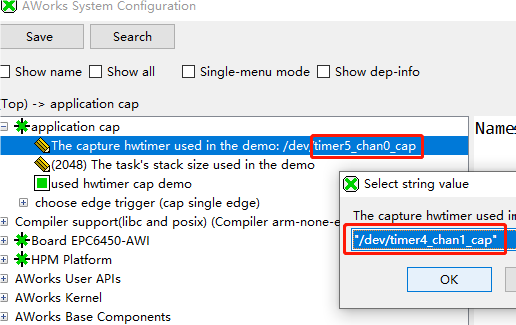 圖11配置界面將CAP_GPIO 對應的引腳改為PIN_PE24,對應著開發板排針 URX1 絲印的位置,如圖12所示。
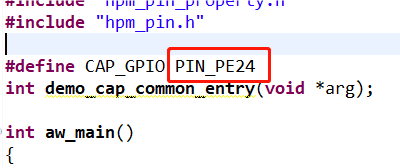
圖12CAP引腳將 PE25 , PE24 這兩個引腳,也就是排針上 URX1 和 UTX1 短接。
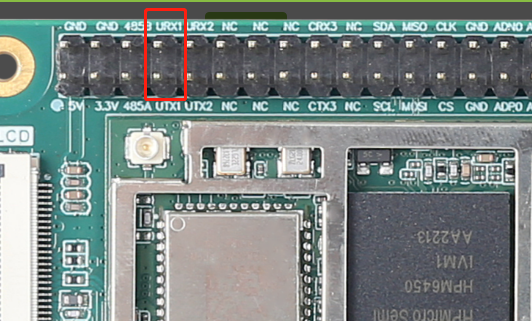
圖13引腳位置上訴代碼中使用aw_hwtimer_cap_config_get接口獲取捕獲定時器的配置信息,配置AW_CAPTURE_RISING_EDGE單通道模式后使用aw_hwtimer_cap_config_set接口配置捕獲定時器。使用aw_hwtimer_cap_start接口啟動定時器。在test_cap_single_edge函數中調用mk_edge函數制造兩次上升沿,使用aw_hwtimer_cap_read接口讀取這兩次事件捕獲到的計數值,計算出差值后在串口上顯示。在test_cap_single_edge函數中使用mk_edge函數中控制CAP_GPIO引腳輸出高電平后延時5ms再輸出低電平。延時20ms后再次調用mk_edge函數,因此兩次上升沿事件間隔應為25ms。串口打印結果如下圖所示。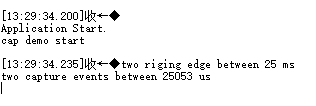 圖14串口打印結果
至此,所有類型的硬件定時器樣例均已展示完畢,在軟件應用設計中可根據實際需求選取不同類型的定時器進行使用。更多其他類型外設的用法介紹,請關注后續同系列推文~
-
接口
+關注
關注
33文章
8664瀏覽量
151508 -
定時器
+關注
關注
23文章
3253瀏覽量
115067
發布評論請先 登錄
相關推薦
為何ZLG致遠電子要推出LGA嵌入式核心板?

TPA3255產品應用在消防廣播,固定輸入下, 如果輸出負載變化時,輸出電壓還能保持不變嗎?
基于RL78/G16 FPB的觸摸樣例工程創建演示流程

武漢凡谷:現階段已有產品應用到5.5G系統
【Vision Board創客營連載體驗】HWTIMER設備體驗
淺談智慧校園的用電安全管理分析及產品應用
《RT-Thread設備驅動開發指南》基礎篇--以先楫bsp的hwtimer設備為例


 【產品應用】AWorksLP 樣例詳解(MR6450)—— HWTimer



評論