作者:顏國進英特爾邊緣計算創新大使
RT-DETR 是在 DETR 模型基礎上進行改進的,一種基于 DETR 架構的實時端到端檢測器,它通過使用一系列新的技術和算法,實現了更高效的訓練和推理,在前文我們發表了《基于 OpenVINO Python API 部署 RT-DETR 模型 | 開發者實戰》和《基于 OpenVINO C++ API 部署 RT-DETR 模型 | 開發者實戰》,在該文章中,我們基于 OpenVINO Python 和 C++ API 向大家展示了的 RT-DETR 模型的部署流程,并分別展示了是否包含后處理的模型部署流程,為大家使用 RT-DETR 模型提供了很好的范例。在實際工業應用時,有時我們需要在 C# 環境下使用該模型應用到工業檢測中,因此在本文中,我們將向大家展示使用 OpenVINO Csharp API 部署 RT-DETR 模型,并對比不同編程平臺下模型部署的速度。
該項目所使用的全部代碼已經在 GitHub 上開源,并且收藏在 OpenVINO-CSharp-API 項目里。
1. RT-DETR
飛槳在去年 3 月份推出了高精度通用目標檢測模型 PP-YOLOE ,同年在 PP-YOLOE 的基礎上提出了 PP-YOLOE+。而繼 PP-YOLOE 提出后,MT-YOLOv6、YOLOv7、DAMO-YOLO、RTMDet 等模型先后被提出,一直迭代到今年開年的 YOLOv8。
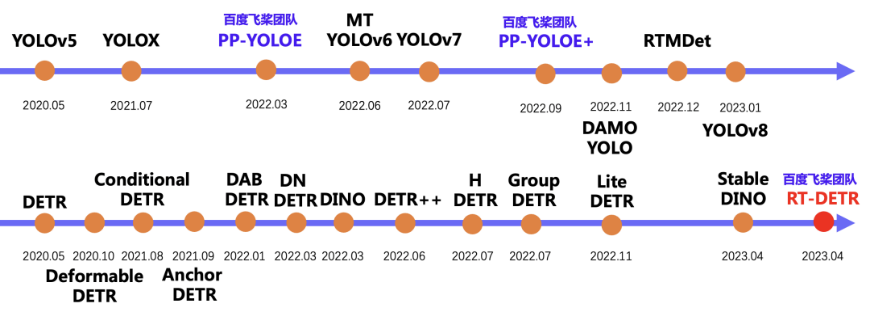
YOLO 檢測器有個較大的待改進點是需要 NMS 后處理,其通常難以優化且不夠魯棒,因此檢測器的速度存在延遲。DETR是一種不需要 NMS 后處理、基于 Transformer 的端到端目標檢測器。百度飛槳正式推出了 —— RT-DETR (Real-Time DEtection TRansformer) ,一種基于 DETR 架構的實時端到端檢測器,其在速度和精度上取得了 SOTA 性能。
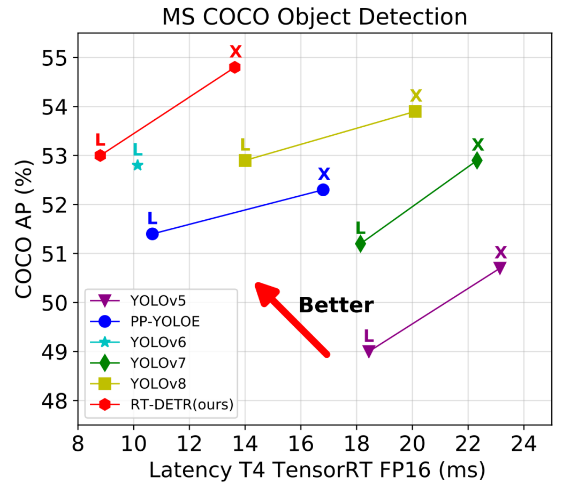
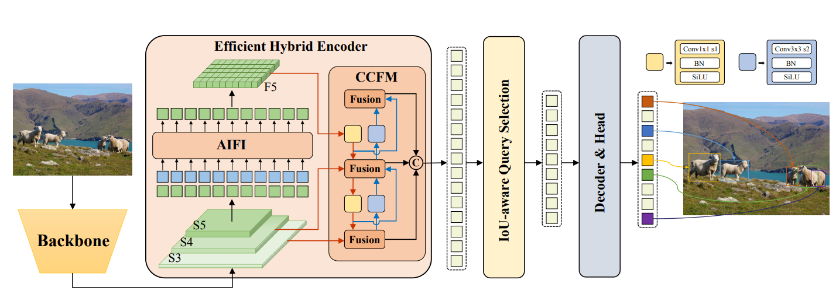
RT-DETR 是在 DETR 模型基礎上進行改進的,它通過使用一系列新的技術和算法,實現了更高效的訓練和推理。具體來說,RT-DETR 具有以下優勢:
1. 實時性能更佳
RT-DETR 采用了一種新的注意力機制,能夠更好地捕獲物體之間的關系,并減少計算量。此外,RT-DETR 還引入了一種基于時間的注意力機制,能夠更好地處理視頻數據。
2. 精度更高
RT-DETR 在保證實時性能的同時,還能夠保持較高的檢測精度。這主要得益于 RT-DETR 引入的一種新的多任務學習機制,能夠更好地利用訓練數據。
3. 更易于訓練和調參
RT-DETR 采用了一種新的損失函數,能夠更好地進行訓練和調參。此外,RT-DETR 還引入了一種新的數據增強技術,能夠更好地利用訓練數據。
2. OpenVINO
英特爾 發行版OpenVINO 工具套件基于 oneAPI而開發,可以加快高性能計算機視覺和深度學習視覺應用開發速度工具套件,適用于從邊緣到云的各種英特爾平臺上,幫助用戶更快地將更準確的真實世界結果部署到生產系統中。通過簡化的開發工作流程,OpenVINO 可賦能開發者在現實世界中部署高性能應用程序和算法。
OpenVINO 2023.1 于 2023 年 9 月 18 日發布,該工具包帶來了挖掘生成人工智能全部潛力的新功能。生成人工智能的覆蓋范圍得到了擴展,通過 PyTorch* 等框架增強了體驗,您可以在其中自動導入和轉換模型。大型語言模型(LLM)在運行時性能和內存優化方面得到了提升。聊天機器人、代碼生成等的模型已啟用。OpenVINO更便攜,性能更高,可以在任何需要的地方運行:在邊緣、云中或本地。
3. 環境配置
本文中主要使用的項目環境可以通過 NuGet Package 包進行安裝,Visual Studio 提供了 NuGet Package 包管理功能,可以通過其進行安裝,主要使用下圖兩個程序包,C# 平臺安裝程序包還是十分方便的,直接安裝即可使用:
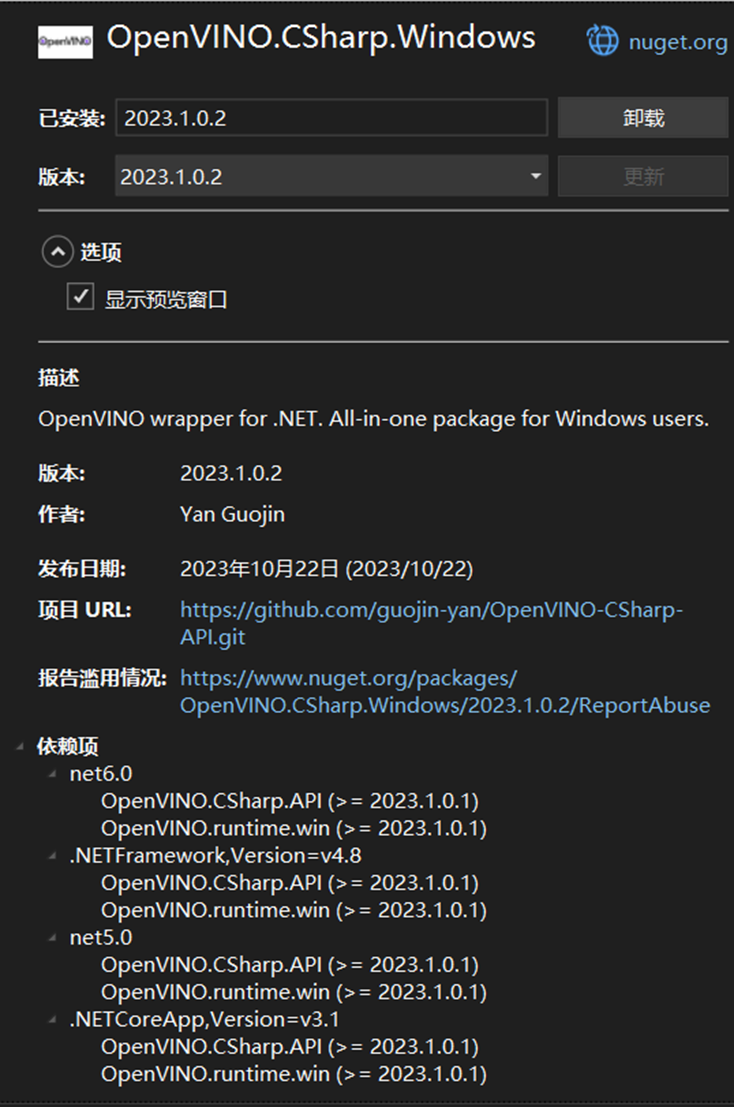
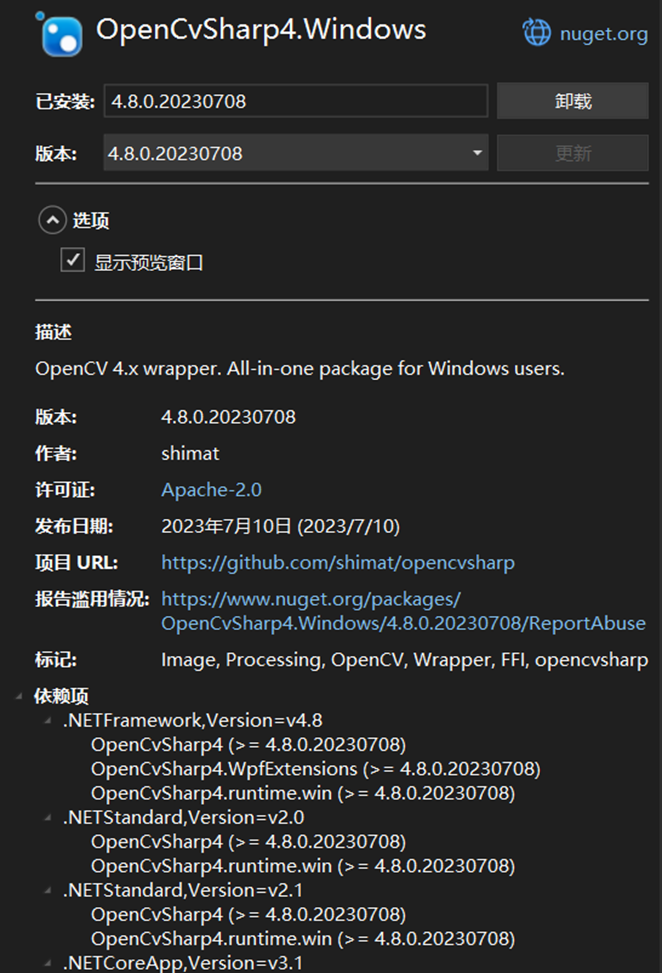
除了通過 Visual Studio 安裝,也可以通過 dotnet 指令進行安裝,安裝命令為:
dotnet add package OpenVINO.CSharp.Windows --version 2023.1.0.2
dotnet add package OpenCvSharp4.Windows --version 4.8.0.20230708
左滑查看更多
4. 模型下載與轉換
在之前的文章中我們已經講解了模型的到處方式,大家可以參考下面兩篇文章實現模型導出:《基于 OpenVINO Python API 部署 RT-DETR 模型 | 開發者實戰》和《基于 OpenVINO C++ API 部署 RT-DETR 模型 | 開發者實戰》。
5. C# 代碼實現
為了更系統地實現 RT-DETR 模型的推理流程,我們采用 C# 特性,封裝了 RTDETRPredictor 模型推理類以及 RTDETRProcess 模型數據處理類,下面我們將對這兩個類中的關鍵代碼進行講解。
5.1 模型推理類實現
C# 代碼中我們定義的 RTDETRPredictor 模型推理類如下所示:
public class RTDETRPredictor
{
  public RTDETRPredictor(string model_path, string label_path,
  string device_name = "CPU", bool postprcoess = true)
{}
  public Mat predict(Mat image)
{}
  private void pritf_model_info(Model model)
{}
  private void fill_tensor_data_image(Tensor input_tensor, Mat input_image)
{}
  private void fill_tensor_data_float(Tensor input_tensor, float[] input_data, int data_size)
{}
  RTDETRProcess rtdetr_process;
  bool post_flag;
  Core core;
  Model model;
  CompiledModel compiled_model;
  InferRequest infer_request;
}
左滑查看更多
1)模型推理類初始化
首先我們需要初始化模型推理類,初始化相關信息:
public RTDETRPredictor(string model_path, string label_path, string device_name = "CPU", bool postprcoess = true)
{
  INFO("Model path: " + model_path);
  INFO("Device name: " + device_name);
  core = new Core();
  model = core.read_model(model_path);
  pritf_model_info(model);
  compiled_model = core.compile_model(model, device_name);
  infer_request = compiled_model.create_infer_request();
  rtdetr_process = new RTDETRProcess(new Size(640, 640), label_path, 0.5f);
  this.post_flag = postprcoess;
}
左滑查看更多
在該方法中主要包含以下幾個輸入:
model_path:推理模型地址;
label_path:模型預測類別文件;
device_name:推理設備名稱;
post_flag:模型是否包含后處理,當 post_flag = true 時,包含后處理,當 post_flag = false 時,不包含后處理。
2)圖片預測 API
這一步中主要是對輸入圖片進行預測,并將模型預測結果會知道輸入圖片上,下面是這階段的主要代碼:
public Mat predict(Mat image)
{
  Mat blob_image = rtdetr_process.preprocess(image.Clone());
  if (post_flag)
  {
    Tensor image_tensor = infer_request.get_tensor("image");
    Tensor shape_tensor = infer_request.get_tensor("im_shape");
    Tensor scale_tensor = infer_request.get_tensor("scale_factor");
    image_tensor.set_shape(new Shape(new List { 1, 3, 640, 640 }));
    shape_tensor.set_shape(new Shape(new List { 1, 2 }));
    scale_tensor.set_shape(new Shape(new List { 1, 2 }));
    fill_tensor_data_image(image_tensor, blob_image);
    fill_tensor_data_float(shape_tensor, rtdetr_process.get_input_shape().ToArray(), 2);
    fill_tensor_data_float(scale_tensor, rtdetr_process.get_scale_factor().ToArray(), 2);
  } else {
    Tensor image_tensor = infer_request.get_input_tensor();
    image_tensor.set_shape(new Shape(new List { 1, 3, 640, 640 }));
    fill_tensor_data_image(image_tensor, blob_image);
  }
  infer_request.infer();
  ResultData results;
  if (post_flag)
  {
    Tensor output_tensor = infer_request.get_tensor("reshape2_95.tmp_0");
    float[] result = output_tensor.get_data(300 * 6);
    results = rtdetr_process.postprocess(result, null, true);
  } else {
    Tensor score_tensor = infer_request.get_tensor(model.outputs()[1].get_any_name());
    Tensor bbox_tensor = infer_request.get_tensor(model.outputs()[0].get_any_name());
    float[] score = score_tensor.get_data(300 * 80);
    float[] bbox = bbox_tensor.get_data(300 * 4);
    results = rtdetr_process.postprocess(score, bbox, false);
  }
  return rtdetr_process.draw_box(image, results);
}
左滑查看更多
上述代碼的主要邏輯如下:首先是處理輸入圖片,調用定義的數據處理類,將輸入圖片處理成指定的數據類型;然后根據模型的輸入節點情況配置模型輸入數據,如果使用的是動態模型輸入,需要設置輸入形狀;接下來就是進行模型推理;最后就是對推理結果進行處理,并將結果繪制到輸入圖片上。
在模型數據加載時,此處重新設置了輸入節點形狀,因此此處支持動態模型輸入;并且根據模型是否包含后處理分別封裝了不同的處理方式,所以此處代碼支持所有導出的預測模型。
5.2 模型數據處理類 RTDETRProcess
1)定義 RTDETRProcess
C# 代碼中我們定義的 RTDETRProcess 模型推理類如下所示:
public class RTDETRProcess
{
  public RTDETRProcess(Size target_size, string label_path = null, float threshold = 0.5f, InterpolationFlags interpf = InterpolationFlags.Linear)
{}
  public Mat preprocess(Mat image)
{}
  public ResultData postprocess(float[] score, float[] bbox, bool post_flag)
{}
  public List get_input_shape()
{}
  public List get_scale_factor() { }
  public Mat draw_box(Mat image, ResultData results)
{}
  private void read_labels(string label_path)
{}
  private float sigmoid(float data)
{}
  private int argmax(float[] data, int length)
{}
  private Size target_size;        // The model input size.
  private List labels;  // The model classification label.
  private float threshold;          // The threshold parameter.
  private InterpolationFlags interpf;   // The image scaling method.
  private List im_shape;
  private List scale_factor;
}
左滑查看更多
2) 輸入數據處理方法
輸入數據處理這一塊需要獲取圖片形狀大小以及圖片縮放比例系數,最后直接調用 OpenCV 提供的數據處理方法,對輸入數據進行處理。
public Mat preprocess(Mat image)
{
  im_shape = new List { (float)image.Rows, (float)image.Cols };
  scale_factor = new List { 640.0f / (float)image.Rows, 640.0f / (float)image.Cols };
  Mat input_mat = CvDnn.BlobFromImage(image, 1.0 / 255.0, target_size, 0, true, false);
  return input_mat;
}
左滑查看更多
3)預測結果數據處理方法
public ResultData postprocess(float[] score, float[] bbox, bool post_flag)
{
  ResultData result = new ResultData();
  if (post_flag)
  {
    for (int i = 0; i < 300; ++i)
 ? ? ? ?{
 ? ? ? ? ? ?if (score[6 * i + 1] > threshold)
      {
        result.clsids.Add((int)score[6 * i]);
        result.labels.Add(labels[(int)score[6 * i]]);
        result.bboxs.Add(new Rect((int)score[6 * i + 2], (int)score[6 * i + 3],
          (int)(score[6 * i + 4] - score[6 * i + 2]),
          (int)(score[6 * i + 5] - score[6 * i + 3])));
        result.scores.Add(score[6 * i + 1]);
      }
    }
  }
  else
  {
    for (int i = 0; i < 300; ++i)
 ? ? ? ?{
 ? ? ? ? ? ?float[] s = new float[80];
 ? ? ? ? ? ?for (int j = 0; j < 80; ++j)
 ? ? ? ? ? ?{
 ? ? ? ? ? ? ? ?s[j] = score[80 * i + j];
 ? ? ? ? ? ?}
 ? ? ? ? ? ?int clsid = argmax(s, 80);
 ? ? ? ? ? ?float max_score = sigmoid(s[clsid]);
 ? ? ? ? ? ?if (max_score > threshold)
      {
        result.clsids.Add(clsid);
        result.labels.Add(labels[clsid]);
        float cx = (float)(bbox[4 * i] * 640.0 / scale_factor[1]);
        float cy = (float)(bbox[4 * i + 1] * 640.0 / scale_factor[0]);
        float w = (float)(bbox[4 * i + 2] * 640.0 / scale_factor[1]);
        float h = (float)(bbox[4 * i + 3] * 640.0 / scale_factor[0]);
        result.bboxs.Add(new Rect((int)(cx - w / 2), (int)(cy - h / 2), (int)w, (int)h));
        result.scores.Add(max_score);
      }
    }
  }
  return result;
}
左滑查看更多
此處對輸出結果做一個解釋,由于我們提供了兩種模型的輸出,此處提供了兩種模型的輸出數據處理方式,主要區別在于是否對預測框進行還原以及對預測類別進行提取,具體區別大家可以查看上述代碼。
6. 預測結果展示
最后通過上述代碼,我們最終可以直接實現 RT-DETR 模型的推理部署,RT-DETR 與訓練模型采用的是 COCO 數據集,最終我們可以獲取預測后的圖像結果,如圖所示:
上圖中展示了 RT-DETR 模型預測結果,同時,我們對模型圖里過程中的關鍵信息以及推理結果進行了打印:
[INFO] Hello, World!
[INFO] Model path: E:ModelRT-DETRRTDETR
tdetr_r50vd_6x_coco.xml
[INFO] Device name: CPU
[INFO] Inference Model
[INFO]  Model name: Model from PaddlePaddle.
[INFO]  Input:
[INFO]    name: im_shape
[INFO]    type: float
[INFO]    shape: Shape : {1,2}
[INFO]    name: image
[INFO]    type: float
[INFO]    shape: Shape : {1,3,640,640}
[INFO]    name: scale_factor
[INFO]    type: float
[INFO]    shape: Shape : {1,2}
[INFO]  Output:
[INFO]    name: reshape2_95.tmp_0
[INFO]    type: float
[INFO]    shape: Shape : {300,6}
[INFO]    name: tile_3.tmp_0
[INFO]    type: int32_t
[INFO]    shape: Shape : {1}
[INFO] Infer result:
[INFO]  class_id : 0, label : person, confidence : 0.9437, left_top : [504.0, 504.0], right_bottom: [596.0, 429.0]
[INFO]  class_id : 0, label : person, confidence : 0.9396, left_top : [414.0, 414.0], right_bottom: [506.0, 450.0]
[INFO]  class_id : 0, label : person, confidence : 0.8740, left_top : [162.0, 162.0], right_bottom: [197.0, 265.0]
[INFO]  class_id : 0, label : person, confidence : 0.8715, left_top : [267.0, 267.0], right_bottom: [298.0, 267.0]
[INFO]  class_id : 0, label : person, confidence : 0.8663, left_top : [327.0, 327.0], right_bottom: [346.0, 127.0]
[INFO]  class_id : 0, label : person, confidence : 0.8593, left_top : [576.0, 576.0], right_bottom: [611.0, 315.0]
[INFO]  class_id : 0, label : person, confidence : 0.8578, left_top : [104.0, 104.0], right_bottom: [126.0, 148.0]
[INFO]  class_id : 0, label : person, confidence : 0.8272, left_top : [363.0, 363.0], right_bottom: [381.0, 180.0]
[INFO]  class_id : 0, label : person, confidence : 0.8183, left_top : [349.0, 349.0], right_bottom: [365.0, 155.0]
[INFO]  class_id : 0, label : person, confidence : 0.8167, left_top : [378.0, 378.0], right_bottom: [394.0, 132.0]
[INFO]  class_id : 56, label : chair, confidence : 0.6448, left_top : [98.0, 98.0], right_bottom: [118.0, 250.0]
[INFO]  class_id : 56, label : chair, confidence : 0.6271, left_top : [75.0, 75.0], right_bottom: [102.0, 245.0]
[INFO]  class_id : 24, label : backpack, confidence : 0.6196, left_top : [64.0, 64.0], right_bottom: [84.0, 243.0]
[INFO]  class_id : 0, label : person, confidence : 0.6016, left_top : [186.0, 186.0], right_bottom: [199.0, 97.0]
[INFO]  class_id : 0, label : person, confidence : 0.5715, left_top : [169.0, 169.0], right_bottom: [178.0, 95.0]
[INFO]  class_id : 33, label : kite, confidence : 0.5623, left_top : [162.0, 162.0], right_bottom: [614.0, 539.0]
左滑查看更多
7. 平臺推理時間測試
為了評價不同平臺的模型推理性能,在 C++、C# 平臺分別部署了 RT-DETR 不同 Backbone 結構的模型,如下表所示:
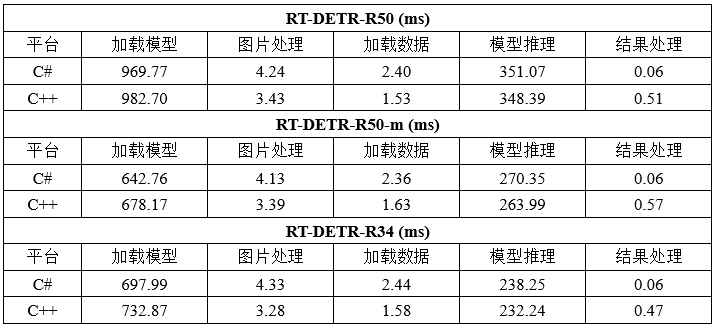
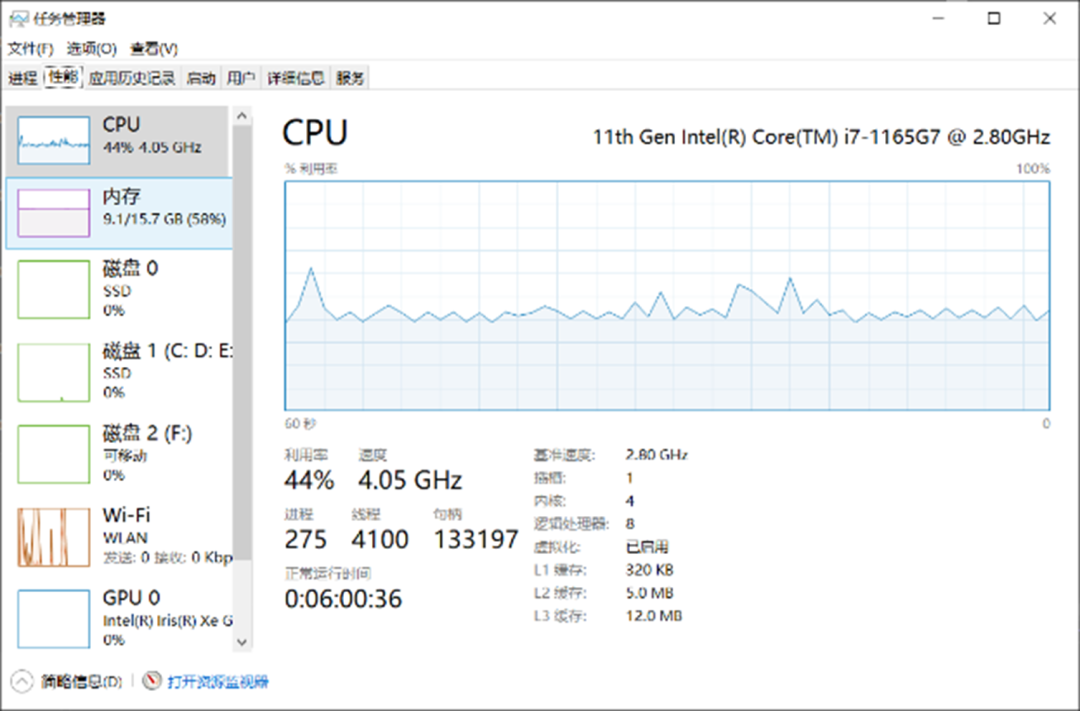
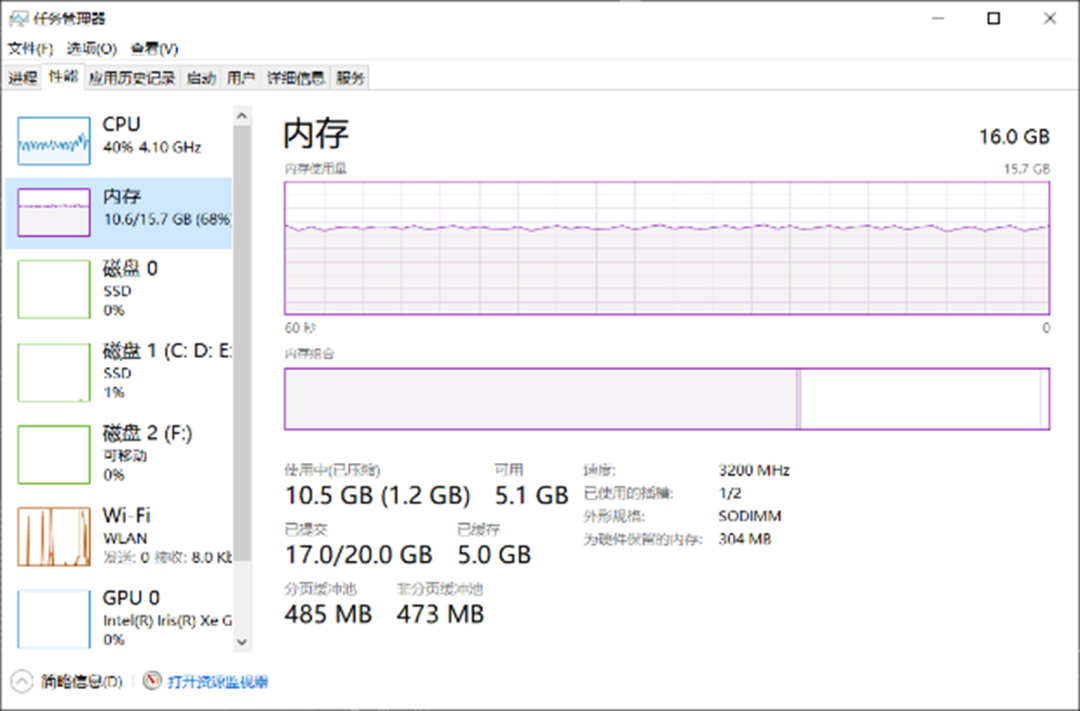
通過該表可以看出,不同 Backbone 結構的 RT-DETR 模型在 C++、C# 不同平臺上所表現出來的模型推理性能基本一致,說明我們所推出的 OpenVINO C# API 對模型推理性能并沒有產生較大的影響。下圖為模型推理時 CPU 使用以及內存占用情況,可以看出在本機設備上,模型部署時 CPU 占用在 40%~45% 左右,內存穩定在 10G 左右,所測試結果 CPU 以及內存占用未減去其他軟件開銷。
8. 總結
在本項目中,我們介紹了 OpenVINO C# API 部署 RT-DETR 模型的案例,并結合該模型的處理方式封裝完整的代碼案例,實現了在英特爾平臺使用 OpenVINO C# API 加速深度學習模型,有助于大家以后落地 RT-DETR 模型在工業上的應用。
最后我們對比了不同 Backbone 結構的 RT-DETR 模型在 C++、C# 不同平臺上所表現出來的模型推理性能,在 C++ 與 C# 平臺上,OpenVINO 所表現出的性能基本一致。但在 CPU 平臺下,RT-DETR 模型推理時間依舊達不到理想效果,后續我們會繼續研究該模型的量化技術,通過量化技術提升模型的推理速度。
審核編輯:湯梓紅
-
英特爾
+關注
關注
61文章
9964瀏覽量
171771 -
檢測器
+關注
關注
1文章
864瀏覽量
47687 -
模型
+關注
關注
1文章
3243瀏覽量
48840 -
OpenVINO
+關注
關注
0文章
93瀏覽量
202
原文標題:基于 OpenVINO? C# API 部署 RT-DETR 模型 | 開發者實戰
文章出處:【微信號:英特爾物聯網,微信公眾號:英特爾物聯網】歡迎添加關注!文章轉載請注明出處。
發布評論請先 登錄
相關推薦
基于C#和OpenVINO?在英特爾獨立顯卡上部署PP-TinyPose模型
如何使用OpenVINO C++ API部署FastSAM模型

在C++中使用OpenVINO工具包部署YOLOv5模型
簡單聊聊目標檢測新范式RT-DETR的骨干:HGNetv2

介紹RT-DETR兩種風格的onnx格式和推理方式

自訓練Pytorch模型使用OpenVINO?優化并部署在AI愛克斯開發板

用OpenVINO? C++ API編寫YOLOv8-Seg實例分割模型推理程序

基于OpenVINO Python API部署RT-DETR模型

如何使用OpenVINO Python API部署FastSAM模型
基于OpenVINO C++ API部署RT-DETR模型

OpenVINO? Java API應用RT-DETR做目標檢測器實戰
用OpenVINO C# API在intel平臺部署YOLOv10目標檢測模型

使用OpenVINO C# API部署YOLO-World實現實時開放詞匯對象檢測
使用OpenVINO Model Server在哪吒開發板上部署模型


 基于OpenVINO C# API部署RT-DETR模型


評論