YOLOv8是一種令人驚嘆的分割模型;它易于訓練、測試和部署。在本教程中,我們將學習如何在自定義數據集上使用YOLOv8。但在此之前,我想告訴你為什么在存在其他優秀的分割模型時應該使用YOLOv8呢?
我正在從事與醫學圖像分割相關的項目,當我的合作者突然告訴我,我們只有來自175名患者的600張圖像和標注。在醫學成像領域,這是一個常見的問題,因為臨床醫生是最忙碌的人,他們有許多職責。然而,他向我保證,一旦模型訓練好(并進行微調),我們將獲得來自其他300多名患者的圖像和標注,作為額外的測試集以評估我們的模型。
我開始將這50名患者分為訓練、測試和驗證數據集,使用8010的比例。對于模型,我首先嘗試了UNet及其變體(ResUNet、Attention UNet、Res-Attention UNet)。這些模型在訓練、測試和驗證數據集上表現出色,但在額外的測試集上表現糟糕。然后我想,“讓我們試試YOLOv8;如果有效,那將是很好的,如果不行,那將是一次有趣的學習經歷。”幾個小時后,它奏效了,令我驚訝的是,在額外的測試集上遠遠超出了我的預期。我不能透露具體數值,因為論文仍在審查中,但我愿意分享如何將其調整為自定義數據集,以便你可以節省大量工作時間。讓我們開始制定攻略。
攻略
以下是我們將學習的主題:
1. YOLOv8簡介
2. 安裝庫
3. 數據集準備
4. 訓練準備
5. 訓練模型
6. 結果
YOLOv8簡介
YOLOv8是YOLO系列的最新版本,用于實時目標檢測,由Ultralytics開發。它通過引入空間注意力和特征融合等修改來提高準確性和速度。該架構將修改過的CSPDarknet53骨干網絡與用于處理的先進頭部相結合。這些先進之處使YOLOv8成為各種計算機視覺任務的最新選擇。
安裝庫
以下是安裝庫的選項。
# Install the ultralytics package using conda
conda install -c conda-forge ultralytics


or


# Install the ultralytics package from PyPI
pip install ultralytics
數據集準備
數據集需要進行兩個步驟的處理:
步驟1:請按照以下結構組織您的數據集(圖像和掩膜):理想情況下,訓練、測試和驗證(val)的比例為8010。數據集文件夾的安排如下:
dataset
|
|---train
|   |-- images
|   |-- labels
|
|---Val
|   |-- images
|   |-- labels
|
|---test
|   |-- images
|   |-- labels
步驟2:第二步是將 .png(或任何類型)掩膜(標簽)轉換為所有3個標簽文件夾中的 .txt 文件。以下是將標簽(.png、.jpg)轉換為 .txt 文件的Python代碼。(您也可以在此操作)
將每個標簽圖像轉換為 .txt 文件
import numpy as np
from PIL import Image


import numpy as np
from PIL import Image
from pathlib import Path


def create_label(image_path, label_path):
    # Load the image from the given path and convert it to a NumPy array
    mask = np.asarray(Image.open(image_path))


    # Find the coordinates of non-zero (i.e., not black) pixels in the mask's first channel (assumed to be red)
    rows, cols = np.nonzero(mask[:, :, 0])


    # If no non-zero pixels are found in the mask, return early as there's nothing to label
    if len(rows) == 0:
        return  # Optionally, handle the case of no non-zero pixels as needed


    # Calculate the normalized coordinates by dividing by the respective dimensions of the image
    # This is done to ensure that the coordinates are relative (between 0 and 1) rather than absolute
    normalized_coords = [(col / mask.shape[1], row / mask.shape[0]) for row, col in zip(rows, cols)]


    # Construct a string representing the label data
    # The format starts with '0' (which might represent a class id or similar) followed by pairs of normalized coordinates
    label_line = '0 ' + ' '.join([f'{cord[0]} {cord[1]}' for cord in normalized_coords])


    # Ensure that the directory for the label_path exists, create it if not
    Path(label_path).parent.mkdir(parents=True, exist_ok=True)


    # Open the label file in write mode and write the label_line to it
    with open(label_path, 'w') as f:
        f.write(label_line)


import os


for x in ['train', 'val', 'test']:
    images_dir_path = Path(f'datasets/{x}/labels')
    for img_path in images_dir_path.iterdir():
        if img_path.is_file() and img_path.suffix.lower() in ['.jpg', '.jpeg', '.png', '.bmp']:
            label_path = img_path.parent.parent / 'labels_' / f'{img_path.stem}.txt'
            label_line = create_label(img_path, label_path)
        else:
            print(f"Skipping non-image file: {img_path}")
請注意:在運行上述代碼后,請不要忘記從標簽文件夾中刪除標簽(掩膜)圖像。
訓練準備
為訓練創建 'data.yaml' 文件。只需在Python中運行下面的代碼,它將為YOLOv8創建 'data.yaml' 文件。
yaml_content = f'''
train: train/images
val: val/images
test: test/images


names: ['object']
# Hyperparameters ------------------------------------------------------------------------------------------------------
# lr0: 0.01  # initial learning rate (i.e. SGD=1E-2, Adam=1E-3)
# lrf: 0.01  # final learning rate (lr0 * lrf)
# momentum: 0.937  # SGD momentum/Adam beta1
# weight_decay: 0.0005  # optimizer weight decay 5e-4
# warmup_epochs: 3.0  # warmup epochs (fractions ok)
# warmup_momentum: 0.8  # warmup initial momentum
# warmup_bias_lr: 0.1  # warmup initial bias lr
# box: 7.5  # box loss gain
# cls: 0.5  # cls loss gain (scale with pixels)
# dfl: 1.5  # dfl loss gain
# pose: 12.0  # pose loss gain
# kobj: 1.0  # keypoint obj loss gain
# label_smoothing: 0.0  # label smoothing (fraction)
# nbs: 64  # nominal batch size
# hsv_h: 0.015  # image HSV-Hue augmentation (fraction)
# hsv_s: 0.7  # image HSV-Saturation augmentation (fraction)
# hsv_v: 0.4  # image HSV-Value augmentation (fraction)
degrees: 0.5  # image rotation (+/- deg)
translate: 0.1  # image translation (+/- fraction)
scale: 0.2  # image scale (+/- gain)
shear: 0.2  # image shear (+/- deg) from -0.5 to 0.5
perspective: 0.1  # image perspective (+/- fraction), range 0-0.001
flipud: 0.7  # image flip up-down (probability)
fliplr: 0.5  # image flip left-right (probability)
mosaic: 0.8  # image mosaic (probability)
mixup: 0.1  # image mixup (probability)
# copy_paste: 0.0  # segment copy-paste (probability)
    '''

with Path('data.yaml').open('w') as f:
    f.write(yaml_content)
訓練模型
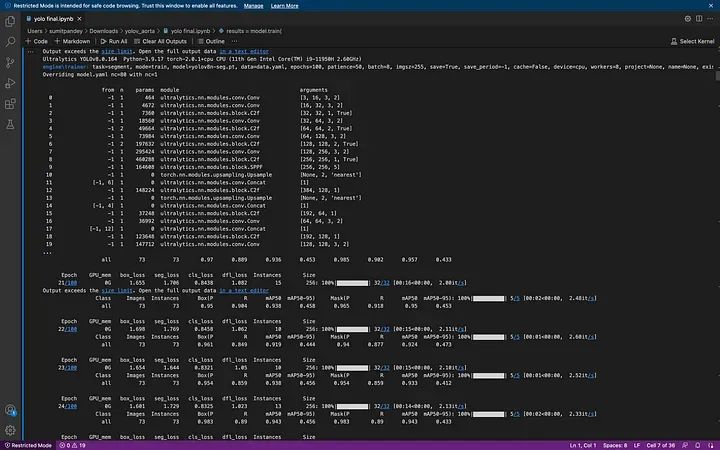
一旦數據準備好,其余的非常簡單,只需運行以下代碼。
import matplotlib.pyplot as plt
from ultralytics import YOLO


model = YOLO("yolov8n-seg.pt")


results = model.train(
        batch=8,
        device="cpu",
        data="data.yaml",
        epochs=100,
        imgsz=255)

恭喜,你成功了。現在你會看到一個 'runs' 文件夾,你可以在其中找到所有的訓練矩陣和圖表。
結果
好,讓我們在測試數據上檢查結果:
model = YOLO("runs/segment/train13/weights/best.pt") # load the model


file = glob.glob('datasets/test/images/*') # let's get the images
現在讓我們在圖像上運行代碼。
# lets run the model over every image
for i in range(len(file)):
    result = model(file[i], save=True, save_txt=True)
將每個 Pred.txt 文件轉換為 mask.png
import numpy as np
import cv2


def convert_label_to_image(label_path, image_path):
    # Read the .txt label file
    with open(label_path, 'r') as f:
        label_line = f.readline()


    # Parse the label line to extract the normalized coordinates
    coords = label_line.strip().split()[1:]  # Remove the class label (assuming it's always 0)


    # Convert normalized coordinates to pixel coordinates
    width, height = 256, 256  # Set the dimensions of the output image
    coordinates = [(float(coords[i]) * width, float(coords[i+1]) * height) for i in range(0, len(coords), 2)]
    coordinates = np.array(coordinates, dtype=np.int32)


    # Create a blank image
    image = np.zeros((height, width, 3), dtype=np.uint8)


    # Draw the polygon using the coordinates
    cv2.fillPoly(image, [coordinates], (255, 255, 255))  # Fill the polygon with white color
    print(image.shape)
    # Save the image
    cv2.imwrite(image_path, image)
    print("Image saved successfully.")


# Example usage
label_path = 'runs/segment/predict4/val_labels/img_105.txt'
image_path = 'runs/segment/predict4/val_labels/img_105.jpg'
convert_label_to_image(label_path, image_path)


file = glob.glob('runs/segment/predict11/labels/*.txt')
for i in range(len(file)):
    label_path = file[i]
    image_path = file[i][:-3]+'jpg'
    convert_label_to_image(label_path, image_path)
審核編輯:湯梓紅 -
模型
+關注
關注
1文章
3243瀏覽量
48840 -
數據集
+關注
關注
4文章
1208瀏覽量
24701 -
醫學圖像分割
+關注
關注
0文章
5瀏覽量
833
原文標題:基于YOLOv8的自定義醫學圖像分割
文章出處:【微信號:vision263com,微信公眾號:新機器視覺】歡迎添加關注!文章轉載請注明出處。
發布評論請先 登錄
相關推薦
TensorRT 8.6 C++開發環境配置與YOLOv8實例分割推理演示

在AI愛克斯開發板上用OpenVINO?加速YOLOv8目標檢測模型

AI愛克斯開發板上使用OpenVINO加速YOLOv8目標檢測模型

在AI愛克斯開發板上用OpenVINO?加速YOLOv8-seg實例分割模型

教你如何用兩行代碼搞定YOLOv8各種模型推理

如何修改YOLOv8的源碼

用自己的數據集訓練YOLOv8實例分割模型

YOLOv8實現旋轉對象檢測

OpenCV4.8 C++實現YOLOv8 OBB旋轉對象檢測


 基于YOLOv8的自定義醫學圖像分割


評論