在之前掃描二維碼提取任務之后,工作中又需要將身份證圖像中的身份證號碼提取出來,然后給同事調用進行識別。之前的連通域檢測算法比較“蠻力”,因為它一旦檢測出一個大的區域,那么這區域中的所有內部區域都將不復存在了。所以在連通域檢測時,需要第一步去掉周圍可能存在的白邊,否則就會失敗。后來筆者換了一個思路,如果檢測一個區域時保存對應生成該區域的點,該區域不符合要求的話就將這些點擦掉,從而就不會影響到內部的區域了。于是就有了一下算法的誕生:
(1)從左上角開始,從碰到的第一個白點開始探測最大的連通域,獲取離該點小于max_dis的所有點,放到一個list中。
(2)然后遍歷該列表,并將離每一個點距離小于max_dis的點都放到該list中。
(3)遍歷結束后,計算包含list中所有點的最小rect區域。
(4)根據設定的目標區域特點,如長寬、長寬比等,來判斷該區域是否滿足要求,如果滿足,則放到rectlist中。然后將該list中的所有點都置黑。轉到(1)執行。
(5)如果rectlist為空,則沒有獲取到目標rect。如果>=1 則將之按照一個規則進行排序(應該是那個最主要的特征),然后輸出最可能的那個rect。
算法過程演示如下:
原圖:
色彩過濾(為了得到效果好一點的canny圖):
canny圖:
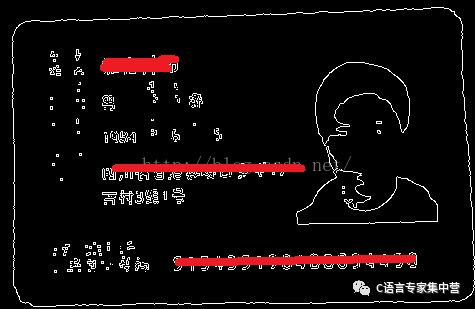
檢測畫框與擦除:
第一次 畫框:

第一次擦除:
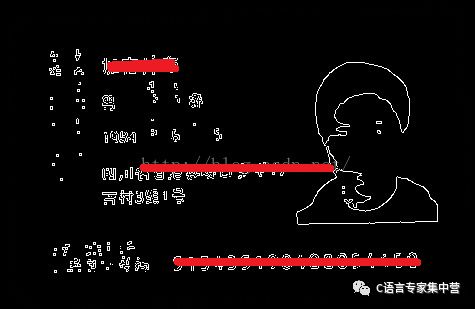
第二次畫框:
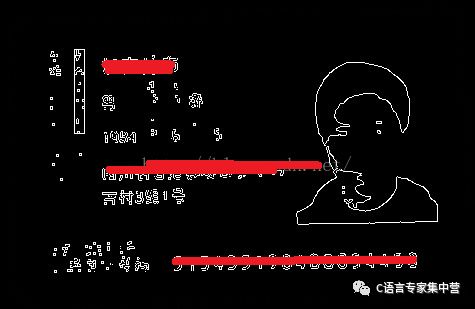
第二次擦除
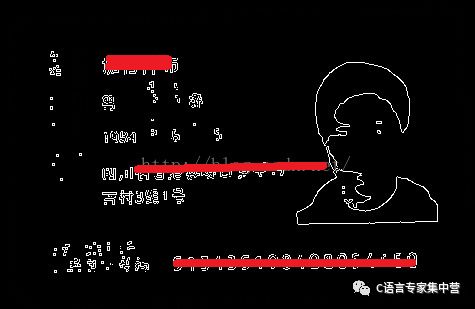
第n次畫框:

第n次擦除:

最后的什么都沒剩下:

得出結果:
詳細算法代碼如下:
FindIdCode.h
#include "opencv2/core/core.hpp"
#include "opencv2/imgproc/imgproc_c.h"
#include "opencv2/imgproc/imgproc.hpp"
#include "opencv2/highgui/highgui.hpp"
#include
#include < io.h>
#include
#include
#include "opencv/cv.h"
#include "opencv/cxcore.h"
#include "opencv2/highgui/highgui_c.h"
#include "direct.h"
using namespace cv;
using namespace std;
class CGetIDCOde
{
public:
CGetIDCOde();
//刪除文件 并返回string 值
string getFilePath( const char * szBuf);
//獲取文件長度
long GetFileLength(const char * filepath);
//過濾顏色
void FilterColor(string strImgFileName);
//找到目標連通域
RECT FindTargetConnectedDomain();
//將list中的點都設置成某一個顏色
void SetPointListColor(Mat & srcImg, std::vector
//根據點列表獲取最小包含區域
void GetRectFromPointList(std::vector
//獲取與該點臨近的點
void GetNearPoint(Mat & srcImg,cv::Point currentPoint, std::vector
//將一個box框畫成某一個顏色
void DrowBoxColor(Mat &srcImg, std::vector
//獲取一個聯通區域
BOOL GetOneConnectedDomain(Mat & srcImg, std::vector
//將圖像的某一個區域保存為圖像
void SavePicWithDestRect(string strSource, string strDest, RECT destRect);
//獲取身份證號圖像區域
RECT GetIdCode(const char * szSourceFile);
//邊緣檢測
int outLinePic2();
char szCurrentPath[MAX_PATH];
string strOrigin;
string strSave1;
string strSave1_1;
string strSave2;
string strSave3;
string strSave4;
string strSave5;
string strSave3_0;
string strSave3_1;
string strSave3_2;
string strSave3_3;
string strSave6;
string strSave7;
string strSave8;
};
CPP代碼:
FindIdCode.cpp
#include "FindIdCode.h"
int mMAX_DIS = 0;
double fScale = 0.0;
#define BOX_WIDTH 50
#define BLACK 0
#define MID_BLACK_WHITE 128
#define WHITE 255
#define RATE 0.2
//按照框的寬度排序
BOOL SortByM5(RECT &v1, RECT &v2)
{
int nWidth1 = v1.right - v1.left;
int nHeight1 = v1.bottom - v1.top;
int nWidth2 = v2.right - v2.left;
int nHeight2 = v2.bottom - v2.top;
float fRate1 = 1.0 * nWidth1 / nHeight1;
float fRate2 = 1.0 * nWidth2 / nHeight2;
if (fRate1 > fRate2)
{
return TRUE;
}
else
{
return FALSE;
}
}
string CGetIDCOde::getFilePath( const char * szBuf)
{
string str;
str = szCurrentPath;
str += "";
str += szBuf;
//刪除已經存在的文件
DeleteFile(str.c_str());
return str;
}
long CGetIDCOde::GetFileLength(const char * filepath)
{
FILE* file = fopen(filepath, "rb");
if (file)
{
long size = filelength(fileno(file));
return size;
}
else
{
return 0;
}
}
//顏色過濾
void CGetIDCOde::FilterColor(string strImgFileName)
{
uchar uDifferMax = 80;
uchar rMax = 100;
uchar bMax = 150;
uchar gMax = 150;
uchar uWhite = 255;
uchar r,b,g;
IplImage *workImg = cvLoadImage(strImgFileName.c_str(), CV_LOAD_IMAGE_UNCHANGED);
//像素太高的進行縮放
if (workImg->width > 900)
{
int nTargetWidth = 600;
fScale = 1.0 * workImg->width / nTargetWidth;
CvSize czSize;
//計算目標圖像大小
czSize.width = nTargetWidth;
czSize.height = workImg->height / fScale;
//IplImage *pSrcImage = cvLoadImage(strSave2.c_str(), CV_LOAD_IMAGE_UNCHANGED);
IplImage *pDstImage = cvCreateImage(czSize, workImg->depth, workImg->nChannels);
cvResize(workImg, pDstImage, CV_INTER_AREA);
cvReleaseImage(&workImg);
cvSaveImage(strSave1_1.c_str(),pDstImage);
workImg = pDstImage;
}
for(int x=0;x
{
for(int y=0;y
{
b=((uchar*)(workImg->imageData+x*workImg->widthStep))[y*3+0];
g=((uchar*)(workImg->imageData+x*workImg->widthStep))[y*3+1];
r=((uchar*)(workImg->imageData+x*workImg->widthStep))[y*3+2];
//偏色比較嚴重的
//uchar uMax = max(max(b,g),r);
//uchar uMin = min(min(b,g),r);
//if ( uMax - uMin > uDifferMax)
int nAbove = 0;
if (b >= uDifferMax)
{
nAbove ++;
}
if (g >= uDifferMax)
{
nAbove ++;
}
if (r >= uDifferMax)
{
nAbove ++;
}
//有兩個大于80
if(nAbove >= 2 || b > bMax || g > gMax || r > rMax)
{
((uchar*)(workImg->imageData+x*workImg->widthStep))[y*3+0] = uWhite;
((uchar*)(workImg->imageData+x*workImg->widthStep))[y*3+1] = uWhite;
((uchar*)(workImg->imageData+x*workImg->widthStep))[y*3+2] = uWhite;
}
}
}
cvSaveImage(strSave1.c_str(), workImg);
}
int CGetIDCOde::outLinePic2()
{
Mat src = imread(strSave1.c_str());
Mat dst;
if (!src.empty())
{
//輸入圖像
//輸出圖像
//輸入圖像顏色通道數
//x方向階數
//y方向階數
Sobel(src,dst,src.depth(),1,1);
//imwrite("sobel.jpg",dst);
//輸入圖像
//輸出圖像
//輸入圖像顏色通道數
Laplacian(src,dst,src.depth());
imwrite("laplacian.jpg",dst);
//輸入圖像
//輸出圖像
//彩色轉灰度
cvtColor(src,src,CV_BGR2GRAY); //canny只處理灰度圖
//輸入圖像
//輸出圖像
//低閾值
//高閾值,opencv建議是低閾值的3倍
//內部sobel濾波器大小
//threshold1和threshold2 當中的小閾值用來控制邊緣連接,大的閾值用來控制強邊緣的初始分割。50 150
Canny(src,dst,220,240,3);
imwrite(strSave2.c_str(),dst);
return 0;
}
else
{
cout<< "IMG is not exist!";
return -1;
}
}
void CGetIDCOde::SetPointListColor(Mat & srcImg, std::vector
{
for (int i = 0; i < pointList.size(); i ++)
{
int x = pointList[i].x;
int y = pointList[i].y;
*(srcImg.data + srcImg.step[0] * y + srcImg.step[1] * x) = nColor;
}
}
RECT CGetIDCOde::FindTargetConnectedDomain()
{
Mat srcImg = imread(strSave2.c_str(), CV_LOAD_IMAGE_GRAYSCALE);
//設定最大的距離
mMAX_DIS = srcImg.cols * (1.0 * 9 / 400) + 1;
int nMaxWidth = 0.6 * srcImg.cols;
int nMaxHeight = 1.0 * 5 * srcImg.rows / 36 ;
std::vector
//探測一個矩形連通域,判斷是否符合目標特征,不符合刪除找下一個。
//找到一個放入vector中。
std::vector
while(TRUE)
{
RECT rect;
GetOneConnectedDomain(srcImg, pointList,rect);
//判斷該rect是否符合要求。
int nWidth = rect.right - rect.left;
int nHeight = rect.bottom - rect.top;
// 300 20
float fRate = 1.0 * nWidth / nHeight;
if (nHeight > 5 && nHeight < nMaxHeight && nWidth > 100 && nWidth < nMaxWidth? ?&&? fRate > 8 && fRate < 20)
{
//SavePicWithDestRect(strOrigin, strSave8, rect);
targetRectList.push_back(rect);
//break;
}
else
{
if (pointList.empty())
{
break;
}
}
//置黑然后找下一個
SetPointListColor(srcImg, pointList, BLACK);
imwrite(strSave3_3.c_str(),srcImg);
pointList.clear();
}
//有多個排序
if (targetRectList.size() > 0)
{
sort(targetRectList.begin(), targetRectList.end(), SortByM5);
//找到 提取圖像 保存。
RECT rect = targetRectList[0];
rect.left -= mMAX_DIS;
if (rect.left < 0)
{
rect.left = 0;
}
rect.top -= mMAX_DIS;
if (rect.top < 0)
{
rect.top = 0;
}
rect.right += mMAX_DIS;
if (rect.right > srcImg.cols)
{
rect.right = srcImg.cols;
}
rect.bottom += mMAX_DIS;
if (rect.bottom > srcImg.rows)
{
rect.bottom = srcImg.rows;
}
if (fScale > 0.0)
{
rect.left *= fScale;
rect.right*= fScale;
rect.bottom *= fScale;
rect.top *= fScale;
}
return rect;
//SavePicWithDestRect(strOrigin, strSave8, rect);
}
else
{
//cout<< "find no numbers!";
//getchar();
RECT rect;
rect.bottom = rect.top = rect.left = rect.right = 0;
return rect;
}
}
//保存圖像
void CGetIDCOde::SavePicWithDestRect(string strSource, string strDest, RECT destRect)
{
IplImage* src;
IplImage* dst;
src = cvLoadImage(strSource.c_str(),1);
if(!src)
{
return ;
}
cvSetImageROI(src,cvRect(destRect.left,destRect.top ,destRect.right - destRect.left, destRect.bottom - destRect.top));
dst = cvCreateImage(cvSize(destRect.right - destRect.left, destRect.bottom - destRect.top),
IPL_DEPTH_8U,
src->nChannels);
cvCopy(src,dst,0);
cvResetImageROI(src);
cvSaveImage(strDest.c_str(), dst);
cvReleaseImage(&dst);
cvReleaseImage(&src);
}
BOOL CGetIDCOde::GetOneConnectedDomain(Mat & srcImg, std::vector
{
int nWidth = srcImg.cols;
int nHeight = srcImg.rows;
int nXStart = 0;
int nYStart = 0;
BOOL bBlack = TRUE;
BOOL bBreak = FALSE;
int nWhite = 0;
//找到第一個最上角的白點
for (int y = 0; y < nHeight; y ++)
{
for (int x = 0; x < nWidth; x++)
{
int nPixel = (int)(*(srcImg.data + srcImg.step[0] * y + srcImg.step[1] * x));
if (nPixel > MID_BLACK_WHITE)
{
nXStart = x;
nYStart = y;
cv::Point tempPint(nXStart,nYStart);
pointList.push_back(tempPint);
bBreak = TRUE;
break;
}
}
if (bBreak)
{
break;
}
}
int nSize = pointList.size();
//探測下一個點。
for (int i = 0; i < nSize; i ++)
{
cv::Point currentPoint = pointList[i];
GetNearPoint(srcImg, currentPoint, pointList);
nSize = pointList.size();
//如果超過4000個點則刪除后重新再來
if (nSize > 3000)
{
break;
}
}
//對該pointList求最小包含的矩形框。
GetRectFromPointList(pointList, rect);
std::vector
tempTect.push_back(rect);
DrowBoxColor(srcImg,tempTect, WHITE);
imwrite(strSave3_2.c_str(),srcImg);
DrowBoxColor(srcImg,tempTect, BLACK);
return TRUE;
}
void CGetIDCOde::GetRectFromPointList(std::vector
{
int nLeft = 0;
int nTop = 0;
int nRight = 0;
int nBottom = 0;
for(int i = 0; i < pointList.size(); i ++)
{
cv::Point tempPoint = pointList[i];
if (i == 0)
{
nLeft = nRight = tempPoint.x;
nTop = nBottom = tempPoint.y;
}
else
{
if (tempPoint.x < nLeft)
{
nLeft = tempPoint.x;
}
if (tempPoint.x > nRight)
{
nRight = tempPoint.x;
}
if (tempPoint.y < nTop)
{
nTop = tempPoint.y;
}
if (tempPoint.y > nBottom)
{
nBottom = tempPoint.y;
}
}
}
rtRect.left = nLeft;
rtRect.top = nTop;
rtRect.right = nRight;
rtRect.bottom = nBottom;
}
void CGetIDCOde::GetNearPoint(Mat & srcImg,cv::Point currentPoint, std::vector
{
//探測以該點為中心的 20 * 20范圍的點。
for (int y = max(0, currentPoint.y - mMAX_DIS); y < min(srcImg.rows, currentPoint.y + mMAX_DIS); y ++)
{
for (int x = max(currentPoint.x - mMAX_DIS, 0); x < min(srcImg.cols, currentPoint.x + mMAX_DIS); x ++)
{
int nPixel = (int)(*(srcImg.data + srcImg.step[0] * y + srcImg.step[1] * x));
if (nPixel > MID_BLACK_WHITE)
{
cv::Point tempPint(x, y);
//看該點是否已經放入list
std::vector
if (itFind == pointList.end())
{
pointList.push_back(tempPint);
}
}
}
}
}
//畫框線為一個顏色
void CGetIDCOde::DrowBoxColor(Mat &srcImg, std::vector
{
int nResultSize = boxList.size();
for (int i = 0; i < nResultSize; i ++)
{
RECT tempRect = boxList[i];
//上下邊線
int y1 = tempRect.top;
int y2 = tempRect.bottom;
for (int x = tempRect.left; x <= tempRect.right; x ++)
{
*(srcImg.data + srcImg.step[1] * x + srcImg.step[0] * y1) = nColor;
*(srcImg.data + srcImg.step[1] * x + srcImg.step[0] * y2) = nColor;
}
//左右邊線
int x1 = tempRect.left;
int x2 = tempRect.right;
for (int y = tempRect.top; y <= tempRect.bottom; y ++)
{
*(srcImg.data + srcImg.step[1] * x1 + srcImg.step[0] * y) = nColor;
*(srcImg.data + srcImg.step[1] * x2 + srcImg.step[0] * y) = nColor;
}
}
}
RECT CGetIDCOde::GetIdCode(const char * szSourceFile)
{
CopyFile(szSourceFile, strOrigin.c_str(), FALSE);
//文件大小 過小則不進行圖像過濾
RECT rect;
rect.bottom = rect.top = rect.left = rect.right = 0;
long nFileLen = GetFileLength(strOrigin.c_str());
if (nFileLen == 0)
{
return rect;
}
else if (nFileLen > 7000 )
{
FilterColor(strOrigin);
}
else
{
CopyFile(strOrigin.c_str(), strSave1.c_str(),FALSE );
}
if (outLinePic2() == -1)
{
return rect;
}
return FindTargetConnectedDomain();
}
CGetIDCOde::CGetIDCOde()
{
_getcwd(szCurrentPath,MAX_PATH);
strOrigin = getFilePath("imageText.jpg");
strSave1 = getFilePath("imageText_D.jpg");
strSave1_1 = getFilePath("imageText_ReSize.jpg");
strSave2 = getFilePath("canny.jpg");
strSave3 = getFilePath("imageText_Clear0.jpg");
strSave4 = getFilePath("imageText_Clear1.jpg");
strSave5 = getFilePath("imageText_Clear2.jpg");
strSave3_0 = getFilePath("imageText_Clear3_0.jpg");
strSave3_1 = getFilePath("imageText_Clear3_1.jpg");
strSave3_2 = getFilePath("imageText_Clear3_2.jpg");
strSave3_3 = getFilePath("imageText_Clear3_3.jpg");
strSave6 = getFilePath("imageText_Clear3.jpg");
strSave7 = getFilePath("imageText_D.jpg");
strSave8 = getFilePath("imageText_Clear4.jpg");
}
類的測試代碼:
#include "../FindIdCode/FindIdCode.h"
using namespace std;
#ifdef _DEBUG
#pragma comment(lib, "Debug/FindIdCode.lib")
#else
#pragma comment(lib, "Release/FindIdCode.lib")
#endif
int main(int argc, char **argv)
{
if(argc < 2)?
return(1);
CGetIDCOde getIdcode;
//char* szSourceFile = "D:\scan\00000000000000000\3032_024.jpg";
//dll測試
char* szSourceFile = argv[1];
RECT rect = getIdcode.GetIdCode(szSourceFile);
//CopyFile(szSourceFile,strOrigin.c_str(), FALSE);
getIdcode.SavePicWithDestRect(szSourceFile, getIdcode.strSave8, rect);
cout<<"the rect is "<
return 0;
}
說明:
由于不斷的進行循環檢測,如果像素過高圖片太大則耗時較多,而且邊緣檢測效果特別不好,所以程序中對于像素寬度大于900的則縮放到400。
程序運行效果的好壞直接影響因數是 canny圖片的效果。所以對于不同特點的圖片,可以調整canny函數的參數,如本例中采用的參數是:Canny(src,dst,220,240,3)。
色彩過濾:由于身份證有很多藍色和紅色的底紋,將rgb過大的色彩變成了白色。有時候并不一定會有好的效果,反而會讓邊緣增多,反而影響結果。另外如果圖像特別模糊,最好也不要進行色彩過濾。
最后還是需要提醒一下opencv的環境問題。
-
圖像
+關注
關注
2文章
1088瀏覽量
40515 -
代碼
+關注
關注
30文章
4809瀏覽量
68816 -
檢測算法
+關注
關注
0文章
119瀏覽量
25229
原文標題:身份證號碼圖像提取--基于canny邊緣檢測的連通域檢測算法
文章出處:【微信號:C_Expert,微信公眾號:C語言專家集中營】歡迎添加關注!文章轉載請注明出處。
發布評論請先 登錄
相關推薦
用DM642開發板做的canny邊緣檢測算法(附CCS源碼
關于canny算子邊緣檢測的問題
圖像邊緣檢測算法體驗步驟(Photoshop,Matlab)
基于Qualcomm FastCv的邊緣檢測算法詳解
基于Canny檢測算法實現的目標跟蹤

基于改進Canny的圖像邊緣檢測算法


 基于canny邊緣檢測的連通域檢測算法


評論