很多時(shí)候我們不在家的時(shí)候,都希望能夠了解到家里的情況,這時(shí)候你可能想到需要一個(gè)web攝像頭來(lái)進(jìn)行監(jiān)控,但是作為一個(gè)410c開(kāi)放愛(ài)好者,我們?nèi)ベI一個(gè)這樣的攝像頭就太浪費(fèi)了,今天就帶大家一起來(lái)用手中的dragonbaord 410c開(kāi)發(fā)板來(lái)實(shí)現(xiàn)一些個(gè)簡(jiǎn)單的帶有運(yùn)動(dòng)追蹤功能的攝像頭,廢話不多說(shuō),接下來(lái)上干貨。
一、準(zhǔn)備工作
準(zhǔn)備一塊dragonboard 410c開(kāi)發(fā)板、一個(gè)USB攝像頭、鼠標(biāo)、鍵盤(pán)當(dāng)然還有適配器和能夠接入網(wǎng)絡(luò)的wifi熱點(diǎn)。
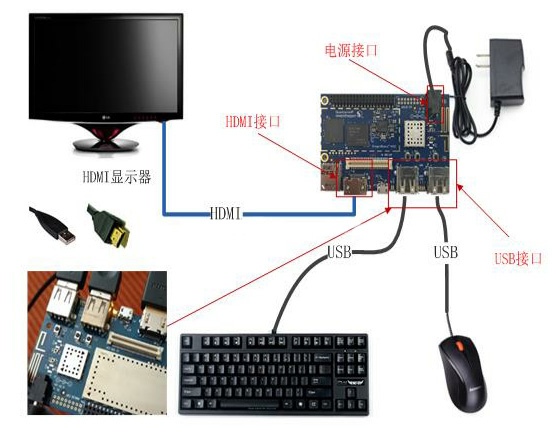
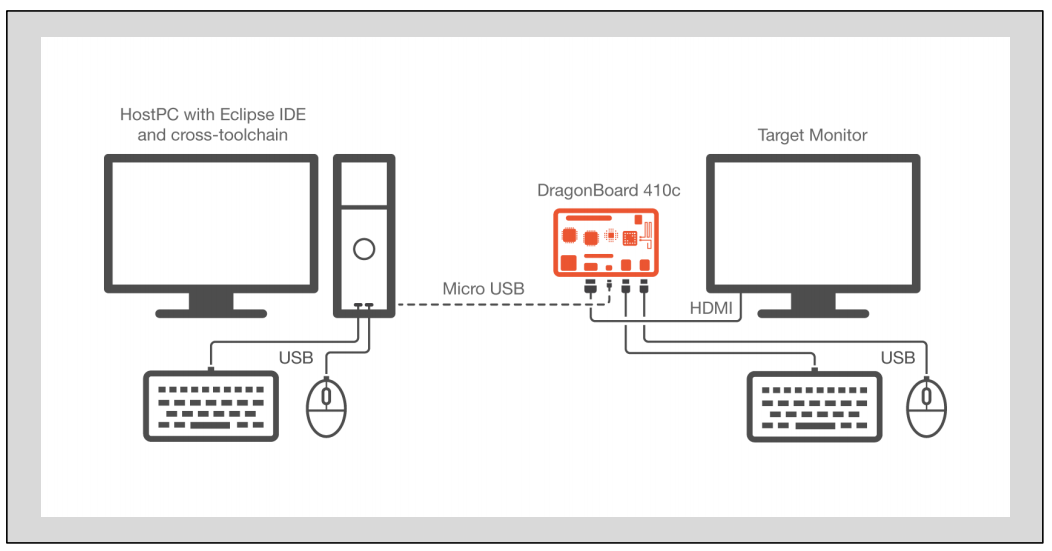
這里鼠標(biāo)和鍵盤(pán)主要是用來(lái)進(jìn)行開(kāi)發(fā),如果你的dragonboard 410c開(kāi)發(fā)板已經(jīng)安裝好了debain操作系統(tǒng),這里我們接下來(lái)的工作將全部在dragonboard 410c開(kāi)發(fā)板上完成,不需要PC機(jī),具體環(huán)境搭建參考如下:
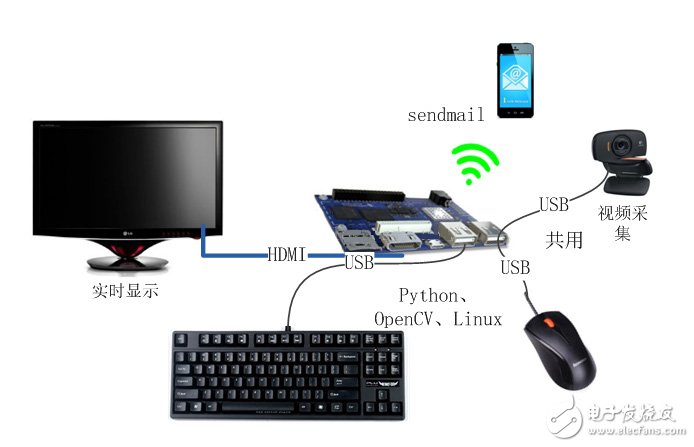
按照上述環(huán)境搭建后,就可以啟動(dòng)你的dragonboard410c開(kāi)發(fā)板了,這里首先我們不連接攝像頭,直接連接鼠標(biāo),因?yàn)檫€需要配置你的dragonboard 410c開(kāi)發(fā)板的網(wǎng)絡(luò)和在上面進(jìn)行編程,編號(hào)程序后運(yùn)行程序的時(shí)候再講鼠標(biāo)拔掉,連接USB攝像頭。
二、代碼實(shí)現(xiàn)
整個(gè)開(kāi)發(fā)過(guò)程中采用Python腳本語(yǔ)言來(lái)進(jìn)行設(shè)計(jì),并且借助于opencvpython庫(kù)來(lái)進(jìn)行相關(guān)的圖形處理操作,廢話不多說(shuō),具體代碼如下:
#!/usr/bin/env python
import argparse
import datetime
import imutils
import time
import cv2
import numpy as np
ap = argparse.ArgumentParser()
ap.add_argument("-v","--video", help="path to the video file")
ap.add_argument("-a","--min-area", type=int, default=5000, help="minimum areasize")
args = vars(ap.parse_args())
?ifargs.get("video", None) is None:
???camera = cv2.VideoCapture(0)
???time.sleep(0.1)
?else:
???camera = cv2.VideoCapture(args["video"])
?framenext = None
i=0
while True:
???(grabbed, frame) = camera.read()
???if not grabbed:
???????break
???frame = imutils.resize(frame, width=500)
???framenext = frame
???gray = cv2.cvtColor(frame, cv2.COLOR_BGR2GRAY)
???#gray_pre = np.float32(gray)
???gray = cv2.GaussianBlur(gray, (21, 21), 0)
???if firstFrame is None:
???????firstFrame = gray
???????continue???????????
???frameDelta = cv2.absdiff(firstFrame, gray)
???thresh = cv2.threshold(frameDelta, 115, 255, cv2.THRESH_BINARY)[1]
???thresh = cv2.dilate(thresh, None, iterations=2)
???(cnts, _) = cv2.findContours(thresh.copy(), cv2.RETR_EXTERNAL,
???????cv2.CHAIN_APPROX_SIMPLE)
????for c in cnts:
???????# if the contour is too small, ignore it
???????if cv2.contourArea(c) < args["min_area"]:
???????????continue
????????# compute the bounding box for the contour? draw it on the frame
???????# and update the text
???????(x, y, w, h) = cv2.boundingRect(c)
???????cv2.rectangle(frame, (x, y), (x + w, y + h), (0, 255, 0), 2)
???????text = "Occupied"
# caculation feature points
???graynext? =cv2.cvtColor(framenext, cv2.COLOR_BGR2GRAY)
???#graynext = np.float32(graynext);
???detector = cv2.xfeatures2d.SIFT_create()
???keypoints = detector.detect(gray,None)
???framenext=cv2.drawKeypoints(graynext,keypoints)
# draw the text and timestamp on the frame
???cv2.putText(frame, "Room Status: {}".format(text), (10, 20),
???????cv2.FONT_HERSHEY_SIMPLEX, 0.5, (0, 0, 255), 2)
???cv2.putText(frame, datetime.datetime.now().strftime("%A %d %B %Y%I:%M:%S%p"),
???????(10, frame.shape[0] - 10), cv2.FONT_HERSHEY_SIMPLEX, 0.35, (0, 0, 255),1)
???cv2.imshow("Security Feed", frame)
???cv2.imshow("Thresh", thresh)
???cv2.imshow("Frame Delta", frameDelta)
???cv2.imshow("keypoints",framenext)
???#key = cv2.waitKey(1) & 0xFF
???if cv2.waitKey(10) == 27:
???????break?
?????????????????? camera.release()
????cv2.destroyAllWindows()
???????? #Send the message via our own SMTP server (sendmail)
????sender = 'from@runoob.com'
????receivers = ['XXXXXXXXXX@thundersoft.com']
????text = MIMEText('Hello Qualcomm my name is NO1','plain','utf-8')
????image_url = "./detected_face.jpg"
?????image = MIMEImage(open(image_url,'rb').read())
????image.add_header('Content-ID','
????message = MIMEMultipart('related')
????message['From'] = Header("workshop",'utf-8')
????message['To'] = Header("Test",'utf-8')
????subject = 'Python SMTP Test'
????message['Subject'] = Header(subject,'utf-8')
????message.attach(text)
????message.attach(image)
try:
???????? smtpObj=smtplib.SMTP('localhost')
???????? #smtpObj.set_debuglevel(1)
???????? smtpObj.sendmail(sender,receivers, message.as_string())
???????? smtpObj.quit()
???????? print"done!"
except smtplib.SMTPException:
?print "error:send failed"
三、測(cè)試
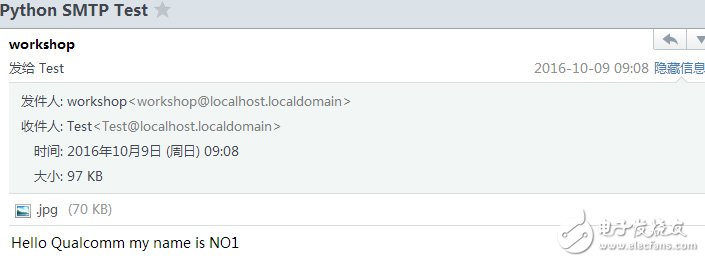
編寫(xiě)好代碼后保存,然后使用Python monition_camera.py命令就可以運(yùn)行上述代碼了,這里我們收到的郵件及附件效果如下,由于涉及到隱私具體的跟蹤人體目標(biāo)就不展示了,大家下載代碼實(shí)現(xiàn)即可以看到效果。
 電子發(fā)燒友App






評(píng)論