本項目利用GT511C3指紋傳感器(FPS)模塊,在Aduino開發板上實現了一個高精度、快速響應的指紋掃描儀。項目通過Arduino錄入指紋,在需要的時候檢測、驗證指紋,還可通過硬姐智造PCBA一站式服務將項目從DIY拓展到新興的生物識別市場。
所需的組件:
Arduino UNO開發板
GT511C3指紋傳感器模塊
162A LCD顯示屏
1K電阻
2K電阻
10K電位器
按鈕
連接跳線
面包板
了解GT511C3指紋傳感器模塊
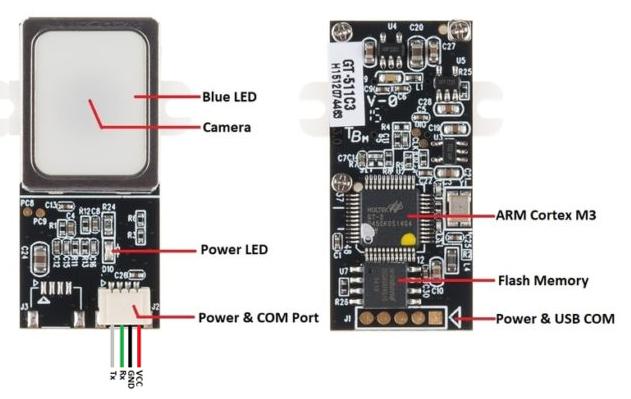
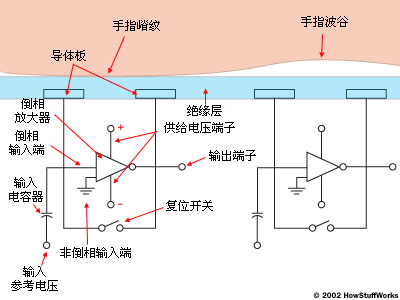
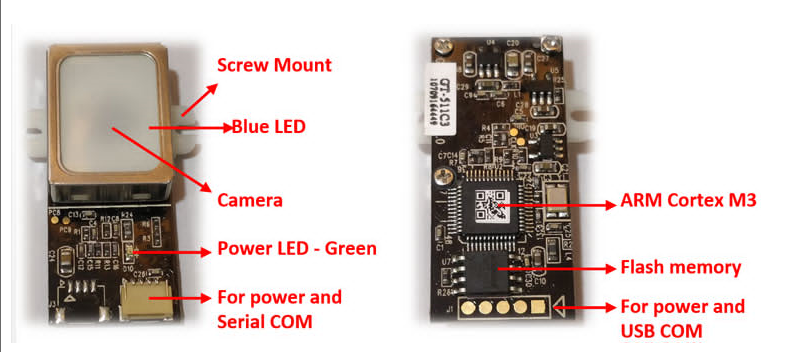
與電容式、超聲波指紋傳感器模塊不同,GT511C3指紋傳感器模塊采用光學技術。該模塊內置一個攝像頭,可以拍攝指紋圖案,再由內部HOLTEK ARM Cortex M3 MCU處理這些指紋圖案。該掃描儀模塊最多可保存200次指紋掃描,并為每個指紋分配一個從0到199的ID。
該光學傳感器模塊外形小巧,可輕松集成到具有串行UART接口的應用中。模塊有四根線:兩根線用于TX和RX,兩根線用于電源。傳感器可在3.3-6V電壓范圍內工作,通信引腳(Rx和Tx)可承受3.3V電壓。
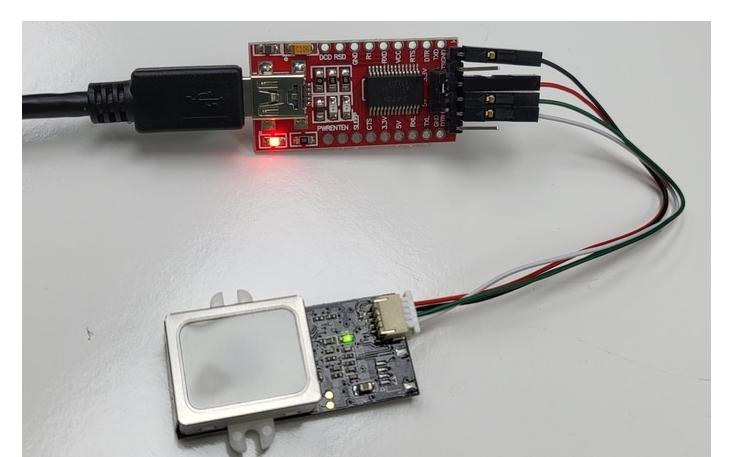
GT511C3模塊可通過USB直接與計算機連接。使用USB連接時,可使用SDK_DEMO.exe應用程序控制此模塊。此應用程序允許用戶錄/驗證/刪除指紋。
?
?
GT511C3模塊的特性和規格:
工作電壓:3.3-6VDC
工作電流:<130mA
工作溫度:~20°C ~ +60°C
CPU:ARM Cortex M3內核(Holtek HT32F2755)
最大指紋數:200個指紋
傳感器:光學傳感器
串行通信:UART(默認:9600波特)和USB v1.1
錯誤接受率 (FAR):< 0.001%
錯誤拒絕率 (FRR): < 0.01%
注冊時間 < 3 秒(3個指紋)
識別時間:<1.0秒(200個指紋)
GT511C3指紋傳感器模塊有4個引腳,紅色線是VCC,黑色是GND,綠色線是Rx,白色線是Tx。
GT511C3 SDK演示軟件
?
GT511C3 SDK是一套快速入門套件。使用時,首先將指紋傳感器連接到USB轉TTL模塊,將紅色線連接到VCC,黑色線連接到GND,綠色線連接到Tx,白色線連接到Rx。
?
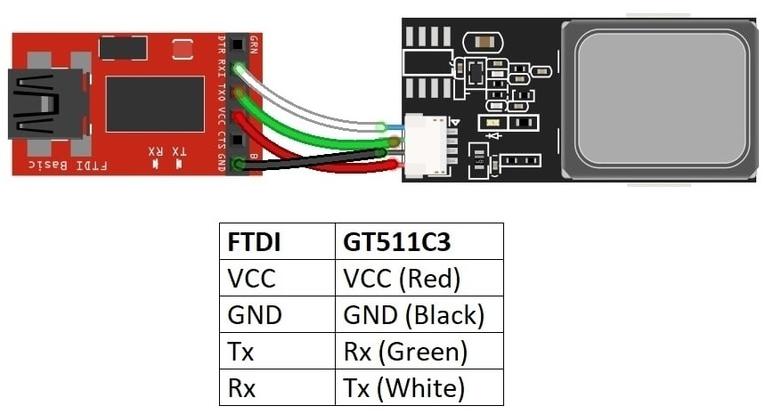 USB轉TTL FTDI模塊與GT511C3指紋傳感器的UART連接
?
接下來,按以下操作在電腦上使用SDK:
1. 下載 SDK_DEMO.exe
2. 解壓文件夾。
3. 進入解壓后的目錄
4. 打開 SDK_DEMO.exe 可執行文件。
5. 在“串行端口號”下拉菜單中選擇FTDI枚舉的COM端口。
6. 在波特率的下拉菜單中選擇9600。
7. 單擊打開按鈕。
?
?
連接正確后,將顯示固件版本和設備序列號,以及其他選項,例如錄取、驗證、識別、獲取圖像、刪除、獲取數據庫等。如果要刪除指紋,只需單擊“全部刪除”選項即可完成。
將GT511C3模塊與Arduino連接
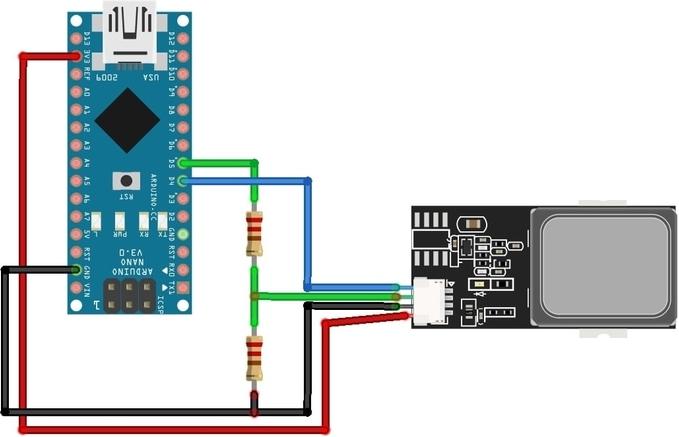
根據線路圖,將指紋傳感器與Arduino連接起來。
?
?
由于傳感器UART引腳僅承受3.3V電壓,本項目使用了一個由2K電阻和1K電阻組成的分壓器網絡,將綠色線(Rx)連接到Arduino開發板的D5引腳,將白色線(Tx)連接到Arduino開發板的D4引腳。
?
 GT511C3 Arduino庫
?
現在要做的,就是把GT511C3 Arduino庫上傳到Arduino IDE。該庫由Sparkfun編寫,已經在其他類型的指紋傳感器上進行了測試。
以下是指紋錄入代碼:
#include "FPS_GT511C3.h"
#include "SoftwareSerial.h"
FPS_GT511C3 fps(4, 5); ? ? ? ? ?// ? ?digital pin 5(arduino Tx, fps Rx)
? ? ? ? ? ? ? ? ? ? ? ? ? ? ? ?// ? ?digital pin 4(arduino Rx, fps Tx)
void setup()
{
?Serial.begin(9600); ? ? ? ? ? //default baud rate
?delay(100);
?fps.Open();
?fps.SetLED(true);
?Enroll();
}
void Enroll()
{
?int enrollid = 0; ? ? ? ? ? ? // find open enroll id
?bool okid = true;
?while (okid == true)
?{
? ?okid = fps.CheckEnrolled(enrollid);
? ?if (okid==true) enrollid++;
?}
?fps.EnrollStart(enrollid); ? // enroll
?
?Serial.print("Press finger to Enroll #");?
?Serial.println(enrollid);
?while(fps.IsPressFinger() == false) delay(100);
?bool bret = fps.CaptureFinger(true);
?int iret = 0;
?if (bret != false)
?{
? ?Serial.println("Remove finger");
? ?fps.Enroll1();?
? ?while(fps.IsPressFinger() == true) delay(100);
? ?Serial.println("Press same finger again");
? ?while(fps.IsPressFinger() == false) delay(100);
? ?bret = fps.CaptureFinger(true);
? ?if (bret != false)
? ?{
? ? ?Serial.println("Remove finger");
? ? ?fps.Enroll2();
? ? ?while(fps.IsPressFinger() == true) delay(100);
? ? ?Serial.println("Press same finger yet again");
? ? ?while(fps.IsPressFinger() == false) delay(100);
? ? ?bret = fps.CaptureFinger(true);
? ? ?if (bret != false)
? ? ?{
? ? ? ?Serial.println("Remove finger");
? ? ? ?iret = fps.Enroll3();
? ? ? ?if (iret == 0)
? ? ? ?{
? ? ? ? ?Serial.println("Enrolling Successfull");
? ? ? ?}
? ? ? ?else
? ? ? ?{
? ? ? ? ?Serial.print("Enrolling Failed with error code:");
? ? ? ? ?Serial.println(iret);
? ? ? ?}
? ? ?}
? ? ?else Serial.println("Failed to capture third finger");
? ?}
? ?else Serial.println("Failed to capture second finger");
?}
?else Serial.println("Failed to capture first finger");
}
void loop()
{
?delay(100);
}
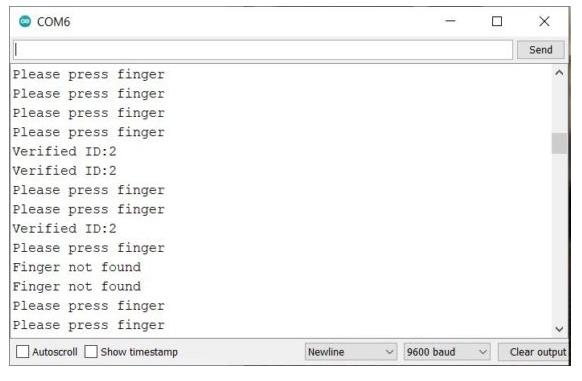
上傳代碼后,打開串口監視器,系統將要求你放置一個手指,進行錄入并注冊。
?
?
以下是讀取指紋的代碼:
#include "FPS_GT511C3.h"
#include "SoftwareSerial.h"
FPS_GT511C3 fps(4, 5); ? ? ? ? ?// ? ?digital pin 5(arduino Tx, fps Rx)
? ? ? ? ? ? ? ? ? ? ? ? ? ? ? ?// ? ?digital pin 4(arduino Rx, fps Tx)
void setup()
{
?Serial.begin(9600); ? ? ? ? ? //default baud rate
?delay(100);
?fps.Open();
?fps.SetLED(true);
}
void loop()
{
?// Identify fingerprint test
?if (fps.IsPressFinger())
?{
? ?fps.CaptureFinger(false);
? ?int id = fps.Identify1_N();
? ?if (id <200)
? ?{
? ? ?Serial.print("Verified ID:");
? ? ?Serial.println(id);
? ?}
? ?else
? ?{
? ? ?Serial.println("Finger not found");
? ?}
?}
?else
?{
? ?Serial.println("Please press finger");
?}
?delay(100);
}
?
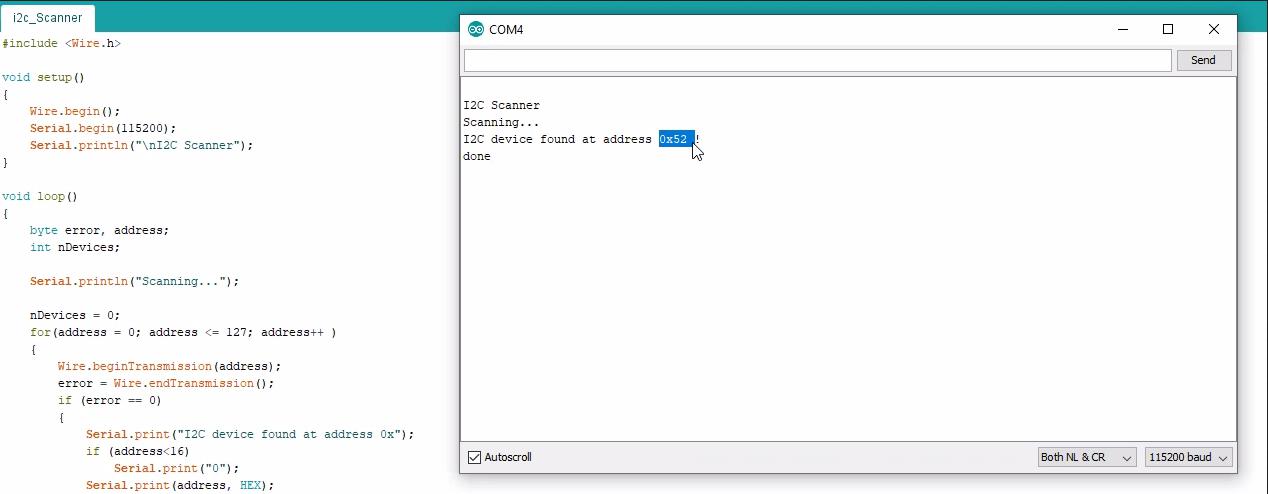
再次上傳代碼并進行測試。上傳代碼后,打開串口監視器,系統將請求放置手指進行驗證。你可以放置剛剛注冊的手指,也可以隨意放一個指頭上去,讓設備自己讀取你的指紋并進行驗證對比。
采用Arduino和LCD屏的便攜式指紋掃描儀
經過對GT511C3的了解和使用,我們在上述電路圖中再添加一個LCD顯示屏,就構成了一個簡單的便攜式指紋掃描儀。
?
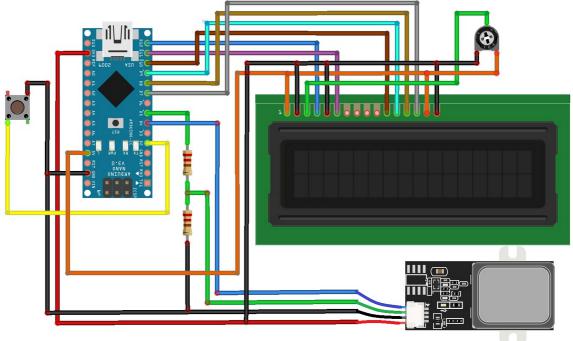 GT511C3指紋傳感器、LCD顯示屏與Arduino開發板的連接電路圖
?
這里,我們通過一個按鈕開關,將GT511C3連接到Arduino數字引腳2。按下按鈕時,傳感器將進入指紋錄入模式。新添加的16x2字符LCD顯示屏,用來顯示用戶與指紋傳感器交互時的實時數據。
增加了LCD顯示屏后,組合了指紋錄入、驗證和LCD顯示庫的完整代碼如下:
#include?
const int rs = 12, en = 11, d4 = 10, d5 = 9, d6 = 8, d7 = 7;
LiquidCrystal lcd(rs, en, d4, d5, d6, d7);
#include "FPS_GT511C3.h"
#include "SoftwareSerial.h"
FPS_GT511C3 fps(4, 5); ? ? ? ? ?// ? ?digital pin 5(arduino Tx, fps Rx)
void setup()
{
?Serial.begin(9600); ? ? ? ? ? //default baud rate
?lcd.begin(16, 2);
?delay(100);
?fps.Open();
?fps.SetLED(true);
?pinMode(2, INPUT_PULLUP); //Connect to internal pull up resistor as input pin
?lcd.setCursor(4, 0);
?lcd.print("GT511C3");
?lcd.setCursor(3, 1);
?lcd.print("FPS Sensor");
?delay(2500);
}
void loop()
{
?read_fps();
?if (digitalRead(2) == 0) //If button pressed
?{
? ?Enroll(); //Enroll a fingerprint
?}
?delay(100);
}
void Enroll()
{
?int enrollid = 0; ? ? ? ? ? ? // find open enroll id
?bool okid = true;
?while (okid == true)
?{
? ?okid = fps.CheckEnrolled(enrollid);
? ?if (okid == true) enrollid++;
?}
?fps.EnrollStart(enrollid); ? // enroll
?Serial.print("Press finger to Enroll #");
?Serial.println(enrollid);
?lcd.setCursor(0, 0);
?lcd.print("Put Finger to");
?lcd.setCursor(0, 1);
?lcd.print("Enroll: #");
?lcd.print(enrollid);
?while (fps.IsPressFinger() == false)
? ?delay(100);
?bool bret = fps.CaptureFinger(true);
?int iret = 0;
?if (bret != false)
?{
? ?Serial.println("Remove finger");
? ?lcd.clear();
? ?lcd.setCursor(0, 0);
? ?lcd.print("Remove finger");
? ?fps.Enroll1();
? ?while (fps.IsPressFinger() == true)
? ? ?delay(100);
? ?Serial.println("Press same finger again");
? ?lcd.clear();
? ?lcd.setCursor(0, 0);
? ?lcd.print("Put same finger");
? ?lcd.setCursor(0, 1);
? ?lcd.print("again");
? ?while (fps.IsPressFinger() == false)
? ? ?delay(100);
? ?bret = fps.CaptureFinger(true);
? ?if (bret != false)
? ?{
? ? ?Serial.println("Remove finger");
? ? ?lcd.clear();
? ? ?lcd.setCursor(0, 0);
? ? ?lcd.print("Remove finger");
? ? ?fps.Enroll2();
? ? ?while (fps.IsPressFinger() == true)
? ? ? ?delay(100);
? ? ?Serial.println("Press same finger yet again");
? ? ?lcd.clear();
? ? ?lcd.setCursor(0, 0);
? ? ?lcd.print("Put same finger");
? ? ?lcd.setCursor(0, 1);
? ? ?lcd.print("yet again");
? ? ?while (fps.IsPressFinger() == false)
? ? ? ?delay(100);
? ? ?bret = fps.CaptureFinger(true);
? ? ?if (bret != false)
? ? ?{
? ? ? ?Serial.println("Remove finger");
? ? ? ?iret = fps.Enroll3();
? ? ? ?if (iret == 0)
? ? ? ?{
? ? ? ? ?Serial.println("Enrolling Successfull");
? ? ? ? ?lcd.clear();
? ? ? ? ?lcd.setCursor(0, 0);
? ? ? ? ?lcd.print("Enrolling");
? ? ? ? ?lcd.setCursor(0, 1);
? ? ? ? ?lcd.print("Successfull");
? ? ? ?}
? ? ? ?else
? ? ? ?{
? ? ? ? ?Serial.print("Enrolling Failed with error code:");
? ? ? ? ?Serial.println(iret);
? ? ? ? ?lcd.clear();
? ? ? ? ?lcd.setCursor(0, 0);
? ? ? ? ?lcd.print("Enrolling Failed");
? ? ? ? ?lcd.setCursor(0, 1);
? ? ? ? ?lcd.print(iret);
? ? ? ?}
? ? ?}
? ? ?else
? ? ? ?Serial.println("Failed to capture third finger");
? ? ?lcd.clear();
? ? ?lcd.setCursor(0, 0);
? ? ?lcd.print("Failed Capturing");
? ? ?lcd.setCursor(0, 1);
? ? ?lcd.print("third finger");
? ?}
? ?else
? ? ?Serial.println("Failed to capture second finger");
? ?lcd.clear();
? ?lcd.setCursor(0, 0);
? ?lcd.print("Failed Capturing");
? ?lcd.setCursor(0, 1);
? ?lcd.print("second finger");
?}
?else
? ?Serial.println("Failed to capture first finger");
?lcd.clear();
?lcd.setCursor(0, 0);
?lcd.print("Failed Capturing");
?lcd.setCursor(0, 1);
?lcd.print("first finger");
}
void read_fps()
{
?// Identify fingerprint test
?if (fps.IsPressFinger())
?{
? ?fps.CaptureFinger(false);
? ?int id = fps.Identify1_N();
? ?if (id < 200)
? ?{
? ? ?Serial.print("Verified ID:");
? ? ?Serial.println(id);
? ? ?lcd.clear();
? ? ?lcd.setCursor(0, 0);
? ? ?lcd.print("Verified ID:");
? ? ?lcd.setCursor(0, 1);
? ? ?lcd.print(id);
? ?}
? ?else
? ?{
? ? ?Serial.println("Finger not found");
? ? ?lcd.clear();
? ? ?lcd.setCursor(0, 0);
? ? ?lcd.print("Finger Not Found");
? ?}
?}
?else
?{
? ?Serial.println("Please press finger");
? ?lcd.clear();
? ?lcd.setCursor(0, 0);
? ?lcd.print("Please Put ");
? ?lcd.setCursor(0, 1);
? ?lcd.print("Finger");
?}
?delay(100);
}
選擇Arduino Nano開發板型號和COM端口并上傳。代碼上傳完成后,LCD顯示屏會提示放置手指,同時,指紋模塊中的藍色LED將會點亮。
如果要錄入指紋,請按下按鈕,然后掃描手指3次。完成后,指紋錄取完畢。
要驗證指紋,請將同一根手指放在指紋模塊上。
上面就是一個便攜式指紋掃描儀模型的制作全過程了。如果你覺得這個項目非常好,還想進行小批量生產,就需要將其中的面包板換成PCB板。這里的PCB打樣很簡單,硬姐智造PCBA一站式“打樣+批量”服務可滿足創客的各種定制需求,把項目從DIY拓展到指紋鎖、POS機等生物識別領域。
?
 電子發燒友App




評論